December 12, 2019

Custom Exception throws as Aggregate Exception

I faced this issue while using Custom Exception class with Task Parallel Library. The issue was that when I throw the Custom Exception, it was not getting caught in Custom Exception catch clause. In this post I will explain how you can catch Custom Exception when working with TPL.

Lets start with example code, here is the definition for my Custom Exception class.

class MyCustomException : Exception
{
 //custom code...
}

Here is the function GetOrderCount() with is throwing this Custom Exception from new Task.

public static class UserManager
{
 public static int GetOrderCount(string userName)
 {
  int orderCount = Task.Run(() => {
   if (userName == "test") // any condition, to validate and throw exception...
   {
    throw new MyCustomException();
   }

   return 10; // get value from database...
  }).Result;

  return orderCount;
 }
}

Here is the Controller's action method which is calling previous method GetOrderCount().

[HttpGet("{userName}")]
public IActionResult GetOrderCount(string userName)
{
 try
 {
  int count = UserManager.GetOrderCount(userName);
  
        return Ok(new { OrderCount = count });
 }
 catch (MyCustomException ex1) // this will get ignored
 { 
  //handle for MyCustomException  
 } 
 catch (Exception ex3) // this will handle any exception, including MyCustomException
 {
  //handle for generic exception
 }
}

Here is the issue, I was expecting to run code for MyCustomException handle but it was not getting there. After searching on this, I found that this is the behavior designed because of TPL. If a child task throws an exception, that exception is wrapped in an AggregateException exception before it is propagated to the parent. And chain cycle continues if the parent itself is a child task of some other parent task, i.e. which also wraps its own AggregateException exception before it propagates it back to the calling thread.

In a nutshell, MyCustomException is actually wraps in AggregateException, so I have to place a catch for AggregateException instead of MyCustomException. And to get access MyCustomException object, I have to read the InnerException property of AggregateException.

Here is the updated code after making this change.

[HttpGet("{userName}")]
public IActionResult GetOrderCount(string userName)
{
 try
 {
  int count = UserManager.GetOrderCount(userName);
  
        return Ok(new { OrderCount = count });
 }
 catch (AggregateException ex1) // now this will handle MyCustomException 
 { 
        MyCustomException myException = ex1.InnerException as MyCustomException;
  //other handling logic for MyCustomException...
 } 
 catch (Exception ex3) // this will handle any other exception
 {
  //handle for generic exception
 }
}

This way you can get handle of your Custom Exception.

References:

December 11, 2019

Setup Swagger with .Net Core Web API

Swagger is a open-source framework for describing your API using a common language that everyone can understand, usually in json or yaml formats which could be readable for both humans and machines. Swagger makes it easire for developers to design, build, document, and consume RESTful web services.

It provides the following benefits:

  • Human and machine readable.
  • Easier to understand for less technnical people. Developers and non-developers i.e. product managers and even potential clients can have a better perspective of the design of your API.
  • Adoptable for new changes, because it reflects the changes immediately on your swagger UI without writing special code for swagger. You only make changes to your REST API and swagger will do its part on its own.

Here is how you can implement swagger in .Net Core API project.

  • First you have to install two Nuget paackages.

    • Swashbuckle.AspNetCore
    • Swashbuckle.AspNetCore.Annotations
  • Once you have installed Nuget Packages, then inside ConfigureServices() method in Startup.cs, add this section:

     services.AddSwaggerGen(c =>
     {
      c.OperationFilter();
      c.EnableAnnotations();
      c.SwaggerDoc("v1", new Info
      {
       Title = "My API",
       Version = "v1"
      });
     });
      
  • Inside Configure() method in Startup.cs, we have to tell IApplicationBuilder object to use Swagger:

     app.UseSwagger();
      app.UseSwaggerUI(c =>
      {
       c.SwaggerEndpoint("/swagger/v1/swagger.json", "Sample API");
      });
      

When you run the .Net Core API project, go to the link, adding /swagger/index.html for your base URL. For example:

https://localhost:44319/swagger/index.html

It will display the swagger UI page similar to this.

November 20, 2019

Unable to configure HTTPS endpoint. No server certificate was specified, and the default developer certificate could not be found.

Problem:

During development in Visual Studio, ASP.Net Core WebAPI project started throwing this error.

Unable to configure HTTPS endpoint. No server certificate was specified, and the default developer certificate could not be found. To generate a developer certificate run 'dotnet dev-certs https'. To trust the certificate (Windows and macOS only) run 'dotnet dev-certs https --trust'.

Solution:

As suggested in the error message, we have to run the command dotnet dev-certs https.

  • First close the browser or stop Visual Studio debugger if you are directly running from Visual Studio.
  • Open the command prompt, go to the project's root folder and run this command.

     dotnet dev-certs https --clean
    

    It cleans all HTTPS development certificates from the machine. It will give you following message.

    Cleaning HTTPS development certificates from the machine. A prompt might get displayed to confirm the removal of some of the certificates.

    It may give you a prompt for the removal of certificate, if so, just accept.

  • Second run this command:

     dotnet dev-certs https -t
    

    To make it trust the certificate on the current platform.

November 14, 2019

Deploy ASP.NET Core app in IIS

Hosting models

ASP.Net Core apps support two hosting models.

In-process hosting model

In-process hosting provides improved performance over out-of-process hosting because ASP.NET Core app runs in the same process as its IIS worker process.

Out-of-process hosting model

In this model, ASP.NET Core Module is required for process management, because ASP.NET Core apps run in a process separate from the IIS worker process. The module starts the process for the ASP.NET Core app when the first request arrives and restarts the app if it shuts down or crashes.

Install the .NET Core Hosting Bundle

The ASP.NET Core Module allows ASP.NET Core apps to run behind IIS. You can install .NET Core Hosting Bundle on the hosting system, This bundle installs the .NET Core Runtime, .NET Core Library, and the ASP.NET Core Module.

Create IIS website

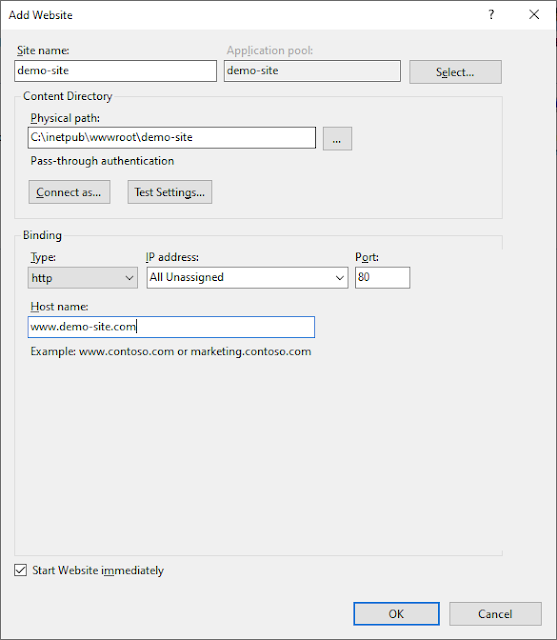
  • In IIS Manager, Right-click the Sites folder. Select Add Website from the contextual menu. Enter a Site name and set the Physical path to the app's published folder path. Provide the Binding configuration, enter Host name and click OK.

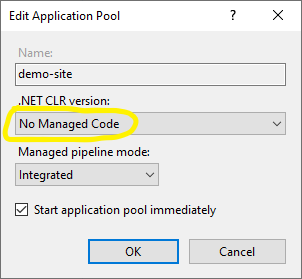
  • Under Application Pools, Right-click the site's app pool and select Basic Settings from the contextual menu. In the Edit Application Pool window, set the .NET CLR version to No Managed Code.

  • For ASP.NET Core 2.2 or later: For a 64-bit (x64) self-contained deployment that uses the in-process hosting model, you need to disable the app pool for 32-bit (x86) processes. For this, In the Actions sidebar of IIS Manager > Application Pools, select Advanced Settings.

  • Locate Enable 32-Bit Applications and set the value to False.

October 24, 2019

What is JSON Web Token

JSON Web Token (JWT) is an open standard used for securely transmitting information between different parties. It helps to accomodate the integrity of the information being passed by using digital signature. Hence the information can be verified and trusted that nobody has tempered the content after being issued by the authority.

Most commonly it is being used for authorization purpose among different web applications. After the user is logged in, each subsequent request will include the JWT, to identity the user and corresponding claims in order to assign access on the server side. Single Sign On is a feature that widely uses JWT.

JSON Web Token structure

JSON Web Tokens consist of three parts separated by dots (.), which are:

  • Header
  • Payload
  • Signature

A JWT typically looks like the following.

 xxxxx.yyyyy.zzzzz

where xxxxx, yyyyy and zzzzz respresents Base64Url encoded values of the header, payload, and signature part of JWT.

Header

Header is the first part of JWON Web Token. It typically consists of two parts: signing algorithm being used for encryption i.e. HMAC SHA256 or RSA, and the type of the token, which is JWT.

For example:

{
  "alg": "HS256",
  "typ": "JWT"
}

Payload

The second part of the token is the payload, which contains the claims. Claims are additional metadata or information we want to transmit. We define claims as simple key-value pairs. There are three types of claims: registered, public, and private claims.

For example, these are the claims usually we store in JWT:

{
  "UserName": "idrees",
  "given_name": "Muhammad",
  "family_name": "Idrees",
  "email": "idrees@test.com"
}

The payload is then Base64Url encoded to form the second part of the JSON Web Token.

Signature

Signature will be generated by combining the encoded JWT Header and the encoded JWT Payload, and then sign it using a strong encryption algorithm, such as HMAC SHA-256 or RSA. A secret key will be used by the server to sign this content, so it will be able to verify existing tokens and sign new ones. Signature's logical calculation looks similar to this code sample:

 $encodedContent = base64UrlEncode(header) + "." + base64UrlEncode(payload);
 $signature = hashHmacSHA256($encodedContent);

To create the signature part you have to take the encoded header, the encoded payload, a secret, the algorithm specified in the header, and sign that.

Review

The output is three Base64-URL strings separated by dots, being more compact when compared to XML-based standards such as SAML.

The following shows a JWT that has the header and payload encoded, and the calculated signature.

eyJhbGciOiJIUzI1NiIsInR5cCI6IkpXVCJ9.eyJqdGkiOiI5NjBiMTExZS04NGQ2LTQxYjAtYmMxNS1lYTFiODU1NjY4ZmQiLCJuYW1laWQiOiIzYWI1ODYyMy0yMTY2LTQwMzktOTA1NS03N2JkZGY5YTYyMWEiLCJVc2VyTmFtZSI6ImlkcmVlcyIsImdpdmVuX25hbWUiOiJNdWhhbW1hZCIsImZhbWlseV9uYW1lIjoiSWRyZWVzIiwiZW1haWwiOiJpZHJlZXNAdGVzdC5jb20iLCJodHRwOi8vc2NoZW1hcy5taWNyb3NvZnQuY29tL3dzLzIwMDgvMDYvaWRlbnRpdHkvY2xhaW1zL3JvbGUiOiJBZG1pbmlzdHJhdG9yIiwibmJmIjoxNTcxODI4OTQ2LCJleHAiOjE1NzE4NzIxNDYsImlzcyI6Imh0dHA6Ly9sb2NhbGhvc3Q6MTY5NjMvIiwiYXVkIjoiaHR0cDovL2xvY2FsaG9zdDoxNjk2My9BcGkvQXV0aCJ9.glPa_uFQrn9wUJt8ZBOMQ64llYjPU98zqwv8Qu56ErU 

When decoded, by a tool like jwt.io, you will be able to see the content of this token:

HEADER: ALGORITHM & TOKEN TYPE
{
  "alg": "HS256",
  "typ": "JWT"
}

PAYLOAD: DATA
{
  "jti": "960b111e-84d6-41b0-bc15-ea1b855668fd",
  "nameid": "3ab58623-2166-4039-9055-77bddf9a621a",
  "UserName": "idrees",
  "given_name": "Muhammad",
  "family_name": "Idrees",
  "email": "idrees@test.com",
  "http://schemas.microsoft.com/ws/2008/06/identity/claims/role": "Administrator",
  "nbf": 1571828946,
  "exp": 1571872146,
  "iss": "http://localhost:16963/",
  "aud": "http://localhost:16963/Api/Auth"
}

Note that, the header and payload is a Base64Url encoded value, it is still in readable form, so do not put confidential information anywhere in the token content.

October 21, 2019

MS SQL Server - Create and change Schema

A database schema could be think of as a container of objects. It is used to logically group objects such as tables, views, stored procedures etc. It serves the similar purpose as namespace in C# or other programming languages. It helps preventing name clashes between objects from different schemas, so you can have different objects with same name in different schemas. For example, Person table is created in schema hr, you can create another table with same name Preson in some other schema i.e. vendor.

Create Schema:

Using SQL Server Management Studio you can create schema by:

  • Navigating to your DATABASE node > Security > Schemas.

  • Right click on Schemas and select New Schema

    SQL Server database Create New Schema
  • In the new Schema dialog, write the name for your schema, you can also specify schema owner, and then click OK button.

    SQL Server database New Schema Dialog

Or you can create schema using T-SQL:

CREATE SCHEMA hr;

Change Schema for an object:

There may be case when you want to transfer objects from one schema to another. Lets say you have table Person currently exists in schema hr, and you want to move this table to another schema vendor. You can use following T-SQL to change schema.

ALTER SCHEMA vendor TRANSFER hr.Person

Same command could be used to change schema for other objects like views, stored procedures, functions.

September 26, 2019

Authentication with ASP.Net Identity

This post will show you how to add ASP.Net Identity support in ASP.Net Webforms application. So it will allow you to enable authentication mechasnism for web requests.

I am using Visual Studio 2017 for this example. Lets create a new website with ASP.NET Web Application (.Net Framework) project template, in the next dialog box select the Empty template, it will make the Change Authentication button disabled.

In this example we will use the default implementation of IdentityUser, UserStore and UserManager classes which comes with EntityFramework package. So we have to install the following packages for this example:

  • Microsoft.AspNet.Identity.EntityFramework

  • Microsoft.AspNet.Identity.Owin
  • Microsoft.Owin.Host.SystemWeb

Add new Web Form named Register with the following content inside the form tag.

 <div style="margin-left:50px;">
  <asp:PlaceHolder runat="server" ID="phRegisterForm">

   <h4>Register</h4>
   <p>Please fill in this form to create an account.</p>
   <hr />
   <p>
    <asp:Label runat="server" ID="lblMsg" />
   </p>

   <label for="email"><b>User Name</b></label>
   <div>
    <asp:TextBox runat="server" ID="UserName" />
   </div>
   <br />
   <label for="psw"><b>Password</b></label>
   <div>
    <asp:TextBox runat="server" ID="Password" TextMode="Password" />
   </div>
   <br />

   <label for="psw-repeat"><b>Repeat Password</b></label>
   <div>
    <asp:TextBox runat="server" ID="ConfirmPassword" TextMode="Password" />
   </div>
   <hr/>

   <asp:Button runat="server" OnClick="CreateUser_Click" Text="Register" />
  </asp:PlaceHolder>
 </div>

In the Register.aspx.cs file, add following code for CreateUser_Click event handler (copied from Microsoft Docs)

protected void CreateUser_Click(object sender, EventArgs e)
      {
         // Default UserStore constructor uses the default connection string named: DefaultConnection
         var userStore = new UserStore();
         var manager = new UserManager(userStore);

         var user = new IdentityUser() { UserName = UserName.Text };
         IdentityResult result = manager.Create(user, Password.Text);

         if (result.Succeeded)
         {
            StatusMessage.Text = string.Format("User {0} was created successfully!", user.UserName);
         }
         else
         {
            lblMsg.Text = result.Errors.FirstOrDefault();
         }
      }

We have setup the Register page markup for user creation. Lets add the database which EntityFramework will use to store user identity data.

First create App_Data folder. Then add for the following connection string tag in web.config file.

  <connectionStrings>
    <add name="DefaultConnection" connectionString="Data Source=(localdb)\MSSQLLocalDB;AttachDbFilename=|DataDirectory|\WebFormsIdentity.mdf;Initial Catalog=WebFormsIdentity;Integrated Security=True" providerName="System.Data.SqlClient" />
   </connectionStrings> 

Since we have used default UserStore constructor, it needs the default connection string named DefaultConnection.

Note that we have only specified the connection string for database WebFormsIdentity.mdf in App_Data folder, but we did not yet created that. The database will be created at runtime by EntityFramework for the Identity entities.

Now you can run the project with start page of Register.aspx, enter user name and password. It will give you the success message.

We have completed the support for creating new users. Lets move to the next part, how to add authentication to login a user. We will use OWIN authentication for which we already have installed the packages Microsoft.AspNet.Identity.Owin and Microsoft.Owin.Host.SystemWeb.

From Microsoft Docs:

ASP.NET Identity uses Microsoft OWIN Authentication middleware for forms authentication. The OWIN Cookie Authentication is a cookie and claims based authentication mechanism that can be used by any framework hosted on OWIN or IIS. The Microsoft.Aspnet.Identity.Owin package contains a set of OWIN extension classes to manage and configure OWIN authentication middleware to be consumed by ASP.NET Identity Core packages. The Microsoft.Owin.Host.SystemWeb package contains an OWIN server that enables OWIN-based applications to run on IIS using the ASP.NET request pipeline. For more information see OWIN Middleware in the IIS integrated pipeline.

First we have to add OWIN startup and authentication configuration.

Right click on the project and click Add New Item, from the item dialog box, select OWIN Startup class, put the name Startup. Replace the content of this file with the following:

 using Microsoft.AspNet.Identity;
 using Microsoft.Owin;
 using Microsoft.Owin.Security.Cookies;
 using Owin;

 [assembly: OwinStartup(typeof(WebFormsIdentity.Startup))]

 namespace WebFormsIdentity // change to your project's namespace
 {
    public class Startup
    {
    public void Configuration(IAppBuilder app)
    {
    // For more information on how to configure your application, visit http://go.microsoft.com/fwlink/?LinkID=316888
    app.UseCookieAuthentication(new CookieAuthenticationOptions
    {
    AuthenticationType = DefaultAuthenticationTypes.ApplicationCookie,
    LoginPath = new PathString("/Login")
    });
    }
    }
 }

Add new Web Form and name it Login, and replace the html content with the following inside form tag.

 <div>
  <h4>Log In</h4>
  <hr />
  <asp:PlaceHolder runat="server" ID="phLoginStatus" Visible="false">
   <p>
    <asp:Label runat="server" ID="lblStatus" />
   </p>
  </asp:PlaceHolder>
  <asp:PlaceHolder runat="server" ID="phLoginForm" Visible="false">
   <label><b>User Name</b></label>
   <div>
    <asp:TextBox runat="server" ID="UserName" />
   </div>
   <br />

   <label><b>Password</b></label>
   <div>
    <asp:TextBox runat="server" ID="Password" TextMode="Password" />
   </div>
   <br />
   <div>
    <asp:Button runat="server" OnClick="SignIn_Click" Text="Log in" />
   </div>
  </asp:PlaceHolder>
  <asp:PlaceHolder runat="server" ID="phLogoutButton" Visible="false">
   <div>
    <div>
     <asp:Button runat="server" OnClick="SingOut_Click" Text="Log out" />
    </div>
   </div>
  </asp:PlaceHolder>
 </div>

Replace the Login.asps.cs file content with the following:

using Microsoft.AspNet.Identity;
using Microsoft.AspNet.Identity.EntityFramework;
using Microsoft.Owin.Security;
using System;
using System.Web;
using System.Web.UI.WebControls;

namespace WebFormsIdentity // change to your project's namespace
{
    public partial class Login2 : System.Web.UI.Page
    {
        protected void Page_Load(object sender, EventArgs e)
        {
            if (!IsPostBack)
            {
                if (User.Identity.IsAuthenticated)
                {
                    lblStatus.Text = string.Format("Hello {0}!!", User.Identity.GetUserName());
                    phLoginStatus.Visible = true;
                    phLogoutButton.Visible = true;
                }
                else
                {
                    phLoginForm.Visible = true;
                }
            }
        }

        protected void SignIn_Click(object sender, EventArgs e)
        {
            var userStore = new UserStore();
            var userManager = new UserManager(userStore);
            var user = userManager.Find(UserName.Text, Password.Text);

            if (user != null)
            {
                var authenticationManager = HttpContext.Current.GetOwinContext().Authentication;
                var userIdentity = userManager.CreateIdentity(user, DefaultAuthenticationTypes.ApplicationCookie);

                authenticationManager.SignIn(new AuthenticationProperties() { IsPersistent = false }, userIdentity);
                Response.Redirect("~/Login.aspx");
            }
            else
            {
                lblStatus.Text = "Invalid username or password.";
                phLoginStatus.Visible = true;
            }
        }

        protected void SingOut_Click(object sender, EventArgs e)
        {
            var authenticationManager = HttpContext.Current.GetOwinContext().Authentication;
            authenticationManager.SignOut();
            Response.Redirect("~/Login.aspx");
        }
    }
}

In the Page_Load we can check for the status of current user and take action based on its User.Identity.IsAuthenticated property.

Now run the website with Login.aspx set as Start Page. Try login with you user created from Register page. It will give you success and failed response messages based on the credentials you enter.

References:

September 22, 2019

ASP.NET Identity reset password

While learning ASP.NET Identity system, when used in my first ASP.Net Web Forms project I faced the problem how to reset a user's password. I found the following code works for me.

ApplicationDbContext context = new ApplicationDbContext();
UserStore userStore = new UserStore(context);
UserManager userManager = new UserManager(userStore);
String userId = "myuser"; //user name here...
String newPassword = "mypassword"; // password here...
String hashedNewPassword = userManager.PasswordHasher.HashPassword(newPassword);
ApplicationUser curentUser = await userStore.FindByIdAsync(userId);
await userStore.SetPasswordHashAsync(curentUser, hashedNewPassword);
await userStore.UpdateAsync(curentUser);

August 22, 2019

C# - How to create List of Anonymous Type objects

Many times you need to create a temporary list of anonymous type objects. For small tasks, like binding a list to a DropDownList control. At that moment you don't want to define a separate class just to keep two properties (i.e. Id & Name) and bind it to the DropDownList's DataSource.

There could be numerous ways to define list of anonymous types and all of these need to infer type from somewhere. I will write some of them here which you can use to create generic list.

  1. First create the object(s) of anonymous type and then pass it to an array and call ToList() method.

       var o1 = new { Id = 1, Name = "Foo" };
       var o2 = new { Id = 2, Name = "Bar" };
    
       var list = new[] { o1, o2 }.ToList();
      
  2. Define a list of dynamic and then populate with anonymous objects.

       List<dynamic> list = new List<dynamic>();
       var o1 = new { Id = 1, Name = "Foo" };
       var o2 = new { Id = 2, Name = "Bar" };
    
       list.Add(01);
       list.Add(02);
      
  3. Define a generic method accepting params T[], and return new List<T>. Pass objects of anonymous type to this method and it will create the List<T>.

       //Define method
       public static List<T> CreateList<T>(params T[] items)
       {
         return new List<T>(items);
       }
    
       //create anonymous objects and call above method
       var o1 = new { Id = 1, Name = "Foo" };
       var o2 = new { Id = 2, Name = "Bar" };
       var list = CreateList(o1, o2);
      
  4. You can use Select() method on Enumerable.Range() to project anonymous objects and then call ToList() method. Once empty list is created, then start adding objects.

       var list = Enumerable.Range(0, 0).Select(e => new { Id = 0, Name = ""}).ToList();
       list.Add(new { Id = 1, Name = "Foo" } );
       list.Add(new { Id = 2, Name = "Bar" } );
      
  5. Enumerable.Repeat() method can also do the trick.

       var list = Enumerable.Repeat(new { Id = 0, Name = "" }, 0).ToList();
       list.Add(new { Id = 1, Name = "Foo" } );
       list.Add(new { Id = 2, Name = "Bar" } );
      
  6. Select() projection method can also use on simple string.

       var list = "".Select( t => new {Id = 0, Name = ""} ).ToList();
       list.Add(new { Id = 1, Name = "Foo" } );
       list.Add(new { Id = 2, Name = "Bar" } );
      

August 19, 2019

Select XML Nodes with XML Namespaces from an XmlDocument and XDocument

To select XML Nodes with Namespace we have to use type XmlNamespaceManager. The AddNamespace() method of XmlNamespaceManager object takes two arguments: one is prefix and the second is the Uri.

Let's say we have following xml:

 <md:ProductOutput xmlns:cb="http://mydomain.com/report/">
   <md:Header>
  <md:Child1 SubjectStatus="">
   Some text for Child1
  </md:Child1>     
   </md:Header>
   <md:Body DocumentID="356d6d32-5755-4ffb-a8b8-8932577526dd">
  <md:Child2>
   Some test for Child2
  </md:Child2>
   </md:Body>
 </md:ProductOutput>

Using XmlDocument:

When selecting nodes from XmlDocument object, you have to use an instance of XmlNamespaceManager class. To select the node md:Header, we will pass the XmlNamespaceManager's instance to SelectSingleNode method of XmlDocument.

XmlDocument xmlDocument = new XmlDocument();
xmlDocument.LoadXml(xmlString); // xmlString variable contains above xml

XmlNamespaceManager nsmgr = new XmlNamespaceManager(xmlDocument.NameTable);
nsmgr.AddNamespace("md", "http://mydomain.com/report/");

XmlNode nodeHeader = xmlDocument.SelectSingleNode("//md:Header", nsmgr);
//nodeHeader contains the required node

Using XDocument:

To select the node elemment from XDoocument, we have to concatenate node name (Header) with the XNamespace and pass this to Element() method of XDocument.Root Element.

var xdoc = XDocument.Parse(xmlString); // xmlString variable contains above xml
XNamespace ns = "http://mydomain.com/report/";

var elementHeader = xdoc.Root.Element(ns + "Header");
//elementHeader contains the required element

July 24, 2019

The remote server returned an error: (411) Length Required

Problem:

If you submit a post request using HttpWebRequest API without setting request body, you will receive following error message:

 System.Net.WebException: 'The remote server returned an error: (411) Length Required.'

For example, If you are making post request with this code:

 string requestedUrl = "http://localhost:13940/MyForm.aspx";
 var request = (HttpWebRequest)WebRequest.Create(requestedUrl);
 request.Method = "POST";
 request.ContentType = "application/x-www-form-urlencoded";

 using (var resp = (HttpWebResponse)request.GetResponse())
 {
  //do your work with response
 }

You will get the above error.

Solution:
  • First, if you are not sending any data in request body, then using the GET method instead will be a good approach.

       string requestedUrl = "http://localhost:13940/MyForm.aspx";
       var request = (HttpWebRequest)WebRequest.Create(requestedUrl);
       request.Method = "GET";
      
  • Second thing is, somehow if you are willing to use POST method and you are not sending any data, then set ContentLength property of the request object to 0, you just have to add this line:

       request.ContentLength = 0;
      
  • Finally, if you need to post some data in the request body, then you must specify the data you are sending as well as length of the data. So the code segment will be like this:

       string requestedUrl = "http://localhost:13940/MyForm.aspx";
       var request = (HttpWebRequest)WebRequest.Create(requestedUrl);
       request.Method = "POST";
       request.ContentType = "application/x-www-form-urlencoded";
       
       //setup data to post
       string postData = "param1=value1¶m2=value2¶m3=value3";
       ASCIIEncoding encoding = new ASCIIEncoding();
       byte[] data = encoding.GetBytes(postData);
       //set content length
       request.ContentLength = data.Length;
       
       //write data to request stream
       var requestStream = request.GetRequestStream();
       requestStream.Write(data, 0, data.Length);
       requestStream.Close();
    
       using (var resp = (HttpWebResponse)request.GetResponse())
       {
         //do your work with response
       }
      

Any of the above change would make your request successfull.

July 15, 2019

The directory '/App_GlobalResources/' is not allowed because the application is precompiled

Problem:

You may encounter the following error message while deploying ASP.NET Web Forms application.

The directory '/App_GlobalResources/' is not allowed because the application is precompiled
Solution:

The solution I found is simply delete the PrecompiledApp.config file and re-start your application.

In some cases, bin folder in deployed website may also cause an error, so you may also need to delete bin folder.

Caution!

Make sure you took the backup before deleting anything.

June 24, 2019

MS SQL Server - Add a column with default value to an existing table

This post describes how to add new column to existing table in SQL Server by using Transact-SQL .

Syntax:

 ALTER TABLE {TABLENAME} 
 ADD {COLUMNNAME} {TYPE} {NULL|NOT NULL} 
 CONSTRAINT {CONSTRAINT_NAME} DEFAULT {DEFAULT_VALUE}
 {WITH VALUES}

Example:

ALTER TABLE Item
        ADD StockQty INT NULL --Or NOT NULL.
 CONSTRAINT DF_Item_StockQty --default constraint name
    DEFAULT (0)--default value
WITH VALUES --Add if Column is Nullable and you want the Default Value for Existing Records.

Lets review the above statement:

  • Item is the target table name, to which I want to add the column.
  • StockQty is the new column name being added, with type INT, also you can specify it as Nullable or NOT NULL.
  • DF_Item_StockQty is the optional constraint name given to the default constraint, if you do not specify name here, it will auto-generate a name like DF_Item_StockQty_6DF5C21B0A
  • DEFAULT (0): 0 is the default value for new column in this example.
  • WITH VALUES is only needed when your new column is Nullable and you want to update existing records with the provided default value (0 in this example). If your Column is NOT NULL, then it will automatically update existing records with the provided default value, whether you specify WITH VALUES or not.

How Inserts work with a Default-Constraint:

  • If you insert a record into table Item and do not specify StockQty's value, then it will be set to the default value 0.
  • If you insert a record and specify StockQty's value as NULL (and your column allows nulls), then the Default-Constraint will not be used and NULL will be inserted as the Value.

References:

Visual Studio - SQL Server Schema Compare - Target unavailable

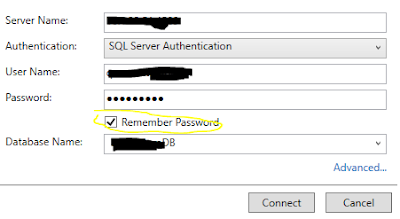
I was using SQL Server Schema Comparison tool in Visual Studio 2017 when I faced this issue. The problem was that I selected source and target databases, and marked the Remember Password check-box for both instances.

When I click on Compare button, it was showing the error message "Target is unavailable". In the Error List tab, showing the error message:

 Unable to restore password.  Enter a password by editing the connection.

I found the following workaround fix this issue for me.

  1. From the drop-down list for target database, choose Select Target option.
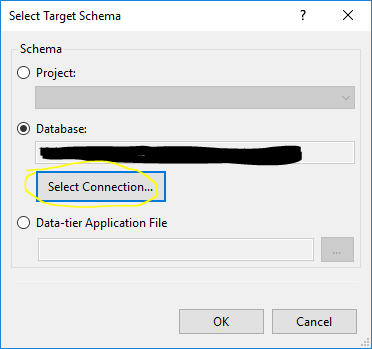
  2. Select Target Schema popup will appear.
  3. Click on Select Connection button.
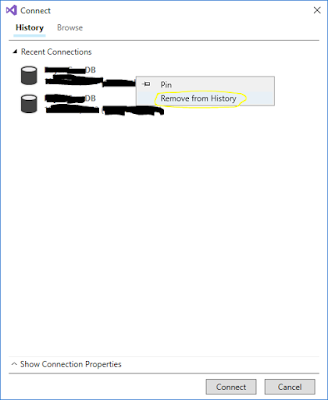
  4. From the History of recent connections list, right click on the target database and click Remove from History
  5. Restart Visual Studio
  6. Re-create the connection

Now compare should work without showing the above error.

May 13, 2019

WCF Service Project publish fails due to .datasource files.

I have multiple WCF service projects in solution file. One service (User Management) has reference to another service (CommonLib) to reuse common functionality. For service method calls I have created separate interfaces and hence separate class templates for each method's request. The parameters of methods are encapsulated in single request object as public properties. And similar pattern used to methods' return values or responses.

In some cases, the request classes names become too long (for some reasons) and that causes me the issue when publishing my User Management WCF service. It was build successfully, but when try to publish, it was showing the following error message:

Copying file Service References\CoreSystem.B2B\CoreService.CoreSystemIntegration.CoreSystem.B2B.GetCompanyConsentsByCompanyAccountIDResponse.datasource to obj\Release\AspnetCompileMerge\Source\Service References\CoreSystem.B2B\CoreService.CoreSystemIntegration.CoreSystem.B2B.GetCompanyConsentsByCompanyAccountIDResponse.datasource failed. The specified path, file name, or both are too long. The fully qualified file name must be less than 260 characters, and the directory name must be less than 248 characters.

While searching I found different suggestions which give valuable information on the topic:

In my case I fixed the issue by deleting all the .datasource files from ProjectRoot/Properties/DataSources folder.

After deleting .datasource files, I got my WCF service published successfully.

May 12, 2019

ExecuteNonQuery() always returns -1

I created the following simple SP to update table record. While running this SP from C#, the ExecuteNonQuery() method was constantly returning -1.

CREATE PROCEDURE [dbo].[UpdateCategory]
  @CategoryID int
 ,@CategoryCode varchar(10)
 ,@CategoryName varchar(50)
 ,@CategoryDescription varchar(100)

AS
BEGIN
 
 SET NOCOUNT ON;

    UPDATE [dbo].[Category]
    SET 
        [CategoryCode] = @CategoryCode
        ,[CategoryName] = @CategoryName
        ,[CategoryDescription] = @CategoryDescription

  WHERE CategoryID = @CategoryID

END

After searching I found the issue was the first line of SP body.

SET NOCOUNT ON;

Setting NOCOUNT ON will stop the number of affect rows to be returned to client. So the default response is always -1.

To get the response with real no of affected rows just remove this line and it will start returning the number of affected rows.

April 18, 2019

How to use jQuery with Angular 7

In this post I will explain how to setup jQuery with Angular.

Step # 1 - Install jQuery using npm

Go to the root of the Angular project where angular.json file is placed, and run the following command to install jQuery dependency.

 npm install --save jquery

Step # 2 - Add jQuery script reference in scripts array

You can now directly add jQuery script reference in index.html file, but a better approach would be to add the relative path in the scripts array in angular.json file.

 "scripts": [
  "node_modules/jquery/dist/jquery.min.js"
  ]

Step # 3 - Use jQuery in component

We need to declare the variable($) for jQuery as following.

 declare var $: any;

Here we have defined $ variable with data type any to satisfy TypeScript compiler.

We have setup jQuery. Now we can write the jQuery code inside ngOnInit event of the component.

Here is sample code for AppComponent with jQuery variavble($) declarartion and its use in ngOnInit function.

 import { Component, OnInit  } from '@angular/core';
 
 declare var $: any;
 
 @Component({
   selector: 'app-root',
   templateUrl: './app.component.html',
   styleUrls: ['./app.component.css']
 })
 export class AppComponent implements OnInit {
   title = 'jQuery with Angular';

   public ngOnInit()
   {
   $(document).ready(() => {
    $('#myDiv').html('Hello world from jQuery');
   });
   }
 }

Where myDiv is the id of any empty div placed inside app.component.html template.

That's all set. Now when you run the component you should be able to see the jQuery message inside the target div.

I hope this helps some of you who may be looking to setup jQuery in Angular component.

April 8, 2019

How to prevent cross-site request forgery (CSRF) attacks in ASP.Net Web Forms

In this post I will explain how to fix CSRF attack in ASP.Net Web Forms application. I found many articles talking about how to implement this in MVC applications, but I face real trouble to develop this in Web Forms. I found following solution worked for me.

We have to write the following code in site's Master page, and this solution will apply CSRF protection to all content pages that are inherit from this Master page. Also make sure all requests making data modifications must use the ViewState.

Here is the code we need to write in Master Page code-behind file.

 public partial class SiteMaster : MasterPage
 {
   private const string AntiXsrfTokenKey = "__AntiXsrfToken";
   private const string AntiXsrfUserNameKey = "__AntiXsrfUserName";
   private string _antiXsrfTokenValue;

   protected void Page_Init(object sender, EventArgs e)
   {
  //check if we already have Anti-XSS cookie, then put it in page's global variable
  var requestCookie = Request.Cookies[AntiXsrfTokenKey];
  Guid requestCookieGuidValue;
  
  if (requestCookie != null
   && Guid.TryParse(requestCookie.Value, out requestCookieGuidValue))
  {
    _antiXsrfTokenValue = requestCookie.Value;
    Page.ViewStateUserKey = _antiXsrfTokenValue;
  }
  //If we do not found CSRF cookie, then this is a new session, so create a new cookie with Anti-XSRF token
  else
  {
    _antiXsrfTokenValue = Guid.NewGuid().ToString("N");
    Page.ViewStateUserKey = _antiXsrfTokenValue;

    var responseCookie = new HttpCookie(AntiXsrfTokenKey)
    {
   HttpOnly = true,

   //Add the Anti-XSRF token to the cookie value
   Value = _antiXsrfTokenValue
    };

    //If we are using SSL, the cookie should be set to secure 
    if (FormsAuthentication.RequireSSL && Request.IsSecureConnection)
    {
   responseCookie.Secure = true;
    }

    //Add the CSRF cookie to the response
    Response.Cookies.Set(responseCookie);
  }

  Page.PreLoad += master_Page_PreLoad;
   }

   protected void master_Page_PreLoad(object sender, EventArgs e)
   {
  //During the initial page request, Add the Anti-XSRF token and user name to the ViewState
  if (!IsPostBack)
  {
    ViewState[AntiXsrfTokenKey] = Page.ViewStateUserKey;
    ViewState[AntiXsrfUserNameKey] = Context.User.Identity.Name ?? String.Empty;
  }
  //During all post back requests to the page, Validate the Anti-XSRF token
  else
  {
    if ((string)ViewState[AntiXsrfTokenKey] != _antiXsrfTokenValue
     || (string)ViewState[AntiXsrfUserNameKey] != (Context.User.Identity.Name ?? String.Empty))
    {
   throw new InvalidOperationException("Validation of Anti-XSRF token failed.");
    }
  }
   }
 }

If Context.User.Identity.Name is empty?

In case if it does not work as per the expectations, one reason could be that the Context.User.Identity.Name is containing empty string not the real user name.

To fix this make sure you need authentication mode set to windowsAuthentication in web.config. and have disabled the anonymous authentication. Hence all the authentication mechanisms are disabled, except for the Windows Authentication.

Another alternative could be if you are manually maintaining login user's data in some Session variable, then replace that statement to read user name from that Session variable rather than Context.User.Identity.Name.

For example, after making this change of reading user name from Session variable, the code listing of master_Page_PreLoad event handler will become similar to this:

  protected void master_Page_PreLoad(object sender, EventArgs e)
   {
  //During the initial page request, Add the Anti-XSRF token and user name to the ViewState
  string userName =  String.Empty;
  if(Session["UserName"] != null)
  {
   userName = Session["UserName"].ToString();
  }
  
  if (!IsPostBack)
  {
    ViewState[AntiXsrfTokenKey] = Page.ViewStateUserKey;
    ViewState[AntiXsrfUserNameKey] = userName;
  }
  //During all post back requests to the page, Validate the Anti-XSRF token
  else
  {
    if ((string)ViewState[AntiXsrfTokenKey] != _antiXsrfTokenValue
     || (string)ViewState[AntiXsrfUserNameKey] != userName)
    {
   throw new InvalidOperationException("Validation of Anti-XSRF token failed.");
    }
  }
   }

Thats all you need. Now all the content pages that are inherited from this master page should be able to prevent CSRF attacks.

I hope this helps some of you who get stuck with a similar problem.

March 14, 2019

How to disable ASP.Net button after click (prevent double clicking)

There could be two possible options you can apply to disable asp.net button after click to keep user from double clicking. Simple disabling the button won't help because you may also have to deal with client side validation on form controls.

For example, we have following markup with asp.net textbox and button.

 <div class="col-md-6">
  <div class="form-group">
   <label>
    User Name: 
    <asp:RequiredFieldValidator runat="server" ControlToValidate="txtUserName" ErrorMessage="Required"
     CssClass="Validator" SetFocusOnError="True" ValidationGroup="SaveUser">*</asp:RequiredFieldValidator>
   </label>
   <asp:TextBox ID="txtUserName" runat="server" class="form-control" ></asp:TextBox>
  </div>
 </div>

 <asp:Button ID="btnSave" runat="server" Text="Save" OnClick="btnSave_Click" CssClass="btn btn-primary" ValidationGroup="SaveUser"/>

We have to disable this asp.net button after clicking. Following options will help you prevent double click problem while also considering client side validation.

  • First option is to use OnClientClick event of asp.net button. We have to return false if client validation failed, else we will disable the button and optionally change the button text to indicate some progress. We also have to set UseSubmitBehavior property value to false. Final markup for the button will be:

       <asp:Button ID="btnSave" runat="server" Text="Save" OnClick="btnSave_Click" CssClass="btn btn-primary" ValidationGroup="SaveUser"
        OnClientClick="if (!Page_ClientValidate()){ return false; } this.disabled = true; this.value = 'Saving...';" 
        UseSubmitBehavior="false"
       />
      
  • Second option is to disable the button on post back event from JavaScript, i.e. window.onbeforeunload. Here is the button markup and script which sets button's disabled property, optionally you can also change button's text to indicate progress for post back event.

       <asp:Button ID="btnSave" runat="server" Text="Save" OnClick="btnSave_Click" CssClass="btn btn-primary" ValidationGroup="SaveUser"/>
      
      <script type = "text/javascript">
       function disableButton() {
        document.getElementById("<%=btnsave.ClientID %>").disabled = true;
        document.getElementById("<%=btnsave.ClientID %>").value = 'Saving...';
       }
       window.onbeforeunload = disableButton;
      </script>
      

I hope this helps some of you who get stuck with a similar problem.

March 11, 2019

jQuery - Find elements with multiple attribute values.

In this post we will see how to write selector string with multiple attribute values. For example, I have <ul> element with a number of child <li> elements, have placed this <ul> element inside <div> with id='#divItems'. An example layout may be like this:

 <div id="divItems">
  <ul>
   <li id="1" data-accountid="1" data-branch="1"<Item1>/li>
   <li id="2" data-accountid="1" data-branch="1"<Item1>/li>
   <li id="3" data-accountid="1" data-branch="3"<Item1>/li>
   <li id="4" data-accountid="2" data-branch="1"<Item1>/li>
   <li id="5" data-accountid="2" data-branch="2"<Item1>/li>
   <li id="6" data-accountid="3" data-branch="1"<Item1>/li>
   <li id="7" data-accountid="3" data-branch="2"<Item1>/li>
   <li id="8" data-accountid="3" data-branch="3"<Item1>/li>
   <li id="9" data-accountid="4" data-branch="1"<Item1>/li>
   <li id="10" data-accountid="4" data-branch="2"<Item1>/li>
   
  </ul>
 </div>

In jQuery you can select desired element for single attribute value (say id), like this:

 var liObject = $("#divItems ul li[id='2']);

You can also find by your own custom data attribute if it is being specified with the element, lets say each li element has attribute data-accountid. Syntax will be same.

 var liObject = $("#divItems ul li[data-accountid='3']);

Take another step, you can specify multiple attributes in selector string. Lets say you can have multiple li elements with data-accountid='3', but you also want to narrow down your filter criteria by further looking for another attribute data-branchid. Here is how you can specify multiple attributes.

 var liObject = $("#divItems ul li[data-accountid='3'][data-branchid='1']);

Similarly you can add any number of attribute filters in selector string.

I hope this helps some of you who get stuck with a similar problem.

February 21, 2019

Running my first Angular project from Visual Studio Code

In this post I will explain how to setup the environment for Angular by listing the steps I have setup my first Angular project with Visual Studio Code. I start with a sample project downloaded from GitHub project Angular-GettingStarted by Deborah Kurata. Lets follow these steps:

  • Download and install Visual Studio Code from https://code.visualstudio.com/
  • In order to install required packages we will use npm (Node Package Manager). So download and install npm from https://nodejs.org/en/download/.
  • Download and extract the project from github.
  • From VS Code terminal, check if you have successfully installed npm by issuing simple command like npm -v. It will give you installed npm version number, like 6.4.1
  • Issue the following command from VS Code terminal to install Angular CLI.
        npm install -g @angular/cli
       
    After installing Angular CLI we have to setup following two directory paths in Environment PATH variable.
    • C:\Users\YOUR-USER\AppData\Roaming\npm
    • C:\Users\YOUR-USER\AppData\Roaming\npm\node_modules\@angular\cli\bin
  • Run following command to install dev dependency package introduced in Angular 6.0
       npm install --save-dev @angular-devkit/build-angular
      
  • Now you can run the project by issuing the npm start command.
        npm start
       
    After successful compilation, it will open the website with the default browser window on localhost.

We have setup the development environment for Angular. I hope this helps some of you who get stuck with a similar problem.

February 14, 2019

Take SQL Server database backup using batch file

In this post, I will share the script to take SQL database backup from batch file. There may be scenarios where you want to automate SQL database backups, in that case this script will be useful. Although there is SQL Server Agent feature available which helps you to automate and perform different set of powerful tasks including database backups. But at times you may need a custom solution like a batch file which could take the backup.

We will use sqlcmd command for this purpose. Following are the parameters we need to pass to sqlcmd.

  • -S (server name)
  • -U (user name)
  • -P (password)
  • -d (database name)
  • -Q (query)

In our script we will first define the parameter's values required to connect the desired database server. These are server, dataBase, user and password.

Next we will define variable targetPath, declaring the target folder path where we want to save the backup file.

These are the 5 variables we need to pass as arguments to sqlcmd.

Often we prefer to add timestamp in backup file name. To add current date/time stamp in file name please refer to my last post Get date-time value to string variable in batch file. However I want to keep this post simple, so I am not using timestamp string sufix in filename for this example.

Here is the final script:

:: Off commands display
@echo off

:: This batch file create backup for SQL Server Database
:: Written by Muhammad Idrees


:: set database connection parameters
:: ---------------------------------------------------------------------------------------------

:: Your server name. I am using server name 'MyServer'
SET server=MyServer

:: Your database name. I am using database name 'MyDatabase'
SET dataBase=MyDatabase

:: Your database-server's user name. My user name is 'sa'
SET user=sa

:: Your database-server's password. My password is '123'
SET password=123

:: ---------------------------------------------------------------------------------------------

:: Set destination path name to save the backup file.
SET targetPath=C:\Backups\

:: Set full name of the backup.
SET fullName=MyDatabase_FullBackup 

:: *****************************************************************************

sqlcmd -S %server% -U %user% -P %password% -d %dataBase% -Q "BACKUP DATABASE %dataBase% TO  DISK = '%targetPath%%dataBase%.bak' WITH NOFORMAT, INIT,  NAME = N'%fullName%', SKIP, NOREWIND, NOUNLOAD,  STATS = 10;"

ECHO Backup finished...

I hope this helps someone looking for batch file solution of taking SQL server backups. I welcome your feedback and suggestions in the comments section below.

Related Posts:

January 31, 2019

Batch file script - Get date-time value in string variable

Batch file is an important tool to automate different tasks, e.g. Copying files/folders, Archiving, Taking backups, Running builds and lot more... Often times we need to create date-time stamp in a string variable for different purposes. For example, I want to write a batch script which will copy a file to a destination folder, but before copying in destination folder I want it to append the date time stamp in target file name. In this post we will see how to pepare date time stamp as string variable in batch file. Here is the script.


::----------------------------------------------------------------------------------------------
::prepare date-string
::----------------------------------------------------------------------------------------------

:: Get day from current date, in variable name 'day'
SET day=%date:~7,2%

:: Get month from current date, in variable name 'month'
SET month=%date:~4,2%

:: Get year from current date, in variable name 'year'
SET year=%date:~10,4%

:: Set year+month+date for date-string, in variable name 'myDateFormat' 
SET myDateFormat=%day%-%month%-%year%

:: Trim myDateFormat to remove white spaces
SET myDateFormat=%myDateFormat: =%

::----------------------------------------------------------------------------------------------
::prepare time-string
::----------------------------------------------------------------------------------------------

:: Get hour from current time, in variable name 'hour'
SET hour=%time:~0,2%

:: Get minute from current time, in variable name 'minute'
SET minute=%time:~3,2%

:: Get second from current time, in variable name 'sec'
SET sec=%time:~6,2% 

:: Set hour+minute+second for time-string, in variable name 'myTimeFormat'
SET myTimeFormat=%hour%-%minute%-%sec%

:: Trim myTimeFormat to remove white spaces
SET myTimeFormat=%myTimeFormat: =%

::----------------------------------------------------------------------------------------------
::set targetFileName with string literal, and also append the date and time strings at the end.
::----------------------------------------------------------------------------------------------

SET targetFileName=CRM System Log-%myDateFormat%-%myTimeFormat%.txt

::copy file, using the variable targetFileName 
copy "C:\Test\CRM System Log.txt" "C:\Test\Destination\%targetFileName%"

I hope this helps some of you who get stuck with a similar problem.

January 24, 2019

WCF - Set nametable character count quota

If you are receiving large size of string from WCF service, you may encounter maximum quota exceeding error.

The maximum nametable character count quota (16384) has been exceeded while reading XML data. The nametable is a data structure used to store strings encountered 
during XML processing – long XML documents with non-repeating element names, attribute names and attribute values may trigger this quota. This quota may be increased by changing 
the MaxNameTableCharCount property on the XmlDictionaryReaderQuotas object used when creating the XML reader. 

To fix this issue you have to change readerQuotas settings in the binding tag.

<binding> 
 <readerQuotas 
        maxDepth="2147483647" 
        maxStringContentLength="2147483647"
        maxArrayLength="2147483647" 
        maxBytesPerRead="4096"
        maxNameTableCharCount="2147483647"
        maxStringContentLength="2147483647"
  />
</binding>

The readerQuota settings are used to limit the bindings. If a request exceeds any of these limits the WCF service will automatically reject the request, to help prevent Denial-of-Service (DoS) attacks.

The readQuota limits can be set on both server and client. This also allows clients to be protected against forged service responses.

I hope this helps some of you who get stuck with a similar problem.

January 13, 2019

WCF Test Client - How to increase MaxReceivedMessageSize

The WCF Test Client shipped with Visual Studio, is useful tool to quickly test and check results for a WCF Service call. However I encounter a scenario where my service call is returning larger result-set that is exceeding the default message size of 65536, and it starts giving me this error message.

The maximum message size quota for incoming messages (65536) has been exceeded. To increase the quota, use the MaxReceivedMessageSize property on the appropriate binding element.

In the last post Increase message size quota for incoming messages, we have seen how to increase the message size from client application's config file. But you might facing problem in searching for a way to configure message size for WCF Test Client when calling a service method. There is an option available to configure message size from WCF Test Client, but it seems to be slightly hidden, because this is not at very prominent place where user can find it easily.

After you Add Service in WCF Test Client, you can find there is a Config File node at the end of the service tree. Right click on Config File node, and select Edit with ScvConfigEditor from the context menu.

Edit with ScvConfigEditor

You will get the configuration editor dialog, just go to the Bindings node, expand it, and select the required binding settings. Here you can change the MaxReceivedMessageSize or any other settings you may need.

Edit with ScvConfigEditor Bidings