Showing posts with label AngularJS. Show all posts

July 19, 2021

AngularJS - Sharing data among Controllers

In AngularJS, you can share data among different componenets, e.g. Controllers, by multiple ways.

Using HTML5 storage features

HTML5 provides localStorage and sessionStorage, but using HTML5's localStorage, you would require to serialize and deserialize the objects before saving or reading them.

For example:

var myObj = {
firstname: "Muhammad",
lastname: "Idrees"
}

//serialize data before saving to localStorage
window.localStorage.set("myObject", JSON.stringify(myObj));

//deserialize to get object
var myObj = JSON.parse(window.localStorage.get("myObject"));

Using ngStorage

To use ngStorage, you have to include the ngStorage.js in your index.html alongwith angular.min.js.

<head>
<title>Angular JS ngStorage Example</title>
<script src="https://ajax.googleapis.com/ajax/libs/angularjs/1.8.2/angular.min.js"></script>
<script src="https://cdnjs.cloudflare.com/ajax/libs/ngStorage/0.3.11/ngStorage.js" ></script>
</head>

ngStorage provides two storage options: $localStorage and $sessionStorage.

You need to add ngStorage (as require) in the module, and then inject the services.

Suppose, if myApp is the name of the app module, you would be injecting ngStorage in myApp module as following:

var app = angular.module('myApp', ['ngStorage']);

After that, you can simply inject $localStorage and $sessionStorage services in controller function.

app.controller('controllerOne', function($localStorage, $sessionStorage) {

// an object to share
var myObj = {
firstname: "Muhammad",
lastname: "Idrees"
}

$localStorage.someValueToShare = myObj;
$sessionStorage.someValueToShare = myObj;
})

.controller('controllerTwo', function($localStorage, $sessionStorage) {

//here you can read data from $localStorage & $sessionStorage
console.log('localStorage: '+ $localStorage +'sessionStorage: '+$sessionStorage);
})

$localStorage and $sessionStorage are globally accessible through any controllers as long as you inject those services in the controller functions.

Using Service

You can create a service to hold the data that need to be shared among different controllers. Then you can simply inject that service in the controller function where you want to use it.

Here is the service code:

app.service('myDataService', function() {
var someData = {};
getData: function() { return someData; },
setData: function(dataToShare) { someData = dataToShare; }
});

Here is how controllers will consume the service myDataService and share data:

app.controller('controllerOne', ['myDataService',function(myDataService) {

// To set the data from the one controller
var myObj = {
firstname: "Muhammad",
lastname: "Idrees"
}
myDataService.setData(myObj);
}]);
app.controller('controllerTwo', ['myDataService',function(myDataService) {

// To get the data from the another controller
var result = myDataService.getData();
console.log(result); 
}]);

July 26, 2017

AngularJS - ng-change is not working for input type file

In this post I will share the code how to detect the change event for HTML file input. We are supporting an old application written with AngularJS, and encountered this problem. If you are using default ng-change attribute, it will not work in AngularJS because of no binding support for file input control. I will show you I solved this problem in my case. I made a custom directive to listen for file input changes which enables us to invoke the custom event handler function. Lets start coding this solution:

Here is the custom directive fileOnChange definition:

 myApp.directive('fileOnChange', function () {
  return {
   restrict: 'A',
   link: function (scope, element, attrs) {
    var onChangeHandler = scope.$eval(attrs.fileOnChange);
    element.bind('change', onChangeHandler);
   }
  };
 });

Here is the HTML for file input showing how to bind this directive to listen for file changes.

 <input type="file" file-on-change="onFileChange"> </input>

Now the final part of this task, write the handler function to do the actual work required on file change. Within the target controller, I write this handler function, in this example it is only showing the selected file name in alert box.

 $scope.onFileChange = function (event) {
  var filename = event.target.files[0].name;
  alert('File name: ' + filename);
 };

January 21, 2016

AngularJS Filter - Limit filter on array of items for matching

AngularJS default filter enables us to filter items list according to a specified input text. By definition, It selects a subset of items from array and returns it as a new array.
For example we have the following list of users:
$scope.myList = [
{
  firstName: "Muhammad",
  lastName: "Idrees",
  description: "Idrees is working as Senior .Net Developer, connected with Ehsan and Faizan"
}, 
{
  firstName: "Ehsan",
  lastName: "Sajjad",
  description: "Ehsan is working as Senior .Net Developer, connected with Idrees"
},
{
  firstName: "Faizan",
  lastName: "Ahmed",
  description: "Faizan is technical consultant, connected with Idrees"
}
]
And here is our html markup, how we want to filter on this list:
 <body ng-app="demoApp" ng-controller="MyController" >
     <p >
        Search:
         <input type="text" ng-model="searchInput" / >
     </p >
     <p >
         <ul>
             <li ng-repeat="user in myList | filter: searchInput">
                 <h4 >{{user.firstName}} {{user.lastName}} </h4 >
                 <p >{{user.description}} </p >
             </li >
         </ul >
     </p >
 </body >
Now if we search for the name Ehsan by typing in the input field, it will display first two items, because both objects containing this search term (in firstname, lastname, or description).
But if I want to filter my list only for firstName, and do not want to match for lastName and description fields. This is how I can limit my filter to desired field.
 <ul>
   <li ng-repeat="user in myList | filter: { firstName : searchInput}" >
    <h4 >{{user.firstName}} {{user.lastName}} </h4 >
    <p >{{user.description}} </p >
   </li >
  </ul >
Now if we type any search term it will only look for that filter in the firstName field. If any record matches the term, it will be displayed.

January 12, 2016

AngularJS - Internationalization

To add internationalization to our demo app we can use a third-party module called angular-translate, you can download from https://github.com/angular-translate/bower-angular-translate/releases. I will add two text labels with language translations, English-Language, Arabic-Language and Urdu-Language.

A sample output of this demo will be like this:

With Arabic-Translator:

angularjs-internationalization-arabic

With Urdu-Translator:

angularjs-internationalization-urdu

With English-Translator:

angularjs-internationalization-english

First, we need to load the script in html page, so that AngularJS can find the module. Add following script tag in html page's head tag:

<script src="assets/libs/angular-translate.min.js"></script>

Next we have to add a dependency on the module pascalprecht.translate defined in angular-translate. So, we go to our main app module and add pascalprecht.translate module in the dependencies list. It now looks like this:
var demoApp = angular.module('demoApp', ['pascalprecht.translate']);
Now, we need to add $translateProvider dependency in the config function of our main module demoApp. Then we add translations for the languages we required in our application. In this demo I am using English-Language, Arabic-Language and Urdu-Language. The following code shows how it's done:
demoApp.config(['$translateProvider', function ($translateProvider) {

    $translateProvider.translations('ar', {
        TITLE: 'تدويل تجريبي',
        DESCRIPTION: 'يمكننا استخدام وحدة خارجية، angular-translate ، إضافة إلى تدويل التطبيق التجريبي لدينا.',
    });

    $translateProvider.translations('ur', {
        TITLE: 'بین الاقوامیت سازی ڈیمو',
        DESCRIPTION: 'ہم ڈیمو اپلی کیشن کے لئے عالمگیریت شامل کرنے کے لئے، angular-translate ، ایک تیسری پارٹی کے ماڈیول کا استعمال کر سکتے ہیں.'
    });

    $translateProvider.translations('en', {
        TITLE: 'Internationalization Demo',
        DESCRIPTION: 'We can use a third-party module, angular-translate, to add internationalization to our demo app.'
    });

    $translateProvider.preferredLanguage('en');
}]);

We use translateProvider.translations to add the translations against a key. Here we added translations for English, Arabic and Urdu languages. If you want to support more languages you can keep adding more translations in the same way. Finally, we set the preferred language to English by calling function$translateProvider.preferredLanguage('en').

Next, we'll add options in html page to let user switch between available languages, so we add a toggle button to html page using bootstrap. The following markup do this work:

<div class="btn-group btn-toggle">
 <button class="btn btn-xs btn-default"
  ng-class="{ar:'active'}[languagePreference.currentLanguage]"
  ng-click="languagePreference.switchLanguage('ar')">
  Arabic</button>

 <button class="btn btn-xs btn-default"
  ng-class="{de:'active'}[languagePreference.currentLanguage]"
  ng-click="languagePreference.switchLanguage('ur')">
  Urdu</button>

 <button class="btn btn-xs btn-default"
  ng-class="{en:'active'}[languagePreference.currentLanguage]"
  ng-click="languagePreference.switchLanguage('en')">
  English
 </button>
</div>

The next thing we need to do is add a function languagePreference.switchLanguage() to $rootScope, which we called in the above markup for toggle button's click event. This accepts a language key and sets the specified language a variable named languagePreference.currentLanguage, used in the above markup in ng-class attribute to setup view for the selected language by applying active class. For that we need to modify the run block in our demoApp module as follows:


demoApp.run(['$rootScope', '$translate', function ($rootScope, $translate) {
    
    $rootScope.languagePreference = { currentLanguage: 'en' };
    $rootScope.languagePreference.switchLanguage = function (key) {

        $translate.use(key);
        $rootScope.languagePreference.currentLanguage = key;
    }

}]);

The function $translate.use(key) takes a key and loads the translations written against it, that we defined in the config function.

Now comes the final thing, to use this translator in UI. We need to replace the static hardcoded strings with a call to translate filter.

For example, regular text will go like this:

<h3>{{'TITLE'}}</h3>
<p>{{'DESCRIPTION'}}</p>
After adding translate filter, the final html will become like this:
<h3>{{'TITLE' | translate}}</h3>
<p>{{'DESCRIPTION' | translate}}</p>

Thats it. We have setup a simple HTML page with two strings, i.e. TITLE and DESCRIPTION, that will be displayed in three different languages. Similarly you can add more language translations in the config function if you need. Also the same way you can add more HTML text with translate filter where required.

January 4, 2016

AngularJS - Custom Filters

AngularJS Filters helps to filter/format data to be displayed to the users. Mostly filers are used in data binding expressions in HTML templates, but you can also use inside controllers, services and directives. AngularJS provides many useful built-in filters, here is a list of some important options:

  • uppercase - used to transform text to upper-case
  • currency - transform a number in currency format
  • number - an expression is formatted as number
  • date - formats a date to string

Following is an example, how we apply filter to an expression:

{{name | uppercase }}

Where name is a model variable in $scope object and uppercase is the name of the filter. A filter is separated from expression by a vertical pipe character (|).

Lets start creating our custom filter. To register a filter we use the function filter() from angular module. First argument is the name of the filter, and second argument is a the factory function used to define the filter's functionality. Filters can accept arguments, so you also use filters in more customized way by adding arguments based on your requirements.

The following snippet creates a filter to replace spaces with some other character (passed in argument).

demoApp.filter('replaceSpaces',function(){
    return function (input, replaceWith) {

        return input.replace(/ /g, replaceWith);
    }
});

And this is how we use this filter in html templates:

{{'Spaces should be removed from this text.' | replaceSpaces : '-'}}

Here we applied filter replaceSpaces with argument '-', separated by ":". So this filter will replace all the occurrences of white spaces with dash sign (-) (or any other character you passed in the argument).

December 24, 2015

AngularJS - Broadcasting and Emitting Events

AngularJS Scope provides support to broadcast events and handle them. We may want to wait for an event to execute some other activity, e.g. waiting for particular data to be received from an AJAX request.

AngularJS provides two types of events generation:

  1. Emitting - propagates the event upwards in the scope hierarchy.
  2. Broadcasting - propagates the event downwards in the scope hierarchy.

Emitting:

The $scope contains a function $emit() that is used to propagate an event upwards in the scope hierarchy. First parameter of this function is the name of the event that is being emitted, after first parameter we can pass multiple parameters for different purposes, but typically we want to pass data which should be shared with the event listeners.

Broadcasting:

The $scope contains another function $broadcast() this will be used to propagate the event downwards in the scope hierarchy. Contains the same parameters as with $emit function, first parameter will be the event's name, and in the second parameter we can pass our data which should be shared by event listeners.

Controllers can register for the event by using notification function $on() which will be called when the event occurs.

Let's see this example:

demoApp.controller('Controller1', function ($scope, $rootScope, $timeout) {

    $scope.title = 'Controller1';
    $scope.showEvents = false;

    $scope.sendMessage = function () {

        $scope.$broadcast('Controller1_Event_Broadcast', 'Hi from Controller1');
        
        $scope.showEvents = true;
    };

    $scope.$on('Controller2_Event_Emit', function (event, data) {

        console.log('I am ' + $scope.title + ', Controller2_Event_Emit received with data: ' + data);

    });
});

demoApp.controller('Controller2', function ($scope) {

    $scope.title = 'Controller2';

    $scope.$on('Controller1_Event_Broadcast', function (event, data) {

        console.log('I am ' + $scope.title + ', Controller1_Event_Broadcast received with data: ' + data);

        $scope.$emit('Controller2_Event_Emit', 'Hi from Controller2');
    });
});

And in html, the controllers hierarchy should be setup as, Contrller2 should be nested in inside Contrller1's tag. e.g:

Check browser's console to see event messages

we have two controllers, Controller1 will broadcast an event (Controller1_Event_Broadcast) using $scope.$broadcast() function, with string data ('Hi from Controller1'). And Controller2 has registered this event with $scope.$on(), where second parameter 'data' contains the value what we passed when this event is raised. Inside the receiving handler of Controller1_Event_Broadcast event, Controller2 is emitting its own event(Controller2_Event_Emit) with $scope.$emit() function. This emitted event also have a handler defined in Controller1 to receive notification from Controller2 for this event.

In this example we have seen how a Parent controller can broadcast its events to downwards to its children controllers, and how a child controller can emit its events upwards to its parents in the hierarchy.

Events with $rootScope:

But how if both these controllers as siblings to each other, and we may want to raise a global event that both these controllers should be able to handle, because so far we have seen how to handle events either from parent or either from child controllers. So here comes the role of $rootScope, as we know all controllers can access the $rootScope's contents. So in case of siblings controllers, if we want to raise an event that should be handles by all sibling controllers then we have to broadcast that event on the $rootScope. Look at this example:

$scope.sendMessage2 = function () {
       
        $rootScope.$broadcast('RootScope_Broadcast_Event', 'Hi from Controller1 via $rootScope');        
       
    };

Added another function sendMessage2() in Controller1, when this function is called, its broadcasts RootScope_Broadcast_Event event on $rootScope. And all interested controllers can register for this event using the same $on() function, like:

$scope.$on('RootScope_Broadcast_Event', function (event, data) {

        console.log('I am ' + $scope.title + ', RootScope_Broadcast_Event received with data: ' + data);

    });    

December 9, 2015

AngularJS - Defining Custom Directives Part IV

AngularJS custom directives series previous articles:

In this post I will discuss isolate scope with local scope properties.

To interact with outside world while using isolated scope, angular provides three options which are known as Local Scope Properties, and used with @,= and & characters.

The local scope option @ is used to access string values that defined outside the directive scope. It can be understand as a function accepting a single string parameter. In the following directive example scope is received a string variable and named it as myLocalName inside directive scope (although you can use the same name as passed through directive, but here I used a different name to make it more clear).

demoApp.directive('directiveWithIsolateScopeRecevingStringParameter1', function () {
 return {
  scope: {
   myLocalName: '@'
  },
  template: 'Item name received from parameter: name = {{myLocalName}}'
 };
});
Directive Implementation:
Note that the attribute name we used here, is following the same naming scheme as we used while defining custom directive, i.e. camelCase. In my-local-name attribute we are passing a string item.name from controller's property. We can also use different names inside directive scope and directive implementation, look at this example:
demoApp.directive('directiveWithIsolateScopeRecevingStringParameter2', function () {
 return {
  scope: {
   myLocalName2: '@myLocalName'
  },
  template: 'Item name received from parameter: name = {{myLocalName2}}'
 };
});
Directive Implementation:

Here in implementation we define attribute named my-local-name, but inside directive scope we are using different name my-local-name2.

Values passed by @ option is not sync with outside scope, i.e. if item.name value changes from outside of directive then directive get updated value, but if the value is being changed inside the directive scope then item.name property will not be affected.

If you want two-way binding then you have to use second scope option '=' character, it will keep the directive variable in-sync with outside world. Example:

demoApp.directive('directiveWithIsolateScopeBindedToObject', function () {
 return {
  scope: {
   myBindedItem: '='
  },
  template: 'Item from isolate scope binded to object in parent controller: name = {{myBindedItem.name}}, category = {{myBindedItem.category}} '
 };
});
Directive Implementation:
    
The last scope binding option & is used to bind external functions. You can think of it as accepting a function delegate, then you can call it like a regular function. For example we can pass a function name, of the controller, which we want to be called on some specific event e.g. click event. When you click an element of the directive, it will call that external function, and controller can define its own logic being invoked from inside the directive.
demoApp.directive('directiveWithIsolateScopeCallingParentFunction', function () {
            return {
                scope: {
                    myFunction: '&'
                },
                template: 'Click this button, it will call a function in parent controller:  '
            };
        });
Directive Implementation:
Here we are passing a function name doSomeWork() in the attribute my-function, and within the directive scope we are accepting this function with & option in our local variable myFunction. Then we are calling this function from the click event of the button defined in the template content of directive.

AngularJS - Defining Custom Directives Part III

After last 2 posts, we are now familiar with developing AngularJS custom directives. If you have not read old posts, I recommend to first take a look on these. In this post I will discuss the scope object inside the custom directive. By default, a directive have access to the parent scope. In the html markup where the directive is placed, it will get access to the scope object of the parent controller. For example in the following directive we can access an item property which is defined in the scope of the parent controller.
demoApp.directive('directiveUsingParentScope', function () {
    return {
        template: 'Item from parent controller: name = {{item.name}}, category = {{item.category}} '
    };
});
Directive Implementation:
Sorry for the long directive names I used in these examples, these are for demonstration purpose to make it more understandable.
This directive will render the name and category properties of item object defined in parent controller. But the limitation here is that the directive is totally depends on the parent controller and if you place directive some where outside of the scope of parent controller, it will not work as expected.
To make a directive more reusable and removing dependency on the parent scope we can isolate it. For this we have to define scope object in the directive declaration. In following example directive is defined with an empty object assigned to its scope, so this directive is no longer have direct access to the parent scope, and would not render the item's name and category.
demoApp.directive('directiveWithIsolateScope', function () {
    return {
        scope: {},
        template: 'Item from isolate scope: name = {{item.name}}, category = {{item.category}} '
    };
});
Directive Implementation:
But angular provides access to another object named $parent, through which we can access parent scope even inside an isolated directive. See this example:
demoApp.directive('directiveWithIsolateScopeAccessingParent', function () {
    return {
        scope: {},
        template: 'Item from isolate scope accessing parent scope: name = {{$parent.item.name}}, category = {{$parent.item.category}} '
    };
});
Directive Implementation:
This directive scope is isolated and have nothing to interact with outside world, but in the template content we are accessing the item property of the parent controller by using $parent object.

December 1, 2015

AngularJS - Defining Custom Directives - Part II

In last post we have seen how to create a basic custom directive in AngularJS, we have used three properties i.e. restrict, template and transclude. Let explore some more features AngularJS provides while using cutom directives. In this post I will focus on templateUrl and the link function.

Template / TemplateUrl Properties: 
We can define the DOM elements to be replaced through the template or templateUrl properties. We have seen an example for template property in the last post, let try options with templateUrl property. At a fundamental level we can use the template property to define our directives content as inline string. As in example below:
validationApp.directive('directiveWithInlineString', function () {
    return {
        restrict: 'EA',
        template: 'Hello from the Directive-With-Inline-String Template', 
    };
});
Next thing we have is the templateUrl property which gives us more flexibility in writing tempaltes. We can use templateUrl in multiple ways.

First method is write html content in a file placed on server, and put that file's url in templateUrl property. For exmaple create file named 'htmlTemplate1.html' and put the following content and save it.
<h3>My Heading</h3>
<p>Hello from the Directive-With-Url Template</p>
Now we can use this file as directive template by putting file url in templateUrl property.
validationApp.directive('directiveWithUrl', function () {
    return {
        restrict: 'EA',
        templateUrl: 'views/htmlTemplate1.html'        
    };
});
This will look for a file 'htmlTemplate1.html' inside 'views' folder and load it as the content of element that imeplemented this directive.

Second method is to write html content within the script tag, with type = 'text/ng-template' and a unique id for our template.
<script type='text/ng-template' id='key_for_template_in_script_tag'>
     <p>Hello from the Directive-With-Template-Key-In-Script-Tag</p>
</script>
Here I defined id='key_for_template_in_script_tag' to uniquely identity the template, now next thing is use this template and for this we have to simply put this key name in the templateUrl property. As in example below:
validationApp.directive('directiveWithScriptTag', function () {
    return {
        restrict: 'EA',
        templateUrl: 'key_for_template_in_script_tag'
    };
});
Just make sure that you place the directive tempalte first, before its implemenation when loading your page.

Third method is to place the template in the cache object used by Angular called the $templateCache. Same like we defined a unique key to template definition in the script tag, we have to label the template for identification. To place things in $templateChache we have to use run function on the module.
validationApp.run(function ($templateCache) {
    $templateCache.put('key_for_template_in_templatecache', 'Hello from the Directive-With-Template-Key-In-TemplateCache');
});
First argument of put function is the key we want to define for template and second argument is the actual content we want to use. We can implement this template in the same way as we did in script tag method.
validationApp.directive('directiveWithTemplateCache', function () {
    return {
        restrict: 'EA',
        templateUrl: 'key_for_template_in_templatecache',
    };
});
Link function: 
Link function will be used to make DOM elements dynamic. Angular runs a link function for each directive and attach event liseners on the DOM elements, this way we can keep the view and model in sync making it more interactive. Let create a directive with link function to transform text between upper case and lower case with mouse movement.
validationApp.directive('directiveWithLinkFunction', function () {
    return {
        restrict: 'EA',

        link: function ($scope, element, attrs) {

            element.bind('mouseenter', function () {
                element.css('text-transform', 'uppercase');
            });
            element.bind('mouseleave', function () {
                element.css('text-transform', 'lowercase');
            });
        }
    }
});
Inside the link function, we are receiving our DOM element in the parameter 'element' , we can attach events, makes changes or write validation logic etc. In this example we are attaching the CSS class to the element to transform text between upper case and lower case.

That's it, its pretty easy making custom directives with even dynamic behavior. I hope you enjoyed this post and learned something useful. I the next post, I will discuss about the scope options we can use in custom directives.

November 30, 2015

AngularJS - Define a basic Custom Directive

Directives are used to attach a specified behavior to the DOM elements by using event listeners. Behavior can be anything, you want to perform some action on any desired event attached with the element or it can even transform the DOM element itself and/or its children. All this is done by AngularJS's HTML compiler which makes DOM elements interactive, means it does attach the behavior source code with target elements. 

Same as you create controllers and services for application requirements, you can define your own custom directives for specific purposes. Following is the template object showing the available options while creating a custom directive.
var objectTemplate = {
restrict: string,
priority: number,
template: string,
templateUrl: string,
replace: bool,
transclude: bool,
scope: bool or object,
controller: function,
require: string,
link: function,
compile: function
};
Lets start defining a basic custom directive.
var myApp = angular.module('demoApp', []);
myApp.directive('helloWorld', function () {
 return {
  restrict: 'EA',
  template: '
Hellow World! Message from custom directive. And here is the inserted text: .
', transclude: true }; });
Lets review the code segment:
restrict property defines the declaration style of the directive, this can have following options:
E => directive will be declared as element, e.g. <hello-world></hello-world>
A => attribute, e.g. <div hello-world></div>
C => class, e.g. <div class=hellow-world></div>
M => comment, e.g. <!--directive:hellow-world -->

In this example I have only used two options EA, it means we can declare our directive as an element or also can be added as an attribute to another element. So the following two lines will produce the same result.
  • <hello-world></hello-world>
  • <div hello-world>Div own message</div>
You can define the DOM elements to be replaced through the template or templateUrl properties. We can set the template content via a string, and templateUrl will be used if we want the template to be loaded from a file. We just defined our template as '<div>Hellow World! Message from custom directive. And here is the div text: <span ng-transclude></span>.</div>' to put a simple message inside a div.

transclude property allow us to replace or append the content from template with the regular content defined by element. Note that we have placed ng-transclude attribute on span tag and place it inside our template. Now when the page will be requested to load, the AngularJS HTML compiler will replace this span tag with the regular content defined within the element. Like in the following example, we display the number as the div's content alongwith the content defined in template property.

<div ng-repeat='number in [1,2,3,4,5]'>
 <div hello-world>{{number}}</div>
</div>

In this post we learned how to declare a basic custom directive. Hopefully in next post I will try to explain how to add logic in our directive to make it more interactive.


November 9, 2015

AngularJS - Form Validation

In this article I will explain how to validate web forms using AngularJS. It provides an easy way to validate data on client side and prevents sending post back to server until we receive correct data according to the defined rules. We can't depend on client side validation to keep our web applications secure, but it provides instant feedback to the user and enhance user experience making our form more interactive.

Validation Directives and Properties

We need to place fields within the form tag and give a name to it. Also, it's important to assign a name to each input field. AngularJS has many directives to provide form validation, following are the available on a classic input field.
Directive Type Description
ng-required boolean Sets the required attribute if set to true
ng-minlength number Sets the minlength validation error key if the value is shorter than minlength.
ng-maxlength number Sets the maxlength validation error key if the value is longer than maxlength.
ng-pattern string Sets pattern validation error key if the ng-model value does not match the regExp in the attribute value.
We can achieve some of these validations through HTML5, but the advantage of using AngularJS directive is that it allows to maintain two-way data binding between model and view.
AngularJS added some properties to form that helps us to validate and provides various information about the current state of input controls and the form. These are:
Boolean: $valid, $invalid, $pristine, $dirty
Object: $error (could be as: { required: false, email:true })
The result can be evaluated through the boolean property $valid. It will be updated based on the validation rules defined for each field by particular directives. If any of these violates the validation rule(s), the result will be false.
The $pristine value by default start with true and becomes false after receiving any input value.
The $dirty flag is just the opposite, it starts with false and becomes true after the first input value is received.

Code Review

We will use a sample demo form to see how validation works in AngularJS. You will see the code listing in Test.html page. I have added the following libraries in head tag for AngularJS and Bootstrap:
<link href="client/assets/css/bootstrap.min.css" rel="stylesheet"></link>
<script src="client/assets/libs/angular.js"></script>
Define ng-app and ng-controller in body tag, to make html page aware of angular framework.
<body ng-app="validationDemoApp" ng-controller="myController">
    <form name="myForm" ng-submit="submitForm(myForm.$valid)" novalidate class="form-horizontal">  
 </form>
</body>
Body tag is using ng-app attribute to our angular application module 'validationDemoApp' and binded to the controller 'myController'. We have placed novalidate attribute to our form tag, it will prevents the HTML5 validation, because we will be validating ourselves. And on submit form, we are calling our javascript function submitForm(myForm.$valid) which accepts a boolean variable passed by form property $valid, within this function we can check this boolean to see if our form data is validated or not according to our defined rules.
Here is the html content for name field:
<div class="form-group">
 <label class="control-label col-sm-2" for="name">Name:</label>
 <div class="col-sm-6">
 
  <input type="text" name="name" placeholder="Name" class="col-lg-6" ng-model="user.name" 
      required ng-minlength="3" ng-maxlength="10" ng-pattern="/^[a-zA-Z0-9]*$/">
      
  <span ng-show="myForm.name.$error.required && isSubmitted" class="help-inline col-lg-offset-1">Please enter name.</span>
  <span ng-show="myForm.name.$error.minlength" class="help-inline col-lg-offset-1">Minimum length should be 3.</span>
  <span ng-show="myForm.name.$error.maxlength" class="help-inline col-lg-offset-1">Maximum length should be 10.</span>
  <span ng-show="myForm.name.$error.pattern" class="help-inline col-lg-offset-1">Please enter only alphanumeric characters.</span>
 </div>
</div>
I have placed each form's field inside a div which has defined the conditional css class as ng-class="{ 'has-error' : myForm.name.$invalid && isSubmitted }", it means apply the css class 'has-error' only if the 'name' property of 'myForm' is 'invalid' and also 'isSubmitted' flag is true. '$invalid' is the forms default property, while 'isSubmitted' is our local variable added to the $scope inside the submit function.
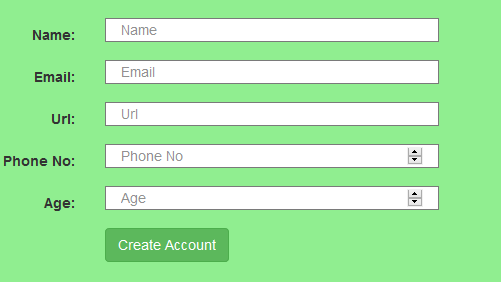
At initial state, you will get the form similar to this with no validation messages:

AngularValidation-New
 Next for the name field, we have defined 3 validation rules as required ng-minlength="3" ng-maxlength="10" which are self-explanatory. ng-pattern="/^[a-zA-Z0-9]*$/" will validate name field to accept only alphanumeric characters. Right after input tag I have placed <span> tags to display error messages with ng-show attribute to show/hide based on validation state.
At first it will display the validation message on screen if 'required' becomes true and also if user try to submit the form. Similarly we can set-up all other fields with different validation rules and different error message defined in <span> tags.
When you click on submit button without making any changes you will see the required validator messages like this:
AngularValidation-Required
 For Age field, I put the range validation in range 20-40, and for this I have used custom validator(custom angular directive). So if you enter anything outside this range you will get error message like this:
AngularValidation-Custom Validation
 I have added an attribute named 'age-validate', this is not AngularJS default attribute, it is custom defined attribute contains our logic to validate age field. Lets move on to JavaScript code:
   // create angular app module
        var validationApp = angular.module('validationDemoApp', []);

        // create controller
        validationApp.controller('myController', function ($scope) {

            // all validation has passed
            //parameter is passed in form tag on submit, i.e. myForm.$valid
            $scope.submitForm = function (isValid) {
                $scope.isSubmitted = true;

                // check the form is valid
                if (isValid) {
     $('#lblMsg').after('
×Success! Your form is submitted successfully.
'); } }; }); validationApp.directive('ageValidate', function () { return { require: 'ngModel', link: function (scope, elem, attr, ngModel) { ngModel.$parsers.unshift(function (value) { if (value >= 20 && value <= 40) { ngModel.$setValidity('ageValidate', true); } else { ngModel.$setValidity('ageValidate', false); } return value; }); } }; });
First we created application module 'validationApp', then added our controller 'myController'. Inside myController we have defined our 'submitForm' function which will be called when the form submitted successfully after passing all validations.
Then comes the custom validation part (or custom angular directive). Note that for custom directive name 'ageValidate' is define will cameCase. Inside the 'link' function, we actually defined our validation logic. Here I am checking if value is between 20-40 then it is valid age otherwise 'false' will be set-up as being invalidated. ngModel.$setValidity('ageValidate', true) is the ultimate function where you can set the validity falg (true or false) providing the custom directive name.
Note: Keep remember that when we are defining custom directive, we are using camelCase without any dashes or underscores, but when we put this directive in html tags, we have to put dashes(-) in between words like in this example, I placed 'age-validate' attribute to the input tag for 'Age'.
We learned how to validate various types of inputs in AngularJS with built-in directives, as well as how to define our own custom validation rule in Angular way. I hope you enjoyed this article and got something out of it. I appreciate your feedback/comments or any improvements you want to suggest in this topic, to help in making the article better and helpful for others.

October 29, 2015

AngularJS - How to GET and POST data by http methods Get / Post

In this post, we will see how to use http requests in AngularJS. For the scope of this post, I assumed that we have already developed ASP.NET WebAPI, say for Products. So we have a ProductController which have action methods for CRUD operations. Lets see how we call that methods from AngularJS, I am using AngularJS factory method as a service componenet to communicate with server.

For example the following code snippet assumes you have a app module varaible defineds as demoApp, here we are creating a productFactory with a dependency parameter $http which we use to make requests to server.
 
demoApp.factory('productFactory', function ($http) {
}
This is how we create a get request over $http object, we passed a URL to ProductController and calling its Get method, which will return data in json string. We also passed 2 callback functions as parameters, first one is called if the request is successfull and the second will be called if request encountered any error.
$http.get('api/Product/Get').
 success(function (data, status, headers, config) {
  // successfully get json response from server
  console.log("get products list - success");
 }).
 error(function (data, status, headers, config) {
  // log error
  console.log(status);
});
This is how we can create a post request over $http object. First define an object, say config, which will define the request headers or other configuration properties. Here we are passing three parameters to the Post function, first is the URL with Controller's post action method, second is the object we want to pass as parameter/data to that function, third is our configuration object we want to set with this request.
  var config = {
  headers: { 'Content-Type': 'application/json' }
 }

$http.post('api/Product/PostProduct', product, config)
 .then(
  function (response, status, headers, config) {
     //sucessfully posted to server
     console.log('PostProduct success: ' + product.Id);
  },
  function (response, status, headers, config) {         
     //log error
     console.log('PostProduct failed.', response, status, headers);
  }
 );
Similarly following code segment will make a delete http request. Here we are only passing productID as query string parameter to the required URL, i.e. Controller's delete action method will accept an integer variable productID as parameter.
  var params = "productID=" + id;
$http.delete('api/Product/DeleteProduct?' + params)
 .then(
  function (response, status, headers) {
   //sucessfully processed delete request
   console.log('DeleteProduct success: ');
  },
  function (response, status, headers) {
   //log error
   console.log('DeleteProduct failed.', response, status, headers);
  }
 ); 
Hope this post helps you, give an idea how to deal with http methods in AngularJS.

September 9, 2015

AngularJs routing not working

I started learning AngularJS, and faced problem that routing is not getting worked. It only displays my index page and I was unable to display my partial views. Even it was not showing any error message while try to trace using firebug.

These are the points you have to consider if you get stuck with Angular Routes not working:

1- While going to define your config for routing, remember to put 'ngRoute' dependency parameter.
For example if following is your code snippet:
var myApp = angular.module('myApp');
{
    $routeProvider
    .when('/view1',
    {
        controller: 'myController',
        templateUrl: 'view1.html'
    })
    //code goes on...
}

You have to change it by putting 'ngRoute' dependency.
var myApp = angular.module('myApp', ['ngRoute']);
{
    $routeProvider
    .when('/view1',
    {
        controller: 'myController',
        templateUrl: 'view1.html'
    })
    //code goes on...
}
2- You may be started Angular JS demos by referencing angular.js library. Note that for routing get worked, we have to reference another library angular-route.js (http://code.angularjs.org/1.2.13/angular-route.js)

3- It should work now. If still not work, try to run your application by hosting in a webserver. For example try run it through Visual Studio