In this post, I will explain how you can deploy an Angular application under IIS.
For this example, I will use the
Angular's Tour of Heroes tutorial application. You can download it from the
this page. Extract it to a folder called myapp.
Go to your myapp folder and run this command to install all the required dependencies.
npm install
Once it finished installing all dependencies, we can test the Tour of Heroes application in our development environment by running:
ng serve
Point your browser at:
http://localhost:4200
You should see the Tour of Heroes application loaded and display the dashboard.
Since this is Single Page Application, it uses the Angular Router which enables you to view different UIs when you click on Dashboard and Heroes links.
Angular Router manages all URL related stuff and enables us to navigate the site with different URLs in the browser like refreshing, browser back/forward button, directly navigating
to a particular URL etc.
Setup Internet Information Services
To mimic a Production Environment we will deploy our Tour of Heroes application to IIS. If you are planning to deploy angular application to the web root directory then there is no need to make any changes in IIS specially for Angular App. But if you want to deploy this app in a sub-folder then we need to install an extension
URL Rewrite Module
(download from
URL Rewrite extension home page
)
and make some configuration changes in web.config file.
After successfull installation of URL Rewrite module, you will see the URL Rewrite icon in IIS for selected website's Features View.
Deployment in Web Root folder:
Lets deploy our application in IIS web root folder. First we need to build the application with --prod flag. Run this command:
ng build --prod
This builds your application and generate the output to the path defined by outputPath property defined in angular.json file(or outDir in .angular-cli.json in older versions). By default, in our case, this will be myapp\dist (folder named dist in the project's root directory).
Copy the content of this(myapp\dist) folder and paste it in the web server's default root directory C:\inetpub\wwwroot.
Point your browser at: http://localhost and you should see the Tour of Heroes dashboard displayed. Since the default website for IIS runs on port 80, there is no need to provide the port in URL, so http://localhost simply will work.
Deploying into a Sub-folder
Deploying an Angular Router app to a sub-folder inside the web root requires a bit more effort.
Before proceeding this, make sure to delete all the files for angular app from C:\inetpub\wwwroot folder, which we copied in previous step.
Lets create a new folder in our web root called myapp (C:\inetpub\wwwroot\myapp). Copy the contents of myapp\dist folder to your C:\inetpub\wwwroot\myapp folder.
Now if you try to use the Tour of Heroes application by going to http://localhost/myapp/index.html we will get a 404 error in the console.
Here we need to make some changes in angular build and also create web.config file.
The base-href Flag
The HTML <base href="..."/> specifies a base path for resolving relative URLs to assets such as images, scripts, and style sheets. For example, given the <base href="/my/app/">, the browser resolves a URL such as some/place/foo.jpg into a server request for my/app/some/place/foo.jpg. During navigation, the Angular router uses the base href as the base path to component, template, and module files.
You'd add base tag near the top of index.html:
<base href="/">
We placed href="/" because / is the root of the application.
If the application is in a sub-folder like C:\inetpub\wwwroot\myapp then it would be pointed towards that:
<base href="/myapp/">
When you build the angular project, you need to supply another flag --base-href with the sub-folder name. The base tag tells the Angular application where it will be deployed relative to IIS webroot folder.
Lets build our Tour of Heroes application again with --base-href flag to tell ng build that we will be deploying to the myapp sub-folder in the web root directory.
ng build --base-href "/myapp/" --prod
When it completes, copy the contents of of your project’s myapp\dist folder into your IIS wwwroot > myapp (C:\inetpub\wwwroot\myapp) folder.
Until this step, we are partially done. If you go to http://localhost/myapp/index.html you should see the application working and you will be able to navigate the site by clicking on Dashboard and Heroes.
However, if you try to refresh the page, by hitting F5 for example, you will get an error. That’s because our web server is not able to handle the Angular Router URLs.
We need to add some configuration that tells our web server to fallback to index.html page, and allow the Angular Router to handle those URLs for us.
Server Configuration with web.config
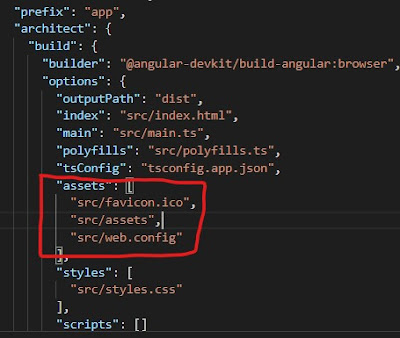
For our deployment in IIS, we have to create a web.config file in the root the app folder with the following content.
<?xml version="1.0" encoding="utf-8"?>
<configuration>

<system.webServer>
  <rewrite>
    <rules>
      <rule name="Angular Routes" stopProcessing="true">
        <match url=".*" />
        <conditions logicalGrouping="MatchAll">
          <add input="{REQUEST_FILENAME}" matchType="IsFile" negate="true" />
          <add input="{REQUEST_FILENAME}" matchType="IsDirectory" negate="true" />
        </conditions>
        <action type="Rewrite" url="./index.html" />
      </rule>
    </rules>
  </rewrite>
</system.webServer>

</configuration>
This configuration enables the web server to serve the index.html file as main fallback.
You can find the details at
Angular's Server configuration page.
Now our Tour of Heroes application deployment is done with IIS. Navigate the site and notice that the routes work correctly. Also, if we copy a URL and paste it into another browser window it works just fine.
References:
Related Post(s):


