December 24, 2015

AngularJS - Broadcasting and Emitting Events

AngularJS Scope provides support to broadcast events and handle them. We may want to wait for an event to execute some other activity, e.g. waiting for particular data to be received from an AJAX request.

AngularJS provides two types of events generation:

  1. Emitting - propagates the event upwards in the scope hierarchy.
  2. Broadcasting - propagates the event downwards in the scope hierarchy.

Emitting:

The $scope contains a function $emit() that is used to propagate an event upwards in the scope hierarchy. First parameter of this function is the name of the event that is being emitted, after first parameter we can pass multiple parameters for different purposes, but typically we want to pass data which should be shared with the event listeners.

Broadcasting:

The $scope contains another function $broadcast() this will be used to propagate the event downwards in the scope hierarchy. Contains the same parameters as with $emit function, first parameter will be the event's name, and in the second parameter we can pass our data which should be shared by event listeners.

Controllers can register for the event by using notification function $on() which will be called when the event occurs.

Let's see this example:

demoApp.controller('Controller1', function ($scope, $rootScope, $timeout) {

    $scope.title = 'Controller1';
    $scope.showEvents = false;

    $scope.sendMessage = function () {

        $scope.$broadcast('Controller1_Event_Broadcast', 'Hi from Controller1');
        
        $scope.showEvents = true;
    };

    $scope.$on('Controller2_Event_Emit', function (event, data) {

        console.log('I am ' + $scope.title + ', Controller2_Event_Emit received with data: ' + data);

    });
});

demoApp.controller('Controller2', function ($scope) {

    $scope.title = 'Controller2';

    $scope.$on('Controller1_Event_Broadcast', function (event, data) {

        console.log('I am ' + $scope.title + ', Controller1_Event_Broadcast received with data: ' + data);

        $scope.$emit('Controller2_Event_Emit', 'Hi from Controller2');
    });
});

And in html, the controllers hierarchy should be setup as, Contrller2 should be nested in inside Contrller1's tag. e.g:

Check browser's console to see event messages

we have two controllers, Controller1 will broadcast an event (Controller1_Event_Broadcast) using $scope.$broadcast() function, with string data ('Hi from Controller1'). And Controller2 has registered this event with $scope.$on(), where second parameter 'data' contains the value what we passed when this event is raised. Inside the receiving handler of Controller1_Event_Broadcast event, Controller2 is emitting its own event(Controller2_Event_Emit) with $scope.$emit() function. This emitted event also have a handler defined in Controller1 to receive notification from Controller2 for this event.

In this example we have seen how a Parent controller can broadcast its events to downwards to its children controllers, and how a child controller can emit its events upwards to its parents in the hierarchy.

Events with $rootScope:

But how if both these controllers as siblings to each other, and we may want to raise a global event that both these controllers should be able to handle, because so far we have seen how to handle events either from parent or either from child controllers. So here comes the role of $rootScope, as we know all controllers can access the $rootScope's contents. So in case of siblings controllers, if we want to raise an event that should be handles by all sibling controllers then we have to broadcast that event on the $rootScope. Look at this example:

$scope.sendMessage2 = function () {
       
        $rootScope.$broadcast('RootScope_Broadcast_Event', 'Hi from Controller1 via $rootScope');        
       
    };

Added another function sendMessage2() in Controller1, when this function is called, its broadcasts RootScope_Broadcast_Event event on $rootScope. And all interested controllers can register for this event using the same $on() function, like:

$scope.$on('RootScope_Broadcast_Event', function (event, data) {

        console.log('I am ' + $scope.title + ', RootScope_Broadcast_Event received with data: ' + data);

    });    
December 14, 2015

MS SQL - How to loop through table rows in T-SQL

In this post we will see three ways to iterate through table rows in a loop using T-SQL. I am using Microsoft SQL SERVER 2008 R2. Let first setup a target table we want to iterate rows. Create a new table (say Items) in database, with the following script.
--Create Table
CREATE TABLE [dbo].[Items](
 [Id] [int] IDENTITY(1,1) NOT NULL,
 [Item_Code] [nvarchar](255) NOT NULL,
 [Item_Name] [nvarchar](255) NOT NULL,
)
Populate Items table with some dummy records.
SET IDENTITY_INSERT [dbo].[Items] ON
INSERT [dbo].[Items] ([Id], [Item_Code], [Item_Name]) VALUES (1, N'I001', N'Item1')
INSERT [dbo].[Items] ([Id], [Item_Code], [Item_Name]) VALUES (2, N'I002', N'Item2')
INSERT [dbo].[Items] ([Id], [Item_Code], [Item_Name]) VALUES (3, N'I003', N'Item3')
INSERT [dbo].[Items] ([Id], [Item_Code], [Item_Name]) VALUES (4, N'I004', N'Item4')
INSERT [dbo].[Items] ([Id], [Item_Code], [Item_Name]) VALUES (5, N'I005', N'Item5')
INSERT [dbo].[Items] ([Id], [Item_Code], [Item_Name]) VALUES (6, N'I006', N'Item6')
INSERT [dbo].[Items] ([Id], [Item_Code], [Item_Name]) VALUES (7, N'I007', N'Item7')
INSERT [dbo].[Items] ([Id], [Item_Code], [Item_Name]) VALUES (8, N'I008', N'Item8')
INSERT [dbo].[Items] ([Id], [Item_Code], [Item_Name]) VALUES (9, N'I009', N'Item9')
INSERT [dbo].[Items] ([Id], [Item_Code], [Item_Name]) VALUES (10, N'I010', N'Item10')
SET IDENTITY_INSERT [dbo].[Items] OFF

Using Cursor
This is the first way we are iterating table rows using CURSOR. For the scope of example I am using only top 10 records in these scripts, you can change according to your requirements. Here is the first loop:
  
--Using Cursor
DECLARE @MyCursor CURSOR;

--sample variables to hold each row's content
DECLARE @ItemID int;
DECLARE @ItemCode varchar(255);
DECLARE @ItemName varchar(255);

BEGIN
    SET @MyCursor = CURSOR FOR
    select top 10 
    Id, Item_Code, Item_Name 
    from dbo.Items

    OPEN @MyCursor
    FETCH NEXT FROM @MyCursor
    INTO @ItemID, @ItemCode, @ItemName

    WHILE @@FETCH_STATUS = 0
    BEGIN
    
  --Your logic here...
  --just printing in the loop
  print 
   'ItemID=' + Cast(@ItemID as varchar(255)) +
   ', ItemCode=' + @ItemCode + 
   ', ItemName=' + @ItemName   
   
   
  FETCH NEXT FROM @MyCursor
  INTO @ItemID, @ItemCode, @ItemName      
  
    END; 

    CLOSE @MyCursor ;
    DEALLOCATE @MyCursor;
END;
Fetching the desired records in cursor and check in the while loop until we get @@FETCH_STATUS = 0. Inside the loop you can put your logic what you want to do with each row's contents. In this example I am using three variables ItemID, ItemCode and ItemName and populating their values from each row content. Then I am just printing these to see the results.

Using temp table (using unique integer key)
Second method is to use temp table that already have a column with unique int key.
--Using #tempTable while target table has an int Unique key
select top 10 
Id,Item_Code, Item_Name
into #tempTable 
from dbo.Items

--sample variables to hold each row's content
DECLARE @ItemID int;
DECLARE @ItemCode varchar(255);
DECLARE @ItemName varchar(255);

while exists (select * from #tempTable)
begin

    select top 1 
     @ItemID = Id
    ,@ItemCode = Item_Code
    ,@ItemName = Item_Name
    from #tempTable
    order by Id asc

    --Your logic here...
 --just printing in the loop
 print 
  'ItemID=' + Cast(@ItemID as varchar(255)) +
  ', ItemCode=' + @ItemCode + 
  ', ItemName=' + @ItemName 


    delete #tempTable where Id = @ItemID

end

drop table #tempTable
In this technique, we are extracting the desired records in a temp table. In the while condition we are checking if there is any record exists in this temp table then continue looping, and within the loop we are selecting top 1 single record, extract its content, put our logic, and then in the end, we can simply delete the current row from temp table. So finally we will get all rows processed and deleted from temp table.

Using temp table (adding new identity key)
Third technique is to use temp table, and add an IDENTITY field in temp table, to uniquely identify each row.
--Using #tempTable and have created own Identity ID
SELECT 
TOP 10
IDENTITY(INT, 1,1) AS TempID,
Item_Code, Item_Name
INTO #tempTable
FROM dbo.Items 

--sample variables to hold each row's content
DECLARE @ItemCode varchar(255);
DECLARE @ItemName varchar(255);

--helper variables used for looping purpose
DECLARE @MaxTempID int;
DECLARE @CurrentTempID int;

SELECT @MaxTempID = MAX(TempID) from #tempTable
SELECT @CurrentTempID = MIN(TempID) from #tempTable

WHILE @CurrentTempID <= @MaxTempID
BEGIN

    -- Get one record
    SELECT TOP 1 
    @ItemCode = Item_Code
    ,@ItemName = Item_Name
    FROM #tempTable
    WHERE TempID = @CurrentTempID

     --Your logic here...
 --just printing in the loop
 PRINT
  'ItemCode=' + @ItemCode + 
  ', ItemName=' + @ItemName 

    SELECT @CurrentTempID = @CurrentTempID + 1
END

In this method, before starting loop we extract the maximum and minimum values of identity column(that we added) in variables to use for looping conditions. Inside the loop we are extracting each row's content by that unique identity value.

December 9, 2015

AngularJS - Defining Custom Directives Part IV

AngularJS custom directives series previous articles:

In this post I will discuss isolate scope with local scope properties.

To interact with outside world while using isolated scope, angular provides three options which are known as Local Scope Properties, and used with @,= and & characters.

The local scope option @ is used to access string values that defined outside the directive scope. It can be understand as a function accepting a single string parameter. In the following directive example scope is received a string variable and named it as myLocalName inside directive scope (although you can use the same name as passed through directive, but here I used a different name to make it more clear).

demoApp.directive('directiveWithIsolateScopeRecevingStringParameter1', function () {
 return {
  scope: {
   myLocalName: '@'
  },
  template: 'Item name received from parameter: name = {{myLocalName}}'
 };
});
Directive Implementation:
Note that the attribute name we used here, is following the same naming scheme as we used while defining custom directive, i.e. camelCase. In my-local-name attribute we are passing a string item.name from controller's property. We can also use different names inside directive scope and directive implementation, look at this example:
demoApp.directive('directiveWithIsolateScopeRecevingStringParameter2', function () {
 return {
  scope: {
   myLocalName2: '@myLocalName'
  },
  template: 'Item name received from parameter: name = {{myLocalName2}}'
 };
});
Directive Implementation:

Here in implementation we define attribute named my-local-name, but inside directive scope we are using different name my-local-name2.

Values passed by @ option is not sync with outside scope, i.e. if item.name value changes from outside of directive then directive get updated value, but if the value is being changed inside the directive scope then item.name property will not be affected.

If you want two-way binding then you have to use second scope option '=' character, it will keep the directive variable in-sync with outside world. Example:

demoApp.directive('directiveWithIsolateScopeBindedToObject', function () {
 return {
  scope: {
   myBindedItem: '='
  },
  template: 'Item from isolate scope binded to object in parent controller: name = {{myBindedItem.name}}, category = {{myBindedItem.category}} '
 };
});
Directive Implementation:
    
The last scope binding option & is used to bind external functions. You can think of it as accepting a function delegate, then you can call it like a regular function. For example we can pass a function name, of the controller, which we want to be called on some specific event e.g. click event. When you click an element of the directive, it will call that external function, and controller can define its own logic being invoked from inside the directive.
demoApp.directive('directiveWithIsolateScopeCallingParentFunction', function () {
            return {
                scope: {
                    myFunction: '&'
                },
                template: 'Click this button, it will call a function in parent controller:  '
            };
        });
Directive Implementation:
Here we are passing a function name doSomeWork() in the attribute my-function, and within the directive scope we are accepting this function with & option in our local variable myFunction. Then we are calling this function from the click event of the button defined in the template content of directive.

AngularJS - Defining Custom Directives Part III

After last 2 posts, we are now familiar with developing AngularJS custom directives. If you have not read old posts, I recommend to first take a look on these. In this post I will discuss the scope object inside the custom directive. By default, a directive have access to the parent scope. In the html markup where the directive is placed, it will get access to the scope object of the parent controller. For example in the following directive we can access an item property which is defined in the scope of the parent controller.
demoApp.directive('directiveUsingParentScope', function () {
    return {
        template: 'Item from parent controller: name = {{item.name}}, category = {{item.category}} '
    };
});
Directive Implementation:
Sorry for the long directive names I used in these examples, these are for demonstration purpose to make it more understandable.
This directive will render the name and category properties of item object defined in parent controller. But the limitation here is that the directive is totally depends on the parent controller and if you place directive some where outside of the scope of parent controller, it will not work as expected.
To make a directive more reusable and removing dependency on the parent scope we can isolate it. For this we have to define scope object in the directive declaration. In following example directive is defined with an empty object assigned to its scope, so this directive is no longer have direct access to the parent scope, and would not render the item's name and category.
demoApp.directive('directiveWithIsolateScope', function () {
    return {
        scope: {},
        template: 'Item from isolate scope: name = {{item.name}}, category = {{item.category}} '
    };
});
Directive Implementation:
But angular provides access to another object named $parent, through which we can access parent scope even inside an isolated directive. See this example:
demoApp.directive('directiveWithIsolateScopeAccessingParent', function () {
    return {
        scope: {},
        template: 'Item from isolate scope accessing parent scope: name = {{$parent.item.name}}, category = {{$parent.item.category}} '
    };
});
Directive Implementation:
This directive scope is isolated and have nothing to interact with outside world, but in the template content we are accessing the item property of the parent controller by using $parent object.

December 1, 2015

AngularJS - Defining Custom Directives - Part II

In last post we have seen how to create a basic custom directive in AngularJS, we have used three properties i.e. restrict, template and transclude. Let explore some more features AngularJS provides while using cutom directives. In this post I will focus on templateUrl and the link function.

Template / TemplateUrl Properties: 
We can define the DOM elements to be replaced through the template or templateUrl properties. We have seen an example for template property in the last post, let try options with templateUrl property. At a fundamental level we can use the template property to define our directives content as inline string. As in example below:
validationApp.directive('directiveWithInlineString', function () {
    return {
        restrict: 'EA',
        template: 'Hello from the Directive-With-Inline-String Template', 
    };
});
Next thing we have is the templateUrl property which gives us more flexibility in writing tempaltes. We can use templateUrl in multiple ways.

First method is write html content in a file placed on server, and put that file's url in templateUrl property. For exmaple create file named 'htmlTemplate1.html' and put the following content and save it.
<h3>My Heading</h3>
<p>Hello from the Directive-With-Url Template</p>
Now we can use this file as directive template by putting file url in templateUrl property.
validationApp.directive('directiveWithUrl', function () {
    return {
        restrict: 'EA',
        templateUrl: 'views/htmlTemplate1.html'        
    };
});
This will look for a file 'htmlTemplate1.html' inside 'views' folder and load it as the content of element that imeplemented this directive.

Second method is to write html content within the script tag, with type = 'text/ng-template' and a unique id for our template.
<script type='text/ng-template' id='key_for_template_in_script_tag'>
     <p>Hello from the Directive-With-Template-Key-In-Script-Tag</p>
</script>
Here I defined id='key_for_template_in_script_tag' to uniquely identity the template, now next thing is use this template and for this we have to simply put this key name in the templateUrl property. As in example below:
validationApp.directive('directiveWithScriptTag', function () {
    return {
        restrict: 'EA',
        templateUrl: 'key_for_template_in_script_tag'
    };
});
Just make sure that you place the directive tempalte first, before its implemenation when loading your page.

Third method is to place the template in the cache object used by Angular called the $templateCache. Same like we defined a unique key to template definition in the script tag, we have to label the template for identification. To place things in $templateChache we have to use run function on the module.
validationApp.run(function ($templateCache) {
    $templateCache.put('key_for_template_in_templatecache', 'Hello from the Directive-With-Template-Key-In-TemplateCache');
});
First argument of put function is the key we want to define for template and second argument is the actual content we want to use. We can implement this template in the same way as we did in script tag method.
validationApp.directive('directiveWithTemplateCache', function () {
    return {
        restrict: 'EA',
        templateUrl: 'key_for_template_in_templatecache',
    };
});
Link function: 
Link function will be used to make DOM elements dynamic. Angular runs a link function for each directive and attach event liseners on the DOM elements, this way we can keep the view and model in sync making it more interactive. Let create a directive with link function to transform text between upper case and lower case with mouse movement.
validationApp.directive('directiveWithLinkFunction', function () {
    return {
        restrict: 'EA',

        link: function ($scope, element, attrs) {

            element.bind('mouseenter', function () {
                element.css('text-transform', 'uppercase');
            });
            element.bind('mouseleave', function () {
                element.css('text-transform', 'lowercase');
            });
        }
    }
});
Inside the link function, we are receiving our DOM element in the parameter 'element' , we can attach events, makes changes or write validation logic etc. In this example we are attaching the CSS class to the element to transform text between upper case and lower case.

That's it, its pretty easy making custom directives with even dynamic behavior. I hope you enjoyed this post and learned something useful. I the next post, I will discuss about the scope options we can use in custom directives.

November 30, 2015

AngularJS - Define a basic Custom Directive

Directives are used to attach a specified behavior to the DOM elements by using event listeners. Behavior can be anything, you want to perform some action on any desired event attached with the element or it can even transform the DOM element itself and/or its children. All this is done by AngularJS's HTML compiler which makes DOM elements interactive, means it does attach the behavior source code with target elements. 

Same as you create controllers and services for application requirements, you can define your own custom directives for specific purposes. Following is the template object showing the available options while creating a custom directive.
var objectTemplate = {
restrict: string,
priority: number,
template: string,
templateUrl: string,
replace: bool,
transclude: bool,
scope: bool or object,
controller: function,
require: string,
link: function,
compile: function
};
Lets start defining a basic custom directive.
var myApp = angular.module('demoApp', []);
myApp.directive('helloWorld', function () {
 return {
  restrict: 'EA',
  template: '
Hellow World! Message from custom directive. And here is the inserted text: .
', transclude: true }; });
Lets review the code segment:
restrict property defines the declaration style of the directive, this can have following options:
E => directive will be declared as element, e.g. <hello-world></hello-world>
A => attribute, e.g. <div hello-world></div>
C => class, e.g. <div class=hellow-world></div>
M => comment, e.g. <!--directive:hellow-world -->

In this example I have only used two options EA, it means we can declare our directive as an element or also can be added as an attribute to another element. So the following two lines will produce the same result.
  • <hello-world></hello-world>
  • <div hello-world>Div own message</div>
You can define the DOM elements to be replaced through the template or templateUrl properties. We can set the template content via a string, and templateUrl will be used if we want the template to be loaded from a file. We just defined our template as '<div>Hellow World! Message from custom directive. And here is the div text: <span ng-transclude></span>.</div>' to put a simple message inside a div.

transclude property allow us to replace or append the content from template with the regular content defined by element. Note that we have placed ng-transclude attribute on span tag and place it inside our template. Now when the page will be requested to load, the AngularJS HTML compiler will replace this span tag with the regular content defined within the element. Like in the following example, we display the number as the div's content alongwith the content defined in template property.

<div ng-repeat='number in [1,2,3,4,5]'>
 <div hello-world>{{number}}</div>
</div>

In this post we learned how to declare a basic custom directive. Hopefully in next post I will try to explain how to add logic in our directive to make it more interactive.


November 21, 2015

Crystal Report not displayed (with Error: bobj is undefined)

Few days back, I encountered a problem with Crystal Reports while hosted in IIS, it was not getting displayed at-all on ASP.Net page. After searching I got fixed with this, here are the 2 steps you might need to follow in case you face the same problem.
  1. Copy aspnet_client\system_web\4_0_30319\crystalreportviewers13 folder to you website's root directory. This would fix the problem in some cases. If not, try also the second point.
  2. There is already defined a section tag <sectionGroup name="crystalReports"> in web.config, here we need to add one more tag for crystal report viewer aso follows:
    <section name="crystalReportViewer" type="System.Configuration.NameValueSectionHandler" />
    
    
    Put the above line just below the <sectionGroup name="crystalReports"> line, before the closing </sectionGroup> tag.

    Somewhere in the last part of web.config, you will find a rptBuildProvider tag like this:
    <rptBuildProvider>
       <add embedRptInResource="true" />
    </rptBuildProvider>
    
    Just below  this tag, you have to add new tag for crystal report viewer to define the path from where it could find its required files.
    <crystalReportViewer>
       <add key="ResourceUri" value="/crystalreportviewers13" />
    </crystalReportViewer>
    
    Here we have defined the path as we have put the crystalreportviewers13 directory in the root of our website. Also you can place it some where else (i.e. in nested directories) if you want, so you have to change the path accordingly in ResourceUri key-value.
Now you can view your crystal report.

November 9, 2015

AngularJS - Form Validation

In this article I will explain how to validate web forms using AngularJS. It provides an easy way to validate data on client side and prevents sending post back to server until we receive correct data according to the defined rules. We can't depend on client side validation to keep our web applications secure, but it provides instant feedback to the user and enhance user experience making our form more interactive.

Validation Directives and Properties

We need to place fields within the form tag and give a name to it. Also, it's important to assign a name to each input field. AngularJS has many directives to provide form validation, following are the available on a classic input field.
Directive Type Description
ng-required boolean Sets the required attribute if set to true
ng-minlength number Sets the minlength validation error key if the value is shorter than minlength.
ng-maxlength number Sets the maxlength validation error key if the value is longer than maxlength.
ng-pattern string Sets pattern validation error key if the ng-model value does not match the regExp in the attribute value.
We can achieve some of these validations through HTML5, but the advantage of using AngularJS directive is that it allows to maintain two-way data binding between model and view.
AngularJS added some properties to form that helps us to validate and provides various information about the current state of input controls and the form. These are:
Boolean: $valid, $invalid, $pristine, $dirty
Object: $error (could be as: { required: false, email:true })
The result can be evaluated through the boolean property $valid. It will be updated based on the validation rules defined for each field by particular directives. If any of these violates the validation rule(s), the result will be false.
The $pristine value by default start with true and becomes false after receiving any input value.
The $dirty flag is just the opposite, it starts with false and becomes true after the first input value is received.

Code Review

We will use a sample demo form to see how validation works in AngularJS. You will see the code listing in Test.html page. I have added the following libraries in head tag for AngularJS and Bootstrap:
<link href="client/assets/css/bootstrap.min.css" rel="stylesheet"></link>
<script src="client/assets/libs/angular.js"></script>
Define ng-app and ng-controller in body tag, to make html page aware of angular framework.
<body ng-app="validationDemoApp" ng-controller="myController">
    <form name="myForm" ng-submit="submitForm(myForm.$valid)" novalidate class="form-horizontal">  
 </form>
</body>
Body tag is using ng-app attribute to our angular application module 'validationDemoApp' and binded to the controller 'myController'. We have placed novalidate attribute to our form tag, it will prevents the HTML5 validation, because we will be validating ourselves. And on submit form, we are calling our javascript function submitForm(myForm.$valid) which accepts a boolean variable passed by form property $valid, within this function we can check this boolean to see if our form data is validated or not according to our defined rules.
Here is the html content for name field:
<div class="form-group">
 <label class="control-label col-sm-2" for="name">Name:</label>
 <div class="col-sm-6">
 
  <input type="text" name="name" placeholder="Name" class="col-lg-6" ng-model="user.name" 
      required ng-minlength="3" ng-maxlength="10" ng-pattern="/^[a-zA-Z0-9]*$/">
      
  <span ng-show="myForm.name.$error.required && isSubmitted" class="help-inline col-lg-offset-1">Please enter name.</span>
  <span ng-show="myForm.name.$error.minlength" class="help-inline col-lg-offset-1">Minimum length should be 3.</span>
  <span ng-show="myForm.name.$error.maxlength" class="help-inline col-lg-offset-1">Maximum length should be 10.</span>
  <span ng-show="myForm.name.$error.pattern" class="help-inline col-lg-offset-1">Please enter only alphanumeric characters.</span>
 </div>
</div>
I have placed each form's field inside a div which has defined the conditional css class as ng-class="{ 'has-error' : myForm.name.$invalid && isSubmitted }", it means apply the css class 'has-error' only if the 'name' property of 'myForm' is 'invalid' and also 'isSubmitted' flag is true. '$invalid' is the forms default property, while 'isSubmitted' is our local variable added to the $scope inside the submit function.
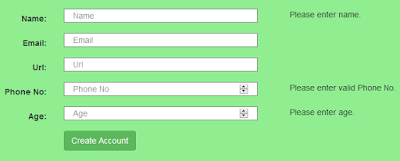
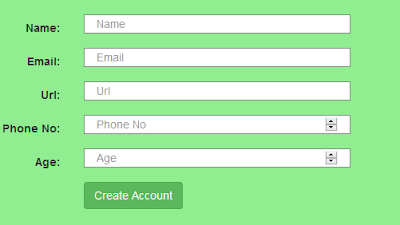
At initial state, you will get the form similar to this with no validation messages:

AngularValidation-New
 Next for the name field, we have defined 3 validation rules as required ng-minlength="3" ng-maxlength="10" which are self-explanatory. ng-pattern="/^[a-zA-Z0-9]*$/" will validate name field to accept only alphanumeric characters. Right after input tag I have placed <span> tags to display error messages with ng-show attribute to show/hide based on validation state.
At first it will display the validation message on screen if 'required' becomes true and also if user try to submit the form. Similarly we can set-up all other fields with different validation rules and different error message defined in <span> tags.
When you click on submit button without making any changes you will see the required validator messages like this:
AngularValidation-Required
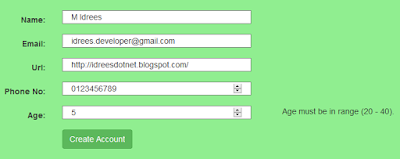
 For Age field, I put the range validation in range 20-40, and for this I have used custom validator(custom angular directive). So if you enter anything outside this range you will get error message like this:
AngularValidation-Custom Validation
 I have added an attribute named 'age-validate', this is not AngularJS default attribute, it is custom defined attribute contains our logic to validate age field. Lets move on to JavaScript code:
   // create angular app module
        var validationApp = angular.module('validationDemoApp', []);

        // create controller
        validationApp.controller('myController', function ($scope) {

            // all validation has passed
            //parameter is passed in form tag on submit, i.e. myForm.$valid
            $scope.submitForm = function (isValid) {
                $scope.isSubmitted = true;

                // check the form is valid
                if (isValid) {
     $('#lblMsg').after('
×Success! Your form is submitted successfully.
'); } }; }); validationApp.directive('ageValidate', function () { return { require: 'ngModel', link: function (scope, elem, attr, ngModel) { ngModel.$parsers.unshift(function (value) { if (value >= 20 && value <= 40) { ngModel.$setValidity('ageValidate', true); } else { ngModel.$setValidity('ageValidate', false); } return value; }); } }; });
First we created application module 'validationApp', then added our controller 'myController'. Inside myController we have defined our 'submitForm' function which will be called when the form submitted successfully after passing all validations.
Then comes the custom validation part (or custom angular directive). Note that for custom directive name 'ageValidate' is define will cameCase. Inside the 'link' function, we actually defined our validation logic. Here I am checking if value is between 20-40 then it is valid age otherwise 'false' will be set-up as being invalidated. ngModel.$setValidity('ageValidate', true) is the ultimate function where you can set the validity falg (true or false) providing the custom directive name.
Note: Keep remember that when we are defining custom directive, we are using camelCase without any dashes or underscores, but when we put this directive in html tags, we have to put dashes(-) in between words like in this example, I placed 'age-validate' attribute to the input tag for 'Age'.
We learned how to validate various types of inputs in AngularJS with built-in directives, as well as how to define our own custom validation rule in Angular way. I hope you enjoyed this article and got something out of it. I appreciate your feedback/comments or any improvements you want to suggest in this topic, to help in making the article better and helpful for others.

October 29, 2015

AngularJS - How to GET and POST data by http methods Get / Post

In this post, we will see how to use http requests in AngularJS. For the scope of this post, I assumed that we have already developed ASP.NET WebAPI, say for Products. So we have a ProductController which have action methods for CRUD operations. Lets see how we call that methods from AngularJS, I am using AngularJS factory method as a service componenet to communicate with server.

For example the following code snippet assumes you have a app module varaible defineds as demoApp, here we are creating a productFactory with a dependency parameter $http which we use to make requests to server.
 
demoApp.factory('productFactory', function ($http) {
}
This is how we create a get request over $http object, we passed a URL to ProductController and calling its Get method, which will return data in json string. We also passed 2 callback functions as parameters, first one is called if the request is successfull and the second will be called if request encountered any error.
$http.get('api/Product/Get').
 success(function (data, status, headers, config) {
  // successfully get json response from server
  console.log("get products list - success");
 }).
 error(function (data, status, headers, config) {
  // log error
  console.log(status);
});
This is how we can create a post request over $http object. First define an object, say config, which will define the request headers or other configuration properties. Here we are passing three parameters to the Post function, first is the URL with Controller's post action method, second is the object we want to pass as parameter/data to that function, third is our configuration object we want to set with this request.
  var config = {
  headers: { 'Content-Type': 'application/json' }
 }

$http.post('api/Product/PostProduct', product, config)
 .then(
  function (response, status, headers, config) {
     //sucessfully posted to server
     console.log('PostProduct success: ' + product.Id);
  },
  function (response, status, headers, config) {         
     //log error
     console.log('PostProduct failed.', response, status, headers);
  }
 );
Similarly following code segment will make a delete http request. Here we are only passing productID as query string parameter to the required URL, i.e. Controller's delete action method will accept an integer variable productID as parameter.
  var params = "productID=" + id;
$http.delete('api/Product/DeleteProduct?' + params)
 .then(
  function (response, status, headers) {
   //sucessfully processed delete request
   console.log('DeleteProduct success: ');
  },
  function (response, status, headers) {
   //log error
   console.log('DeleteProduct failed.', response, status, headers);
  }
 ); 
Hope this post helps you, give an idea how to deal with http methods in AngularJS.

October 24, 2015

No type was found that matches the controller named 'values'.

I created a new project for asp.net-webapi, added a default controller named ValuesController1. When I tried to run and call the controllers action methods I got this error:
No type was found that matches the controller named 'values'.

Even after a whole day spent on googling, I could not find any solution. There are so many post/suggestions to solve this error but no one worked for me. Then I just
tried simply to change the controller's name and it works amazingly.

When a new controller is added, it was like this:
  ValuesController1 : ApiController

I just simply removed "1" from the controller's name, and make it:

  ValuesController : ApiController

And it works in my case.

October 12, 2015

MS SQL Server - Physical folder path using master.dbo.xp_regread

In previous post, we found a way to get the location path to store database files for SQL Server. Another way to find the physical path is master.dbo.xp_regread or master.dbo.xp_instance_regread. You can use these procedures to find the physical path where MS SQL Server stores database files.

xp_regread reads the exact literal registry path you specify, while xp_instance_regread reads(or can transform) the path you specify so that it matches the instance of SQL Server that you're currently using.

Lets see an example:
declare @MasterMdfFile1 nvarchar(512)
exec master.dbo.xp_regread N'HKEY_LOCAL_MACHINE', N'Software\Microsoft\MSSQLServer\MSSQLServer\Parameters', N'SqlArg0', @MasterMdfFile1 output

select @MasterMdfFile1 = substring(@MasterMdfFile1, 3, 255) --removes extra '-d' in-front of path

declare @MasterMdfFile2 nvarchar(512)
exec master.dbo.xp_instance_regread N'HKEY_LOCAL_MACHINE', N'Software\Microsoft\MSSQLServer\MSSQLServer\Parameters', N'SqlArg0', @MasterMdfFile2 output

select @MasterMdfFile2 = substring(@MasterMdfFile2, 3, 255) --removes extra '-d' in-front of path
select @MasterMdfFile1 as MasterMdfFile1, @MasterMdfFile2 as MasterMdfFile2
Sample Output:
MasterMdfFile1    MasterMdfFile2
NULL                             C:\Program Files\Microsoft SQL Server\MSSQL10_50.SQL2008R2SP2\MSSQL\DATA\master.mdf

Here we see that master.dbo.xp_regread returns NULL to @MasterMdfFile1 variable, because it could not find the literal registry path we provided. But master.dbo.xp_instance_regread is showing the result because it converts the path that matches the current instance of SQL Server we are using.

MS SQL Server - Find physical folder path using T-SQL

While deploying my application, I want to make it simplify for user to create / restore / drop databases. So I plan to automate these tasks into script and just provide a simple UI to accomplish these tasks with simple clicks. I need to find out the physical path where my database files are being stored. The following query will give you the physical path to store database's mdf and ldf files for your current SQL Server's instance.
SELECT SUBSTRING(physical_name, 1, CHARINDEX(N'master.mdf', LOWER(physical_name)) - 1) PhysicalPath
FROM master.sys.master_files
WHERE database_id = 1 AND FILE_ID = 1

Sample Output:
C:\Program Files\Microsoft SQL Server\MSSQL10_50.SQL2008MYINSTANCE\MSSQL\DATA\

Here we retrieve the mdf file path for master database, i.e. database_id = 1, and file_id = 1 (file_Id = 2 will give you ldf file path, folder path will be same). Then we extract only the folder path by using substring() function.

September 21, 2015

PowerShell - SessionState

SessionState is an object that reflects the current state of your PowerShell environment. You can find this object in the $ExecutionContext automatic variable:

$executioncontext.SessionState

Drive                         : System.Management.Automation.DriveManagementIntrinsics
Provider                    : System.Management.Automation.CmdletProviderManagementIntrinsics
Path                         : System.Management.Automation.PathIntrinsics
PSVariable                : System.Management.Automation.PSVariableIntrinsics
LanguageMode          : FullLanguage
UseFullLanguageModeInDebugger : False
Scripts                      : {*}
Applications              : {*}
Module                     :
InvokeProvider           : System.Management.Automation.ProviderIntrinsics
InvokeCommand       : System.Management.Automation.CommandInvocationIntrinsics


PSVariable sub-object will retrieve the value of any variable and can also be used to modify variables:
$value = "Test"

Lets retrieve variable contents by using PSVariable:
$executioncontext.SessionState.PSVariable.GetValue("value")
Test

Similarly use Set method to modify variable contents:
$executioncontext.SessionState.PSVariable.Set("value", 100)

$value
100

Remove method will simply remove the variable:
$executioncontext.SessionState.PSVariable.remove("value")
Now if you try to get the contents of variable you will get nothing:
$executioncontext.SessionState.PSVariable.GetValue("value")

You can list down all the available methods in PSVariable object by following cmdlet:
$executioncontext.SessionState.PSVariable | Get-Member -MemberType Methods

Drive subobject lets you manage drives in PowerShell. You could retrieve the current drive by Current property:
$executioncontext.SessionState.Drive.Current

GetAll() lists all available drives and is equivalent to the Get-PSDrive cmdlet:
$executioncontext.SessionState.Drive.GetAll()

September 10, 2015

MS SQL Server - Configure / Send Emails by Database Mail

This post is written by following SQL 2008 R2.

MS SQL Server have the feature to send emails. Let see how we can start using it:

There we have a Stored Prcocedure named msdb.dbo.sp_send_dbmail used to send emails. But if you call this SP straight away like:
EXEC msdb.dbo.sp_send_dbmail  
         @recipients    = 'myID@yahoo.com'
        ,@subject        = 'Test Subject'
        ,@body            = 'Test Body'
        ,@body_format    = 'HTML' 


Enable Database Mail XPs

After running the above stored procedure, you may get this error:
SQL Server blocked access to procedure 'dbo.sp_send_dbmail' of component 'Database Mail XPs' because this component is turned off as part of the security configuration for this server. A system administrator can enable the use of 'Database Mail XPs' by using sp_configure. For more information about enabling 'Database Mail XPs', see "Surface Area Configuration" in SQL Server Books Online.

This is because first you have to configure your server for sending emails. To fix this error, you can connect to SQL Server Instance with System Administrator (SA) Privileges and execute this script to enable:
USE MASTER
GO

--Enable 'Show Advanced Options'
SP_CONFIGURE 'show advanced options', 1
RECONFIGURE WITH OVERRIDE
GO

-- Enable Database Mail XPs Advanced Options in SQL Server */
SP_CONFIGURE 'Database Mail XPs', 1
RECONFIGURE WITH OVERRIDE
GO

--Diable 'Show Advanced Options'
SP_CONFIGURE 'show advanced options', 0
RECONFIGURE WITH OVERRIDE
GO
Now after this if you try to run the same Stored Procedure to send your email, this time you might get this error:
No global profile is configured. Specify a profile name in the @profile_name parameter.

Configure Database Mail Profile Account

If you have not already configured Database Mail Profile Account, follow these steps to create a new one:
  1. Go to SQL Server Object Explorer.
  2. Expand Management Node.
  3. Right click on Database Mail and select Configure Database Mail and proceed with the wizard.
     

    SQL - Database Mail Node

    SQL - Welcome Database Mail Configuration

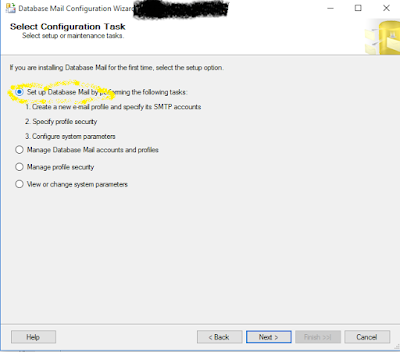
  4. From Select Configuration Task screen, select Set up Database Mail by performing the following tasks.
    SQL - Select Configuration Task
  5. Put your Profile name and Description, and in SMTP accounts grid, select Add to set up a new SMTP account.
  6. A popup box will appear, click on New Account.
    SQL - Mail - New Profile
  7. Now  provide all details for your SMTP account setup. I have setup with my yahoo account. If you use yahoo mail service, you have to provide following details for yahoo:

Server name: smtp.mail.yahoo.com
Port number: 587
And mark the checkbox for Secure Connection (SSL).

       SQL - Mail - Create Account

       Rest of the things you provide your email id with password.
       Click Next and Finish the wizard.

Now you have setup this new SMTP account, then second thing you have to do is to Enable Database Mail XPs as described below.


Configure a Default or Global Database Mail profile

If you have already configured Database Mail Profile Account then you have to follow these steps:
  1. Go to SQL Server Object Explorer.
  2. Expand Management Node.
  3. Right click on Database Mail and select Configure Database Mail and proceed with the wizard.
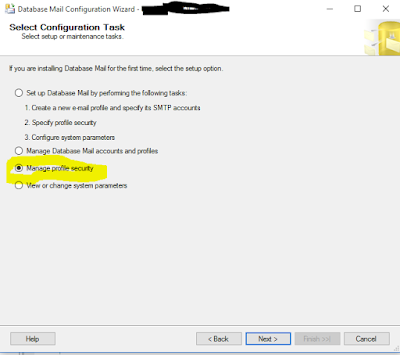
  4. From Select Configuration Task screen, select Manage Profile Secrurity.
    SQL - Database Mail - Manage Security
  5. Now select your desired profile (mark CheckBox as Public) and make it Default Profile by select Yes.
    SQL - Database Mail - Manage Profile Security
  6. Click Next and Finish the wizard.

Now you can send emails from SQL Server.

If you find this post helpful or have any suggestion, please post your valuable comments.

September 9, 2015

AngularJs routing not working

I started learning AngularJS, and faced problem that routing is not getting worked. It only displays my index page and I was unable to display my partial views. Even it was not showing any error message while try to trace using firebug.

These are the points you have to consider if you get stuck with Angular Routes not working:

1- While going to define your config for routing, remember to put 'ngRoute' dependency parameter.
For example if following is your code snippet:
var myApp = angular.module('myApp');
{
    $routeProvider
    .when('/view1',
    {
        controller: 'myController',
        templateUrl: 'view1.html'
    })
    //code goes on...
}

You have to change it by putting 'ngRoute' dependency.
var myApp = angular.module('myApp', ['ngRoute']);
{
    $routeProvider
    .when('/view1',
    {
        controller: 'myController',
        templateUrl: 'view1.html'
    })
    //code goes on...
}
2- You may be started Angular JS demos by referencing angular.js library. Note that for routing get worked, we have to reference another library angular-route.js (http://code.angularjs.org/1.2.13/angular-route.js)

3- It should work now. If still not work, try to run your application by hosting in a webserver. For example try run it through Visual Studio

September 1, 2015

PowerShell - ScriptBlock

The ScriptBlock is a special form of command. It can contains multiple lines of code. It is defined by braces. You can put the call operator to execute a scriptblock: 
& { "Get date: " + (get-date) }

The call operator normally runs only a single commands. With script block you can run multiple lines of instructions since scriptblocks can consist of any number of commands.
& {Get-Process | Where-Object { $_.Name -like 'a*'}}

Similarly you can pass the same sort of command block to Invoke-Expression cmdlet, and you waill get the same results.
Invoke-Expression 'Get-Process | Where-Object { $_.Name -like "a*"}'

Just remember to put code after Invoke-Expression in single quotation marks. If you use double quotation marks, PowerShell will replace all the variable names in the string with the variable contents.

A scriptblock can also uses the param statement to define a parameter. You could easily define your own anonymous scriptblock with arguments. The following scriptblock accepts two parameters and multiplies them:
{ param($value1, $value2) $value1 * $value2 }

To invoke the scriptblock, use the call operator:
& { param($value1, $value2) $value1 * $value2 } 10 5

August 31, 2015

PowerShell - The Call Operator "&"

The call operator "&" is a powerful feature in PowerShell. If you place this operator in front of a string, or a string variable, the string will be interpreted as a command and executed just as if you had input it directly into the console. Let put a command (Dir) in a variable and if you output the contents of the variable, only string will be output:

$myCommand = "Dir"
$
myCommand
Dir

If you type the call operator "&" in front of it, the command will be executed:
& $myCommand

The call operator will not run an entire instruction line but only single command. If you
had also specified arguments for the command, you will get an error:
$myCommand = "Dir C:\"
& $
myCommand

Event if you put an space in command name, you will get same error. For example:
$myCommand = "Dir "
& $
myCommand
 Also generates the error.

Another way to assign a command to a variable is using Get-Command cmdlet, and then use the same call operator to invoke this command.
$myCommand = Get-Command Dir
& $
myCommand

But keep in mind that & $myCommand calls the actual command in $myCommand. You may specify any arguments after it, but you can't put the arguments directly in $command because the call operator always executes only one single command without arguments. So following call will work:
$myCommand = "Dir"
& $
myCommand "c:\"

August 30, 2015

PowerShell - Workflow

Workflow functionality with PowerShell gives you the benefits of automation capabilities.  For example, you need to perform a long-running task that combines multiple steps in a sequence, wrokflows will do the job.

For creating and calling, it is same like a function, lets define our first workflow
workflow Workflow1 {
"My workflow is started"
"Task1 is completed"
"Task2 will take some time - 5 seconds"
Start-Sleep -Seconds 5
"Task3 completed"
"Workflow completed"
}

We can run the workflow just like any other PowerShell function. It looks and acts just like a normal function. Simply call workflow as:
Workflow1

Output of our workflow is:
My workflow is started
Task1 is completed
Task2 will take some time - 5 seconds
Task3 completed
Workflow completed

We can use the PowerShell Get-Command to get details about the workflow we created.
Get-Command Workflow1

Adding -syntax parameter, will display the syntax tempalte for calling workflow.
Workflow1 [<WorkflowCommonParameters>] [<CommonParameters>]

If you have a large no of activities within a workflow, and at some point we want to save a particular state of the workflow. For this we need to simply call this cmdlet within the workflow:
Checkpoint-Workflow

Workflow is an extensive topic in PowerShell. Here I created a simplest workflow just for starting purpose. Hopefully will try to post more on this topic as I get time. If you want to read more on this topic please tell me by your valuable comments, that will help for future posts.

PowerShell - Create / Import / Remove Module

You can write PowerShell script and save in separate file for reuse in different situations. Lets first create the module.

Create a file with extension .psm1, and place a sample function like this:

function Get-TestMessage()
{
    Write-Host("Get-TestMessage function is involed")
}

Now we have a TestModule.psm1 file with one function Get-TestMessage(). Place this module either in one of the PowerShell default module folders that you can query by this special variable $env:PSModulePath. Or also you can place anywhere on your disk, but in this case you have to define the complete file path for the module while importing.

Now, lets create another module, lets say WorkingModule.psm1. Here we want to use a function from the TestModule. We have to import TestModule by this cmdlet:
Import-Module "C:\PATH_TO_YOUR_MODULES_FOLDER\TestModulePSM.psm1"

And now we can simply call our function and it works.
Get-TestMessage

You can find the available functions defined within a module by passing the module name in -module parameter for Get-Command cmdlet.
Get-Command -Module TestModule

In our case it will only return one function.

Once you finished work with a module, you can remove that module by simply call this cmdlet.
Remove-Module TestModulePSM

If this article helps you then please post your valuable comments.

PowerShell - Strings

We can define a literal string surrounded with single quotes and that does not interpret variable expansion or escape characters.
$myString = 'Hello World'

Also we have strings with double quotes called as expanding strings, here PowerShelll expands variable names (such as $myVar) and escape sequences (such as `n) with their values.
$myString = "Hello World"

We have to place two of that string’s quote characters together to add the quote character itself

$myString = "This string includes ""double quotes"" because it combined quote characters."
$myString = 'This string includes ''single quotes'' because it combined quote characters.'

Lets create a variable that holds text with newlines or other explicit formatting.
$myString = @"
This is the first line.
            Now expand it to second line.
    Still continues with string text including new lines and tabs.
"@
$myString


PowerShell uses a backtick (`) character as escape sequences. In this example `n will start a new line.
$myString = "My heading text`n----------------"

Strings dynamically accepts another variable's value.
$myVar = "PowerShell"
$myString = "We are working with $myVar"
$myString
We are working with PowerShell


If you want to prevent PowerShell from interpreting special characters or variable names inside a string. A nonexpanding string uses the single quote character around its text. Now it will not place the variable's content but place the same as we typed.
$myVar = "PowerShell"
$myString = 'I have just defined a variable named $myVar'
$myString

 
You can repeat a string multiple times. Lets say, we want to append "0" to some other value. So for this just put the character inside quotes and multiply it with the number of times you want to repeat. For example, here I want to append ten 0s on the left side with my value "1".
$('0' * 10) + "1"
00000000001


Like we have string.Format() method in C#, we can format our strings in the same way also. We have to use -f after at the end of string quotes, then put the variables we want to set in placeholders. For example:
$var1= "Strings"
$var2= "PowerShell"
$myString = "We are working with {0} in {1}" -f $var1,$var2
$myString


Note that, same like C#, first variable in the sequence will be placed in the first placeholder, second variable in second index and so on.

August 29, 2015

PowerShell - Event Log

You can use the Get-Eventlog cmdlet to access log entries. You can use this cmdlet for two purposes, one is to list the event logs, second you can use it to extract all the events within a specific event log.

-List paramter is used with this cmdlet to list down only event logs.
Get-EventLog -List

If you wanted to get a display of all the entries in the System log, you can just put the log name ('System' in this case) with cmdlet:
Get-EventLog System

But depending on the number of records in the event log, you might get a long scrolling in shell. So its better to use the PowerShell filters. Use Where-Object to pass the information retrieved by Get-Eventlog through the pipeline while allowing only those entries through that meet your criteria. For example the following command will list down all the event in the system events log, that are recorded today.
Get-Eventlog System | Where-Object {($_.TimeWritten).Date -eq (Get-Date).Date}

We also have the -newest parameter. You can simply get only the last x number of events recorded in the log. For example, this command retrieves the last three events written to the System event log:
Get-EventLog System -newest 3

Or you can put the -Format-List parameter for better view:
Get-EventLog System -newest 3 | Format-List

You can use the methods of the .NET framework, to make event entries:
[Diagnostics.EventLog]::WriteEntry("Application","My test event","Information")

To see if this event is successfully recorded, you can check the Event Viewer:
eventvwr.msc

Or you can use the same -newset parameter with cmdlet to view this test event.
Get-EventLog Application -newest 3 | Format-List

PowerShell - Services

PowerShell provides good support for managing windows services. You can list down, start, stop the services from shell. Lets start:

This command will give you the avialable cmdlets for managing services:
Get-Command *service* | Where-Object {$_.CommandType -eq 'cmdlet'}

Get-Service                                                                          
New-Service                                                                          
Restart-Service                                                                      
Resume-Service                                                                       
Set-Service                                                                          
Start-Service                                                                        
Stop-Service                                                                         
Suspend-Service                                                                      

List all services beginning with "sql":
Get-service sql*

This command will give you only running services beginning with "sql":
Get-Service sql* | Where-Object { $_.status -eq 'Running' }

Lets try to start 'SQL Server Browser' service
Get-Service | Where-Object { $_.DisplayName -eq 'SQL Server Browser' } | Start-Service

You need administrator rights to run this command.

In-case you get this error:
SQL Server Browser (SQLBrowser)' cannot be started  due to the following error: Cannot start service SQLBrowser on computer '.'.
Please refer to this post:
http://idreesdotnet.blogspot.com/2015/08/powershell-start-service-service-x.html


All these cmdlets needs you to have administrator rights.
  • New-Service                                                                          
  • Restart-Service                                                                      
  • Resume-Service                                                                       
  • Set-Service                                                                          
  • Start-Service                                                                        
  • Stop-Service                                                                         
  • Suspend-Service                                                                      

PowerShell-Start-Service:Cannot open x service on computer '.'

If you want to start a service through PowerShell you might get this error:

Start-Service YOUR_SERVICE_NAME

Start-Service : Service 'x' cannot be started due to the following error: Cannot open
x service on computer '.'.
At line:1 char:72
+ ... here-Object {$_.DisplayName -eq "x"} | Start-Service
+                                                             ~~~~~~~~~~~~~
    + CategoryInfo          : OpenError: (System.ServiceProcess.ServiceController:ServiceController) [Start-Service],
   ServiceCommandException
    + FullyQualifiedErrorId : CouldNotStartService,Microsoft.PowerShell.Commands.StartServiceCommand

We get this error because we are not running the PowerShell with Administrative privileges. Just right click on PowerShell and then click 'Run as administrator'. You will get your cmdlet worked.

Similarly you might have to do the same thing for following service commands:
  • New-Service   
  • Restart-Service
  • Resume-Service
  • Set-Service   
  • Start-Service 
  • Stop-Service  
  • Suspend-Service

August 27, 2015

PowerShell - Processes

Processes can be controlled directly by the objects and methods of the .NET framework.

You can launch any executable program in a directory named in the PATH environment variable simply by typing its name:

notepad
regedit
explorer

PowerShell can't directly access these processes once they've started. Direct control of a process is only possible if you start the process using the Start() .NET method, which enables you to check whether a process still responds or is terminated. You can also stop running process:
$process = [System.Diagnostics.Process]::Start("notepad")
$process.Responding
True
$process.HasExited
False
$process.Kill()

To view all properties, send the result to a formatting cmdlet like Format-List and append with an asterisk:
Get-Process powershell | Format-List *

If you want to rectreive processes that have been running for less than 60 minutes, you could find them like this:
Get-Process | Where-Object { $_.StartTime -gt (Get-Date).AddMinutes(-60) } | Format-Table

Handles  NPM(K)    PM(K)      WS(K) VM(M)   CPU(s)     Id ProcessName               
-------  ------    -----      ----- -----   ------     -- -----------               
    129      11     4656      11516 ...40     0.06   6416 conhost                   
    161      12     2212      14004 ...29     0.33   6440 InstallAgent              
    128      10     1644      10068 ...54     0.81   8068 notepad                   
    550      30    80468      92368 ...91     1.41   4852 powershell                

If you want to display time elapsed since the process started, then you can add a property to Format-Table with expression like this:

Get-Process | Where-Object { $_.StartTime -gt (Get-Date).AddMinutes(-60) } | Format-Table Name, Id, StartTime, @{expression={ [int](New-TimeSpan $_.StartTime (get-date) ).TotalMinutes }; label="Minutes" } -autosize

Name             Id         StartTime                         Minutes
----                 --          ---------                             -------
conhost          6416    27-Aug-15 2:57:24 PM         5
InstallAgent    6440    27-Aug-15 2:52:34 PM        10
notepad         8068    27-Aug-15 2:57:33 PM          5
powershell     4852    27-Aug-15 2:57:24 PM          5

Since Get-Process is an array you can count the rows easily.
 @(Get-Process notepad).Count

Each Process object contains methods and properties, some of the properties may be read as well as modified, and methods can be executed like commands. For example, you can set the priority of a process. This statement lowers the priority of all Notepads:

Get-Process notepad | ForEach-Object { $_.PriorityClass = "BelowNormal" }

You can stop a process by specifing its name.
Stop-Process -name Notepad

References:
http://powershell.com/cs/blogs/ebookv2/archive/2012/03/24/chapter-17-processes-services-and-event-logs.aspx

PowerShell - Number Conversions

To convert a decimal number to its binary representation, supply a base of 2 to the [Convert]:: ToString() method:

[Convert]::ToString(16, 2)
10000

Similarly for the reverse purpose, to convert a binary number back into its decimal representation, supply a base of 2 to the [Convert]::ToInt32() method:

[Convert]::ToInt32("10000", 2)
16

To convert a decimal number to its octal representation, supply a base of 8 to the [Convert]::ToString() method:

[Convert]::ToString(16, 8)
20

And for the reverse purpose, to convert an octal number back into its decimal representation, supply a base of 8 to the [Convert]::ToInt32() method:

[Convert]::ToInt32("20", 8)
16

To convert a decimal number to its hexa-decimal representation, supply a base of 16 to the [Convert]::ToString() method:

[Convert]::ToString(16, 16)
10

And for the reverse purpose, to convert a hexa-decimal number back into its decimal representation, supply a base of 16 to the [Convert]::ToInt32() method:

[Convert]::ToInt32("10", 16)
16

To directly enter a hexadecimal number, use the 0x prefix:

$hexNumber = 0x1111
$hexNumber

4369

PowerShell - Math

PowerShell supports mathematical tasks primarily through its support for the System.Math class in the .NET Framework.

To explore what methods we have in Math class, lets run this command:
[Math] | Get-Member -Static -MemberType Method

TypeNameNameMemberTypeDefinition
System.MathAbsMethodstatic sbyte Abs(sbyte value), static int16 Abs(int16 value), static int Abs(int value), static long Abs(long value), static float Abs(float value), static double Abs(double value), static decimal Abs(de cimal value)
System.MathAcosMethodstatic double Acos(double d)</ td>
System.MathAsinMethodstatic double Asin(double d)</ td>
System.MathAtanMethodstatic double Atan(double d)</ td>
System.MathAtan2Methodstatic double Atan2(double y, double x)
System.MathBigMulMethodstatic long BigMul(int a, in t b)
System.MathCeilingMethodstatic decimal Ceiling(deci mal d), static double Ceiling(double a)
System.MathCosMethodstatic double Cos(double d)
System.MathCoshMethodstatic double Cosh(double valu e)
System.MathDivRemMethodstatic int DivRem(int a, int b, [ref] int result), static long DivRem(long a, long b, [ref] long result)
System.MathEqualsMethodstatic bool Equals(System.Ob ject objA, System.Object objB)
System.MathExpMethodstatic double Exp(double d)
System.MathFloorMethodstatic decimal Floor(decimal d), static double Floor(double d)
System.MathIEEERemainderMethodstatic double IEEERem ainder(double x, double y)
System.MathLogMethodstatic double Log(double d), st atic double Log(double a, double newBase)
System.MathLog10Methodstatic double Log10(double d)
System.MathMaxMethodstatic sbyte Max(sbyte val1, sb yte val2), static byte Max(byte val1, byte val2), static int16 Max(int16 val1, int16 v al2), static uint16 Max(uint16 val1, uint16 val2), static int Max(int val1, int val2), static uint32 Max(uint32 val1, uint32 val2), static long Max(long val1, long val2), s tatic uint64 Max(uint64 val1, uint64 val2), static float Max(float val1, float val2), static double Max(double val1, double val2), static decimal Max(decimal val1, decimal val2)
System.MathMinMethodstatic sbyte Min(sbyte val1, sb yte val2), static byte Min(byte val1, byte val2), static int16 Min(int16 val1, int16 v al2), static uint16 Min(uint16 val1, uint16 val2), static int Min(int val1, int val2), static uint32 Min(uint32 val1, uint32 val2), static long Min(long val1, long val2), s tatic uint64 Min(uint64 val1, uint64 val2), static float Min(float val1, float val2), static double Min(double val1, double val2), static decimal Min(decimal val1, decimal val2)
System.MathPowMethodstatic double Pow(double x, dou ble y)
System.MathReferenceEqualsMethodstatic bool Referen ceEquals(System.Object objA, System.Object objB)
System.MathRoundMethodstatic double Round(double a) , static double Round(double value, int digits), static double Round(double value, Sys tem.MidpointRounding mode), static double Round(double value, int digits, System.Midpo intRounding mode), static decimal Round(decimal d), static decimal Round(decimal d, in t decimals), static decimal Round(decimal d, System.MidpointRounding mode), static dec imal Round(decimal d, int decimals, System.MidpointRounding mode)
System.MathSignMethodstatic int Sign(sbyte value), static int Sign(int16 value), static int Sign(int value), static int Sign(long value), static int Sign(float value), static int Sign(double value), static int Sign(decimal value)
System.MathSinMethodstatic double Sin(double a)
System.MathSinhMethodstatic double Sinh(double valu e)
System.MathSqrtMethodstatic double Sqrt(double d)</ td>
System.MathTanMethodstatic double Tan(double a)
System.MathTanhMethodstatic double Tanh(double valu e)
System.MathTruncateMethodstatic decimal Truncate(de cimal d), static double Truncate(double d)


And also get properties:
[Math] | Get-Member -Static -MemberType Property

   TypeName: System.Math

Name MemberType Definition            
---- ---------- ----------            
E    Property   static double E {get;}
PI   Property   static double PI {get;}

These methods are as simple to use as it seems. Lets test few methods.

function trunc($number) { [Math]::Truncate($number) }
$result = 3/2
trunc $result
1

Math.Truncate method will converts the decimal number to integral value. We have placed this method in a script block to define our own PowerShell function and then we called it in PowerShell way.

For absolute value of a number, [Math]::Abs() method:
[Math]::Abs(-10.6)
10.6

To find the power of a number, use the [Math]::Pow() method.
[Math]::Pow(5, 2)
25

For Square root of a number, use the [Math]::Sqrt() method:
[Math]::Sqrt(100)
10

To find the sine, cosine, or tangent of an angle (given in radians), use the [Math]::Sin(),
[Math]::Cos(), or [Math]::Tan() method:
[Math]::Sin( [Math]::PI / 2 )
1

Similarly to find the angle of a sine, cosine, or tangent value, use the [Math]::ASin(), [Math]::ACos(), or [Math]::ATan() methods

Use the Measure-Object cmdlet to measure these statistical properties of a list. Just pipe the objects to the Measure-Object cmdlet:
1..10 | Measure-Object -Average -Sum -Maximum -Minimum
Count    : 10
Average  : 5.5
Sum      : 55
Maximum  : 10
Minimum  : 1
Property :

To measure the numeric features of a specific property in a stream of objects, supply that property name to the -Property parameter of the Measure-Object cmdlet. For example, in a directory with files:
Get-ChildItem | Measure-Object -Property Length -Max -Min -Average -Sum
Count    : 16
Average  : 831.25
Sum      : 13300
Maximum  : 2756
Minimum  : 67
Property : Length

References:
Windows PowerShell Cookbook