December 26, 2018

WCF - Increase message size quota for incoming messages.

You may encounter this error message while receving larger resultset from WCF service:

The maximum message size quota for incoming messages (65536) has been exceeded. To increase the quota, use the MaxReceivedMessageSize property on the appropriate binding element.

By default the client application supports the message size 65536. To fix this error you have to increase this default limit.

In App.config or Web.config file of the client application, change/add attributes of the binding tag as below:

 <bindings>
  <basicHttpBinding>
   <binding name="basicHttp" allowCookies="true"
      maxReceivedMessageSize="20000000" 
      maxBufferSize="20000000"
      maxBufferPoolSize="20000000">
    <readerQuotas maxDepth="32" 
      maxArrayLength="200000000"
      maxStringContentLength="200000000"/>
   </binding>
  </basicHttpBinding>
 </bindings>

Here I increased the default value of maxReceivedMessageSize to 20000000.

December 25, 2018

WCF - How to turn on IncludeExceptionDetailInFaults

You may encounter this error message while working with WCF services:

The server was unable to process the request due to an internal error.  For more information about the error, either turn on IncludeExceptionDetailInFaults
 (either from ServiceBehaviorAttribute or from the  configuration behavior) on the server in order to send the exception information back to the client, 
or turn on tracing as per the Microsoft .NET Framework SDK documentation and inspect the server trace logs.

This error message is not showing the real error or exception cause on server side because of security reasons, but instructing to change the configuration in order to receive real exception message, which may be some internal server error.

To fix this error. We have two ways to set this flag's value, either by web.config file or from C# Code.

  1. Open the web.config file of the service. Define a behavior in your web.config file (it may be already defined by default, but with false value. e.g. includeExceptionDetailInFaults="false"). We need to set includeExceptionDetailInFaults="true" in order to include exception details:

    <configuration>
      <system.serviceModel>
        <behaviors>
          <serviceBehaviors>
            <behavior name="debug">
              <serviceDebug includeExceptionDetailInFaults="true" />
            </behavior>
          </serviceBehaviors>
        </behaviors>
        ...
      </system.serviceModel>
    </configuration>
    

    Then apply or attach the behavior to your service:

    <configuration>
      <system.serviceModel>
        ...
        <services>
          <service name="MyServiceName" behaviorConfiguration="debug" />
        </services>
      </system.serviceModel>
    </configuration>
    
  2. You can also set the value of includeExceptionDetailInFaults from C# Code, by using ServiceBehavior attribute on the service's class declaration.

    [ServiceBehavior(IncludeExceptionDetailInFaults = true)]
    public class MyServiceClass:IMyService
    {
     //my service methods...
    }
    

December 20, 2018

The OLE DB provider "OLEDB.12.0" for linked server "(null)"

I was trying to retrieve data from excel in T-SQL using the following statement:

SELECT * FROM OPENROWSET('Microsoft.ACE.OLEDB.12.0', 
    'Excel 12.0;Database=C:\MyPath\MyFile.xlsx;;HDR=YES;IMEX=1', [Sheet1$])

But was receiving the error message.

 Cannot initialize the data source object of OLE DB provider "Microsoft.ACE.OLEDB.12.0" for linked server "(null)".

While searching solution for this error, I have found multiple reasons that leads to differents solutions to fix this issue. Here are the options I have found during my search.

  • Solution 1:

    • Check if the file name is correct/exists?
    • Check if the path/directory name is correct/exists?
  • Solution 2:

    Check if the target file is open, then close it and run your query again.

  • Solution 3:

    Check if you have Microsoft Access Database Engine 2010 installed? If not, you can download it from Microsoft . A system restart may also be helpful.

  • Solution 4:

    Run SSMS as admin.

  • Solution 5:

    Check if the user has rights on SQL Server Service. If not you have to set the proper account/user for this service. Follow these steps:

    • Open the services console by typing Services.msc in the run command.
    • Find the service with name SQL Server(MyInstanceName) (MyInstanceName is the name of your instance), right click on it and click Properties.

      SQL Server Service - Properties
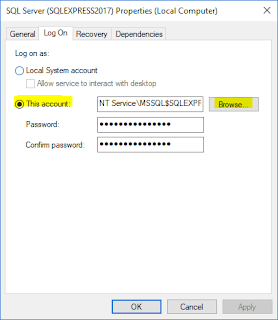
    • In the Properties dialog box, move to Log On tab, against This account: radio option, click the Browse button, a Select User dialog box will appear.

      SQL Server Service - Log On tab
    • In the Select User dialog box, enter the proper user name or you can find from the list by click on Advance button and search for the desired user. Once user is selected, click OK.

      SQL Server Service - Select User tab
    • Then back on the Log On tab, enter the passwords, press Apply, then press OK.

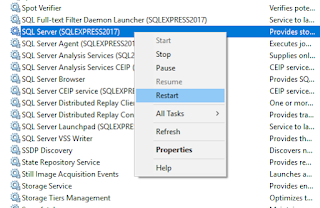
    • Restart the service to make the changes take effect.

      SQL Server Service - Restart

  • Solution 6:

    You have to enable Ad hoc distributed queries:

        Exec sp_configure 'show advanced options', 1;
        RECONFIGURE;
        GO
    
        Exec sp_configure 'Ad Hoc Distributed Queries', 1;
        RECONFIGURE;
        GO
       

  • Solution 7:

    Check the In Process and Dynamic Parameters options for the ACE provider, use following T-SQL command.

        EXEC master.dbo.sp_MSset_oledb_prop N'Microsoft.ACE.OLEDB.12.0'     
         , N'AllowInProcess', 1 
        GO
    
        EXEC master.dbo.sp_MSset_oledb_prop N'Microsoft.ACE.OLEDB.12.0'
         , N'DynamicParameters', 1
        GO
       

  • Solution 8:

    • If you are using select statement with specific columns, make sure the column names are correct. For example in this query:

          SELECT [Col A], [Col B] FROM OPENROWSET('Microsoft.ACE.OLEDB.12.0', 
              'Excel 12.0;Database=C:\MyPath\MyFile.xlsx;;HDR=YES;IMEX=1', [Sheet1$])
        

      Check if [Col A] and [Col B] actually exist in your spreadsheet?

    • Sheet name might be wrong. Do Sheet1(in excel) actually exist in your spreadsheet? Have you appended $ sign with sheet name in your query like [Sheet1$].

  • Solution 9:

    Check if your user have the write access on the Temp folder, e.g.
       C:\Users\MyUser\AppData\Local\Temp (MyUser is your user name)
      
  • Solution 10:

    Check the permissions on the Temp folder located in ServiceProfiles. You have to pick the one based on whether you use a local system account or network domain account.

    For local system account, you have to select:

        C:\Windows\ServiceProfiles\LocalService\AppData\Local\Temp
       

    For network domain accounts, folder is:

        C:\Windows\ServiceProfiles\NetworkService\AppData\Local\Temp
       

    Right click on this folder and give it read write access to the account executing the code.

I tried some of the above solutions to get rid of this error.

If any one has some other solution that helped him solve the issue please share in the comments section below.

References:

December 6, 2018

Directory Junction vs SYMLINK (Symbolic Link)

In the last post Create a Symbolic Link in Windows, we have seen how to create different Symbolic Links, i.e, Hard Link, Directory Symbolic Link and Directory Junction Link. If you have not read the last post I recommend to have a look, it will help you understand better.

In this post we will see how Symbolic Link and Directory Junction fits in different scenarios. At some extent Symbolic Link and Directory Junctions look similar, but they serve different purpose. Here is a list of some of the differences between a junction and a symbolic link.

  • A junction point is designed to target local directories, but a symbolic link can be used for directories and files.
  • A junction can only be linked to a local volume path. Symbolic links can be used to link both local and remote/network path. For example, a symbolic link can link to the network share e.g. \\officenetwork\shared\some-folder.

In windows explorer, the icons displayed for both Symbolic Link and Directory Junction seems identical and you can't differentiate if the created link is a Symbolic Link or a Directory Junction by seeing it. But from the command prompt, you can easily identify the correct type by using DIR command. If you have seen my last post (mentioned above), you may notice that the Directory Junction item will be displayed with <JUNCTION> type in console.

If you try to create a Directory Junction Link to some remote path, it will give you an error message. You have to use Directory Symbolic Link when you need to create a link for remote path. Lets understand this with an example:

Create a Directory Junction Link

In this example, I will create a Directory Symbolic Link to Target remote folder named TestFolder. The directory linked will be created at path C:\SymbolicLink\Network\J_Link.

  • Open the command prompt and go to the path C:\SymbolicLink\Network
  • Run the following command:

       mklink /J "C:\SymbolicLink\Network\J_Link" "\\officenetwork\IT-Developmnet\Idrees\TestFolder"
      

    You will see the error message as follows:

       Local volumes are required to complete the operation.
      
    Directory Junction Link for network path giving error

Create a Directory Symbolic Link

In this example, I will create a Directory Symbolic Link to Target remote folder named TestFolder. The directory linked will be created at path C:\SymbolicLink\Network\J_Link.

  • Open the command prompt and go to the path C:\SymbolicLink\Network
  • Run the following command:

       mklink /D "C:\SymbolicLink\Network\D_Link" "\\officenetwork\IT-Developmnet\Idrees\TestFolder"
      

    You will see the success message as follows:

       symbolic link created for C:\SymbolicLink\Network\D_Link <<===>> \\officenetwork\IT-Developmnet\Idrees\TestFolder
      
    Directory Symbolic Link for network path

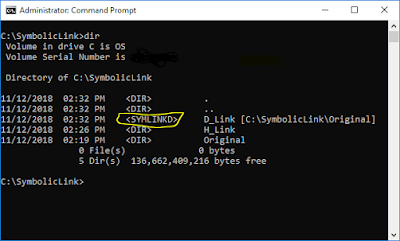
    If you run the DIR command at C:\SymbolicLink\Network, you will see that the newly created directory link will be displayed as <SYMLINKD>.

    Directory Symbolic Link for network path - in command prompt

I hope you find this post helpful. I welcome your suggestions or feedback in the comments section below.

December 3, 2018

Create a Symbolic Link in Windows

Symbolic Link, Soft Link or SymLink referred to the same thing, is a file that is linked to another file or directory, which can be on the same computer or any other on the network. You can create Symbolic Link by using mklink command, which is available since Windows Vista.

Syntax of mklink is:

MKLINK [[/D] | [/H] | [/J]] Link_File_Or_Directory_Path Target_File_Or_Directory_Path

As you can see from the above syntax, mklink allows following 3 switches to create different types of Symbolic Links.

  • /D Directory symbolic link.
  • /H Creates a hard link instead of a symbolic link.
  • /J Directory junction.

The default is a file symbolic link, i.e. if you did not specify and switch than the link created will be File Symbolic Link.

Lets start create each type of link with an example:

First we setup he environment for examples to follow. I created a folder named Symbolic Links at C:/. Inside Symbolic Links folder created another folder named Original, which will be act as Target Folder of symbolic links and contains two files file1.txt and file2.txt.

Create a Hard Link

In this example, I will create a Hard Link to file1.txt which we created inside our Target Folder named Original. The linked file will be created at path C:\SymbolicLink\H_Link.

  • Open the command prompt and go to the path C:\SymbolicLink
  • Create new directory H_Link with the following command

       mkdir H_Link
      
  • Run the following command:

       mklink /H "C:\SymbolicLink\H_Link\file1.txt" "C:\SymbolicLink\Original\file1.txt"
      

    If you get the following error message:

       You do not have sufficient privilege to perform this operation.
      

    Then just restart the command prompt with Administrator Privileges. If you are already running command prompt with Administrator Privileges then you will see the success message as follows:

       Hardlink created for C:\SymbolicLink\H_Link\file1.txt <<===>> C:\SymbolicLink\Original\file1.txt
      

    We have successfully create the Symbolic Link to a file (also know as Hard Link).

Create a Directory Symbolic Link

In this exmaple, I will create a Directory Symbolic Link to Target Folder named Original. The directory linked will be created at path C:\SymbolicLink\D_Link.

  • Open the command prompt and go to the path C:\SymbolicLink
  • Run the following command:

       mklink /D "C:\SymbolicLink\D_Link" "C:\SymbolicLink\Original"
      

    If you get the following error message:

       You do not have sufficient privilege to perform this operation.
      

    Then just restart the command prompt with Administrator Privileges. If you are already running command prompt with Administrator Privileges then you will see the success message as follows:

       symbolic link created for C:\SymbolicLink\D_Link <<===>> C:\SymbolicLink\Original
      

    If you run the DIR command at C:\SymbolicLink, you will see that the newly created directory link will be displayed as .

    Create symbolic links

    In windows explorer, the linked directory will be shown with icon similar to the shortcut icon, like this:

    Create symbolic links

Create a Directory junction

In this exmaple, I will create a Directory Symbolic Link to Target Folder named Original. The directory linked will be created at path C:\SymbolicLink\J_Link.

  • Open the command prompt and go to the path C:\SymbolicLink
  • Run the following command:

       mklink /J "C:\SymbolicLink\J_Link" "C:\SymbolicLink\Original"
      

    You will see the success message as follows:

       Junction created for C:\SymbolicLink\J_Link <<===>> C:\SymbolicLink\Original
      

    If you run the DIR command at C:\SymbolicLink, you will see that the newly created directory link will be displayed as .

    Create symbolic links

    In windows explorer, the linked directory will be shown with the icon similar to Directory Symbolic Link:

    Create symbolic links

It seems like Directory Symbolic Link and Directory junction works in the same way. But there is a difference. I will explain the difference in next post soon.