Showing posts with label ASP DotNet. Show all posts

December 31, 2023

Microsoft.Data.SqlClient.SqlException: The certificate chain was issued by an authority that is not trusted

I faced this error while using the Entity Framework Core with .Net 6.0,

Microsoft.Data.SqlClient.SqlException: 'A connection was successfully established 
with the server, but then an error occurred during the login process. 
(provider: SSL Provider, error: 0 - The certificate chain was issued by an authority
that is not trusted.)'

Breaking change in Microsoft.Data.SqlClient 4.0.0.

I found there is breaking change in Microsoft.Data.SqlClient - 4.0.0 .

Changed Encrypt connection string property to be true by default:
The default value of the Encrypt connection setting has been changed from false to true. 
With the growing use of cloud databases and the need to ensure those connections are secure, 
it's time for this backwards-compatibility-breaking change.

Ensure connections fail when encryption is required:
In scenarios where client encryption libraries were disabled or unavailable, 
it was possible for unencrypted connections to be made when Encrypt was set to true
or the server required encryption.

Solution

The quick-fix is to add Encrypt=False to your connection-strings.

Alongwith Encrypt=False, setting Trusted_Connection=True would also help.

Another workaround if you are using local computer is to set

TrustServerCertificate=True

Please note that, setting TrustServerCertificate=True is not a real fix. The more authentic part of the solution is installing a CA signed certificate.

References:

September 30, 2023

Enable Tag Helper using @tagHelperPrefix

The @tagHelperPrefix directive allows you to specify a tag prefix string to enable Tag Helper support and to make Tag Helper usage explicit.

For example, you could add the following markup to the Views/_ViewImports.cshtml file:

@tagHelperPrefix cst:

This allows you to enable Tag Helper support by using this prefix (cst). Only those elements using the prefix cst, support the Tag Helpers (Tag Helper-enabled elements have a distinctive font/color).

In the code image below, the <label> element have the Tag Helper prefix (cst), so the Tag Helper is enabled for this element. While the <input> element doesn't have Tag Helper prefix (cst), so Tag Helper is not enabled for this element, this is just a regular HTML element.

The same hierarchy rules that apply to @addTagHelper also apply to @tagHelperPrefix.

References:

Related Post(s):

Tag Helper scope with _ViewImports file

  • The _ViewImports.cshtml can be added to any view folder, and the view engine applies the directives from both that file and the Views/_ViewImports.cshtml file.
  • The _ViewImports.cshtml file is additive, If you add an empty Views/Home/_ViewImports.cshtml file for the Home views, there would be no change because it will import all tag helpers from Views/_ViewImports.cshtml file.
  • If you add new tag helpers in Views/Home/_ViewImports.cshtml file for the Home views, it will import all tag helpers from Views/_ViewImports.cshtml file, also it will import all tag helpers from Views/Home/_ViewImports.cshtml file.
  • Any new @addTagHelper directives you add to the Views/Home/_ViewImports.cshtml file (that are not in the default Views/_ViewImports.cshtml file) would expose those Tag Helpers to views only in the Home folder.

References:

Related Post(s):

August 28, 2023

Remove Tag Helpers with @removeTagHelper

Remove Tag Helpers with @removeTagHelper

The @removeTagHelper removes a Tag Helper that was previously added by @addTagHelper.

It has the same two parameters as @addTagHelper:

@removeTagHelper *, MyApplicationTagHelpers

For example, when you want to restrict a specific Tag Helper on a particular view, you can apply the @removeTagHelper to remove the specified Tag Helper.

Using @removeTagHelper in a child folder's _ViewImports.cshtml file (e.g. Views/Folder/_ViewImports.cshtml), it removes the specified Tag Helper from all of the views in that Folder.

Opting out of individual Tags

Instead of removing the Tag Helper from a View, you can also disable a Tag Helper at the element level with the Tag Helper opt-out character ("!").

For example, we can disable the Email validation in the <span> with the Tag Helper opt-out character:

<!span asp-validation-for="Email" class="text-danger"></!span>

In this case, the Tag Helper will be disabled on a single element (<span> in this case), rather than all elements in a View.

The Tag Helper opt-out character must be applied to the both opening and closing tags.

References:

Related Post(s):

Custom Tag Helpers in ASP.NET Core

Tag Helper allows you to add or modify HTML elements from server-side code. In Razor markup, the Tag Helper looks like standard HTML elements. It provides more productive syntax than manually writing the C# Razor markup.

Tag Helpers enable server-side code to participate in creating and rendering HTML elements in Razor files.

(Microsoft Docs - Tag Helpers in ASP.NET Core)

To create a custom Tag Helper, you need to inherit from built-in TagHelper class. For example we have this Tag Helper,

public class StringTagHelper : TagHelper
{
   public override void Process(TagHelperContext context, TagHelperOutput output)
   {
      output.TagName = "span";
      output.TagMode = TagMode.StartTagAndEndTag;

      output.Attributes.Add("data-entity", "customer");

      base.Process(context, output);
   }
}

This Tag Helper will output the span element and add a custom attribute data-entity with value customer.

In the Razor markup, we can use this Tag Helper as:

<string field="CustomerID"></string>

Ofcourse we can add any extra/custom attributes to html tags, these will not interrupt with Tag Helpers.

The browser will render the final output as:

<span field="CustomerID" data-entity="customer"></span>

To use the Tag Helpers in the views, you need to set its scope, usually we define the scope in Views/_ViewImports.cshtml file.

Tag Helpers scope is controlled by a combination of @addTagHelper, @removeTagHelper, and the "!" opt-out character.

To make the required TagHelper avialable for one or more views we use @addTagHelper.

If you create a new ASP.NET Core web app named MyApplicationTagHelpers, the following Views/_ViewImports.cshtml file will be added to your project:

@addTagHelper *, Microsoft.AspNetCore.Mvc.TagHelpers
@addTagHelper *, MyApplicationTagHelpers

Some points for above code:

  • The code above uses the wildcard syntax ("*") to specify that all Tag Helpers in the specified assembly (Microsoft.AspNetCore.Mvc.TagHelpers) will be available to every view file in the Views directory or subdirectory.
  • The first parameter after @addTagHelper specifies the Tag Helpers to load ("*" is used to load all Tag Helpers)
  • The second parameter "Microsoft.AspNetCore.Mvc.TagHelpers" specifies the source assembly from which we want to load the Tag Helpers. It can be current project's assemly or any reference to external library.

References:

Related Post(s):

July 24, 2023

Compile TypeScript code with ASP.NET WebSite Project

In previous posts we have seen how to configure TypeScript code with ASP.NET Core Project and Web Application Project . In this post we will configure the TypeScript in an ASP.NET WebSite Project (.Net Framework).

Suppose we already have an ASP.Net WebSite Project.

Inside Scripts folder, Create a new TypeScript file, say app.ts.

Add the folowing code:

sayHello(name: string) {
	console.log("Hello " + name);
}

As we changed some configurations for TypeScript compiler in the last post, we will do the same here. Select Add New Item, and choose TypeScript Configuration File and use the default name of tsconfig.json. Replace the content in tsconfig.json file with following.

{
  "compilerOptions": {
    "noImplicitAny": false,
    "noEmitOnError": true,
    "removeComments": false,
    "sourceMap": false,
    "target": "ES2015",
    "allowJs": false,
    "inlineSourceMap": true,
    "sourceRoot": "./",
    "outDir": "Scripts",
    "inlineSources": true,
    "lib": [ "es2015", "es2016", "dom", "es2018.promise" ]
  },
  "exclude": [
    "./Scripts/JS"
  ],
  "include": [
    "Scripts/*.ts"
  ],
  "compileOnSave": true
}

The include section above instructs the compiler to compile all typescritps files inside Scripts folder. It will exlude the files for compilation which will be palced inside Scripts/JS folder as mentioned in exclude section above. It also tells the compiler to copy the output js files in Scripts folder (mentioned by outDir key). We need to use the same path when referencing the js file in HTML.

<script src="Scripts/app.js"></script>

Save the changes, and reload the project.

Now we have all setup with TypeScript, we can write TypeScript code and it should work.

Related Post(s):

June 22, 2023

Compile TypeScript code with ASP.NET Web Applicaton Project

In the last post we have seen how to configure TypeScript code with ASP.NET Core Project. In this post we will configure the TypeScript in an ASP.NET Web Applicaton Project (.Net Framework).

Suppose we already have an ASP.Net Web Application Project.

Inside Scripts folder, Create a new TypeScript file, say app.ts.

Add the folowing code:

sayHello(name: string) {
	console.log("Hello " + name);
}

As we changed some configurations for TypeScript compiler in the last post, we will do the same here. Select Add New Item, and choose TypeScript Configuration File and use the default name of tsconfig.json. Replace the content in tsconfig.json file with following.

{
  "compilerOptions": {
    "noImplicitAny": false,
    "noEmitOnError": true,
    "removeComments": false,
    "sourceMap": false,
    "target": "ES2015",
    "allowJs": false,
    "inlineSourceMap": true,
    "sourceRoot": "./",
    "outDir": "Scripts",
    "inlineSources": true,
    "lib": [ "es2015", "es2016", "dom", "es2018.promise" ]
  },
  "exclude": [
    "./Scripts/JS"
  ],
  "compileOnSave": true
}

It will exlude the files for compilation which will be palced inside Scripts/JS folder as mentioned in exclude section above. It also tells the compiler to copy the output js files in Scripts folder (mentioned by outDir key). We need to use the same path when referencing the js file in HTML.

<script src="Scripts/app.js"></script>

Sometimes you might also need to manually add a TypeScript compiler task to your website project. Edit [YourProjectName].csproj file, and add the following <Target> element before the </Project> closing tag:

<Target Name="TypeScriptCompile" BeforeTargets="Build">
  <Exec Command="tsc" />
</Target>

Save the changes, and reload the project.

Now we have all setup with TypeScript, we can write TypeScript code and it should work.

Related Post(s):

October 24, 2022

.NET Core - asp-append-version tag helper

To have better user experience and improve website's performance, modern browsers used to cache the static files like css, js and images. While it helps your website to perform better but it could also lead to serve stale files. If you have made any changes to your css, js or image files, the browsers will keep showing the old images until it refreshes it cache. Sometimes the users have to do a full refresh (Ctrl + F5 or Ctrl + R) for the browser to get latest or fresh content of these files.

In this case we need to tell the browser to get the new files from server to make sure that the user will always be served with latest files without doing full refresh on the browser.

Some ways to acheive this behavior could be:

  1. Every time you make any changes in the file content, also change the file name and its references.
  2. Another way is to add a random string behind the js, css or image url.

Here we will use the second approach to add a random string for these files urls.

The good news is that ASP.NET Core has in-build feature for this issue. We can use the tag helper:

asp-append-version="true" 

To enable this feature ON for particualr static file, we just need to add the above asp-append-version tag-helper/attribute as below.

CSS
<link rel="stylesheet" href="~/css/site.css" asp-append-version="true" />    
JS 
<script src="~/js/site.js" asp-append-version="true"></script>
Image
<img src="~/images/logo.png" asp-append-version="true" />

After making these changes you can check the rendered html from browser source code or inspect element using browser's developer tools. It will be found that there is a random string attached behind file name.

If you make any change within the file content for css/js etc, when the next time browser will render it, it will fetch the fresh file from server because of different random string attached to the file URL.

CSS
https://localhost:7163/css/site.css?v=1Ip96t8Xk8GevF37Kz0Wu_1tuNyEZJcH5PYrmiK1fNs

JS
https://localhost:7163/js/site.js?v=mC13cRUFjf1YiinDRFWfv-eOXac88lLptssglYLhYtQ

You will see a different random string appended each time the changes are made to the file cotent, which makes sure that the browser will fetch the latest copy from server.

September 19, 2022

How to add a custom HTTP header to WCF method call?

I have an environment with SOA architecture spans a number of WCF services. Some of these services need to identity its clients. Based on different client's identity or scope, the service needs to run different conditional code. One way to achieve this functionality is to add a custom http-header in each WCF method call on client side, which will enable WCF service to identity the client for any given request.

In this exmaple, I will add a custom http-header named Client-Id, using custom implemenation of IClientMessageInspector interace.

You need to create two classes

  1. One is CustomHeaderEndpointBehavior to implment IEndpointBehavior interface.
  2. Second is CustomHeaderMessageInspector which implements the IClientMessageInspector interface.

The CustomHeaderEndpointBehavior class will add our custom CustomHeaderMessageInspector to ClientMessageInspectors collection for clientRuntime object.

clientRuntime.ClientMessageInspectors.Add(customHeaderMessageInspector);

In CustomHeaderMessageInspector class, we can add the custom header in BeforeSendRequest() method.

Complete code listing for CustomHeaderMessageInspector class is:

public class CustomHeaderMessageInspector : IClientMessageInspector
{
   private const string CLIENT_ID_HTTP_HEADER = "Client-Id";
   private string _clientId;

   public CustomHeaderMessageInspector(string clientId)
   {
      this._clientId = clientId;
   }

   public void AfterReceiveReply(ref System.ServiceModel.Channels.Message reply, 
                                 object correlationState)
   {

   }

   public object BeforeSendRequest(ref System.ServiceModel.Channels.Message request, 
                                   System.ServiceModel.IClientChannel channel)
   {
      HttpRequestMessageProperty httpRequestMessage;
      object httpRequestMessageObject;
		
      if (request.Properties.TryGetValue(HttpRequestMessageProperty.Name, 
                                         out httpRequestMessageObject))
      {
         httpRequestMessage = httpRequestMessageObject as HttpRequestMessageProperty;
         if (string.IsNullOrEmpty(httpRequestMessage.Headers[CLIENT_ID_HTTP_HEADER]))
         {
            httpRequestMessage.Headers[CLIENT_ID_HTTP_HEADER] = this._clientId;
         }
      }
      else
      {
         httpRequestMessage = new HttpRequestMessageProperty();
         httpRequestMessage.Headers.Add(CLIENT_ID_HTTP_HEADER, this._clientId);
         request.Properties.Add(HttpRequestMessageProperty.Name, httpRequestMessage);
      }

      return request;
   }
}

Code listing for CustomHeaderEndpointBehavior class is:

public class CustomHeaderEndpointBehavior : IEndpointBehavior
{
   private string _clientId;

   public CustomHeaderEndpointBehavior(string clientId)
   {
      this._clientId = clientId;
   }

   public void AddBindingParameters(ServiceEndpoint endpoint, 
               System.ServiceModel.Channels.BindingParameterCollection bindingParameters)
   {

   }

   public void ApplyClientBehavior(ServiceEndpoint endpoint, 
               System.ServiceModel.Dispatcher.ClientRuntime clientRuntime)
   {
      CustomHeaderMessageInspector inspector = new CustomHeaderMessageInspector(this._clientId);

      clientRuntime.ClientMessageInspectors.Add(inspector);
   }

   public void ApplyDispatchBehavior(ServiceEndpoint endpoint, 
               System.ServiceModel.Dispatcher.EndpointDispatcher endpointDispatcher)
   {

   }

   public void Validate(ServiceEndpoint endpoint)
   {

   }
}

When calling the service methods on the client side, you can simply add the custom EndpointBehavior (CustomHeaderEndpointBehavior) on the service client instance object.

ServiceReference1.Service1Client service1Client = new ServiceReference1.Service1Client();

var requestInterceptor = new CustomHeaderEndpointBehavior();
service1Client.Endpoint.EndpointBehaviors.Add(requestInterceptor);

Now you can call any service method, the custom htpp-header will be automatically added to each request.

Related Post(s):

How to trace soap xml from Web Service client?

In this post I will explain how to trace the raw xml for each request and response sent between client/server for Soap/WCF Services.

I found this idea/code from stackoverflow post:

how to trace soap xml as a webservice client in netcore? .

You need to create two classes

  1. One is InspectorBehavior to implment IEndpointBehavior interface.
  2. Second is MyMessageInspector which implements the IClientMessageInspector interface.

The InspectorBehavior class will use the ApplyClientBehavior() method to add the real message inspector by calling Add() method on ClientMessageInspectors collection for clientRuntime object.

clientRuntime.ClientMessageInspectors.Add(myMessageInspector);

Further in MyMessageInspector class, we can retreive and save the Request and Response Xml content in local variables/properties in these two methods.

  • BeforeSendRequest
  • AfterReceiveReply

Complete code listing for MyMessageInspector class is:

public class MyMessageInspector : IClientMessageInspector
{
   public string LastRequestXML { get; private set; }
   public string LastResponseXML { get; private set; }

   public void AfterReceiveReply(ref System.ServiceModel.Channels.Message reply, 
                                 object correlationState)
   {
      LastResponseXML = reply.ToString();
   }

   public object BeforeSendRequest(ref System.ServiceModel.Channels.Message request, 
                                   System.ServiceModel.IClientChannel channel)
   {
      LastRequestXML = request.ToString();
      return request;
   }
}

Code listing for InspectorBehavior class is:

public class InspectorBehavior : IEndpointBehavior
{
   public string LastRequestXML
   {
      get
      {
         return myMessageInspector.LastRequestXML;
      }
   }

   public string LastResponseXML
   {
      get
      {
         return myMessageInspector.LastResponseXML;
      }
   }

   private MyMessageInspector myMessageInspector = new MyMessageInspector();

   public void AddBindingParameters(ServiceEndpoint endpoint, 
               System.ServiceModel.Channels.BindingParameterCollection bindingParameters)
   {

   }

   public void ApplyDispatchBehavior(ServiceEndpoint endpoint, 
               EndpointDispatcher endpointDispatcher)
   {

   }

   public void Validate(ServiceEndpoint endpoint)
   {

   }

   public void ApplyClientBehavior(ServiceEndpoint endpoint, 
               ClientRuntime clientRuntime)
   {
      clientRuntime.ClientMessageInspectors.Add(myMessageInspector);
   }
}

I used the WFC service instance created by Visual Studio template with default two methods GetData() and GetDataUsingDataContract();

When calling the service methods on the client side, you can simply add the custom EndpointBehavior (InspectorBehavior) on the service client instance object.

ServiceReference1.Service1Client service1Client = new ServiceReference1.Service1Client();

var requestInterceptor = new InspectorBehavior();
service1Client.Endpoint.EndpointBehaviors.Add(requestInterceptor);

After service method call, you can get the Request and Response Xml content by requestInterceptor's properties:

string str1 = service1Client.GetDataAsync(1).GetAwaiter().GetResult();
string req1Xml = requestInterceptor.LastRequestXML;
string res1Xml = requestInterceptor.LastResponseXML;

Here is the sample of raw sample I received by above call.

Request

<?xml version="1.0" encoding="utf-16"?>
<s:Envelope xmlns:s="http://schemas.xmlsoap.org/soap/envelope/">
  <s:Header>
    <Action s:mustUnderstand="1" xmlns="http://schemas.microsoft.com/ws/2005/05/addressing/none"
    >http://tempuri.org/IService1/GetData</Action>
  </s:Header>
  <s:Body>
    <GetData xmlns="http://tempuri.org/">
      <value>1</value>
    </GetData>
  </s:Body>
</s:Envelope>

Response

<?xml version="1.0" encoding="utf-16"?>
<s:Envelope xmlns:s="http://schemas.xmlsoap.org/soap/envelope/">
  <s:Header />
  <s:Body>
    <GetDataResponse xmlns="http://tempuri.org/">
      <GetDataResult>You entered: 1</GetDataResult>
    </GetDataResponse>
  </s:Body>
</s:Envelope>

Call the second method, and get the Request and Response Xml content by same properties:

ServiceReference1.CompositeType compositeType = new ServiceReference1.CompositeType();
compositeType.BoolValue = true;
compositeType.StringValue = "some text";

ServiceReference1.CompositeType compositeTypeRes = 
       service1Client.GetDataUsingDataContractAsync(compositeType).GetAwaiter().GetResult();
string req2Xml = requestInterceptor.LastRequestXML;
string res2Xml = requestInterceptor.LastResponseXML;

Here is the sample of raw sample I received by above call.

Request

<?xml version="1.0" encoding="utf-16"?>
<s:Envelope xmlns:s="http://schemas.xmlsoap.org/soap/envelope/">
  <s:Header>
    <Action s:mustUnderstand="1" xmlns="http://schemas.microsoft.com/ws/2005/05/addressing/none"
    >http://tempuri.org/IService1/GetDataUsingDataContract</Action>
  </s:Header>
  <s:Body>
    <GetDataUsingDataContract xmlns="http://tempuri.org/">
      <composite xmlns:d4p1="http://schemas.datacontract.org/2004/07/WcfService1" 
      xmlns:i="http://www.w3.org/2001/XMLSchema-instance">
        <d4p1:BoolValue>true</d4p1:BoolValue>
        <d4p1:StringValue>some text</d4p1:StringValue>
      </composite>
    </GetDataUsingDataContract>
  </s:Body>
</s:Envelope>

Response

<?xml version="1.0" encoding="utf-16"?>
<s:Envelope xmlns:s="http://schemas.xmlsoap.org/soap/envelope/">
  <s:Header />
  <s:Body>
    <GetDataUsingDataContractResponse xmlns="http://tempuri.org/">
      <GetDataUsingDataContractResult xmlns:a="http://schemas.datacontract.org/2004/07/WcfService1" 
      xmlns:i="http://www.w3.org/2001/XMLSchema-instance">
        <a:BoolValue>true</a:BoolValue>
        <a:StringValue>some textSuffix</a:StringValue>
      </GetDataUsingDataContractResult>
    </GetDataUsingDataContractResponse>
  </s:Body>
</s:Envelope>

References:

Related Post(s):

May 19, 2022

Configure IIS for CORS preflight OPTIONS request

To configure IIS to allow an ASP.NET app to receive and handle OPTIONS requests, we have to add the following configuration to the app's web.config file in the system.webServer > handlers section:

<system.webServer>
  <handlers>
    <remove name="ExtensionlessUrlHandler-Integrated-4.0" />
    <remove name="OPTIONSVerbHandler" />
    <add name="ExtensionlessUrlHandler-Integrated-4.0" path="*." verb="*" 
       type="System.Web.Handlers.TransferRequestHandler" 
       preCondition="integratedMode,runtimeVersionv4.0" />
  </handlers>
</system.webServer>

Since the default ExtensionlessUrlHandler-Integrated-4.0 module registration only allows GET, HEAD, POST, and DEBUG requests with extensionless URLs. We will replace this module by first removing it and add with different attribute values to allow OPTIONS requests to reach the app.

After making these configuration changes, if the application still not responding as expected then you need to check the IIS's Request Filtering. It might be the case that IIS disallows OPTIONS verb at the root web application level.

  • Open IIS Manager
  • Click on root application
  • Click on Request Filtering
  • If OPTIONS appears in list, remove that entry and re-add with with Allow Verb... context menu option.

References:

Related Post(s):

How Cross Origin Resource Sharing (CORS) Works

Browser security prevents a web page from making AJAX requests to another domain. This restriction is called the same-origin policy, which preempts a malicious site from reading sensitive data from another site. .

Cross Origin Resource Sharing (CORS) is a W3C standard that allows a server to lighten the same-origin policy. Because sometimes you might want to let other sites call your web API, in this case you have to configure CORS policy as per the requirements, so that the server can accept traffic for pre-defined scenarios and reject the calls otherwise.

You might enable the CORS using [EnableCors] attribute correctly in .Net Web API Project, but still the things don't work as per the expectation. So its important to understand how CORS works.

The CORS specification introduces several new HTTP headers that enable cross-origin requests. If a browser supports CORS, it sets these headers automatically for cross-origin requests; you don't need to do manually in your JavaScript code.

Lets say you are making an AJAX call to the API http://abc.com/api/test, from the website http://localhost:4201. Since the Origin header defines the domain of the source website which is making the request, in this case the Origin is http://localhost:4201

Here is an example of a cross-origin request representation:

(In Raw Format)

Accept: application/json, text/plain, */*
Accept-Encoding: gzip, deflate, br
Accept-Language: en-US,en;q=0.5
Connection: keep-alive
Host: http://abc.com/api/test
Origin: http://localhost:4201
Referer: http://localhost:4201/
User-Agent: Mozilla/5.0 (Windows NT 10.0; Win64; x64; rv:100.0) Gecko/20100101 Firefox/100.0

If the server allows the request, it sets the Access-Control-Allow-Origin response header. The value of this header either matches the Origin header (if the given domain is allowed), or is the wildcard value * (if any origin is allowed).

(In Raw Format)

content-type: application/javascript
content-length: 678
access-control-allow-origin: *
date: Mon, 16 May 2022 09:31:51 GMT

If the response does not include the Access-Control-Allow-Origin header, the AJAX request fails, and the browser disallows the request.

Preflight Requests

For some CORS requests, the browser sends an additional request, called a "preflight request", before it sends the actual request for the resource.

Browser sends the preflight request in certain conditions. Following are conditions in which the browser will not send the preflight request:

  1. The request method is GET, HEAD, or POST
  2. The application sends only these request headers: Accept, Accept-Language, Content-Language, Content-Type, or Last-Event-ID (any other request header will cause the browser to send preflight request).
    • Note that this restriction applies to the headers which the application will add to the request by calling setRequestHeader() method on the XMLHttpRequest object. These request headers are called as author request headers in the CORS specification .
    • The headers set by the browser (like User-Agent, Host, or Content-Length) are excluded from this restriction.
  3. If the Content-Type header is set, its value could only be one of the following (any other value for this header will cause the browser to send preflight request):
    • application/x-www-form-urlencoded
    • multipart/form-data
    • text/plain

Here is an example of a preflight OPTIONS request:

(In Raw Format)

OPTIONS http://abc.com/api/test HTTP/2
Accept: */*
Accept-Encoding: gzip, deflate, br
Accept-Language: en-US,en;q=0.5
Access-Control-Request-Headers: myheader1
Access-Control-Request-Method: GET
Connection: keep-alive
Host: http://abc.com
Origin: http://localhost:4201
Referer: http://localhost:4201/
User-Agent: Mozilla/5.0 (Windows NT 10.0; Win64; x64; rv:100.0) Gecko/20100101 Firefox/100.0

As seen in above example request, the pre-flight request uses the HTTP OPTIONS method. It includes two special headers:

  • Access-Control-Request-Method: The HTTP method that will be used for the actual request (GET method in this above example).
  • Access-Control-Request-Headers: A list of request headers that the application set on the actual request, myheader1 is a custom header set in above example. Note that this does not include headers that the browser sets itself.

Here is an example response, assuming that the server allows the request:

(In Raw Format)

HTTP/1.1 200 OK
Access-Control-Allow-Headers: myheader1
Access-Control-Allow-Origin: *
Content-Length: 0
Date: Mon, 16 May 2022 09:40:05 GMT

The response can include the Access-Control-Allow-Methods header that lists the allowed methods (not listed in above example). The Access-Control-Allow-Headers header lists the allowed headers. If the preflight request succeeds (as in above case), then the browser sends the actual request.

References:

Related Post(s):

April 14, 2021

Download Excel File using AJAX in jQuery

The Excel file can be downloaded as BLOB using jQuery AJAX and XmlHttpRequest (XHR) request. Once the file is successfully sent by the server, it could be downloaded using the Response object inside the Success event handler of jQuery AJAX function.

In this post I will explain the sample code to download the Excel file using AJAX in jQuery.

Lets say the following javascript function DownloadFile is called when user clicked the Download button on the web page. It accepts an arbitrary parameter fileId, you can use any other parameter like filename etc.

Inside the DownloadFile function, you can pass the url(or an accessible file path on server) in the URL parameter of the jQuery AJAX call.

Inside the success callback of AJAX function, we can read and download the target file as byte array from the xhr object. We read the response object as Blob.

function DownloadFile(fileId) {
        $.ajax({
            type: "POST",
            url: "MyController/MyAction",
            data: JSON.stringify({ fileId: fileId }),
            contentType: "application/json; charset=utf-8",
            xhrFields: {
                responseType: 'blob'
            },
            success: function (response, status, xhr) {

                var filename = "";
                var disposition = xhr.getResponseHeader('Content-Disposition');

                if (disposition) {
                    var filenameRegex = /filename[^;=\n]*=((['"]).*?\2|[^;\n]*)/;
                    var matches = filenameRegex.exec(disposition);
                    if (matches !== null && matches[1]) filename = matches[1].replace(/['"]/g, '');
                }
                var linkelem = document.createElement('a');
                try {
                    var blob = new Blob([response], { type: 'application/octet-stream' });

                    if (typeof window.navigator.msSaveBlob !== 'undefined') {
                        //   IE workaround for "HTML7007: One or more blob URLs were revoked by closing the blob for which they were created. These URLs will no longer resolve as the data backing the URL has been freed."
                        window.navigator.msSaveBlob(blob, filename);
                    } else {
                        var URL = window.URL || window.webkitURL;
                        var downloadUrl = URL.createObjectURL(blob);

                        if (filename) {
                            // use HTML5 a[download] attribute to specify filename
                            var a = document.createElement("a");

                            // safari doesn't support this yet
                            if (typeof a.download === 'undefined') {
                                window.location = downloadUrl;
                            } else {
                                a.href = downloadUrl;
                                a.download = filename;
                                document.body.appendChild(a);
                                a.target = "_blank";
                                a.click();
                            }
                        } else {
                            window.location = downloadUrl;
                        }
                    }

                } catch (ex) {
                    console.log(ex);
                }
            },
            failure: function (response) {
                console.log(response.d);
            },
            error: function (response) {
                console.log(response.d);
            }
        });         
    }

You can use the same code to download any binary file, like PDF etc.

Since we are creating html anchor element and simulate click to download file at client. Its good idea to also remove the link once you finished working.

In the following jquery code snippet we are creating anchor element, appending to the body tag and at the end we also removed it.

var a = $("<a />");
a.attr("download", fileName);
a.attr("href", link);
$("body").append(a);
a[0].click();
$("body").remove(a); 

January 29, 2021

Call WCF - Set SecurityProtocol & ServerCertificateValidationCallback

.Net Applications use ServicePointManager.SecurityProtocol Property to specify the version of the Secure Sockets Layer (SSL) or Transport Layer Security (TLS) protocol for new connections, existing connections aren't changed.

It is recommended that you should not specify this property manually and let it be use its default value, which will be obtained from machine configuration. Still In some scenarios, you may want to specifically define the SecurityProtocol when calling a WCF service with Https link. In this case you can define the required protocols like this:

ServicePointManager.SecurityProtocol = SecurityProtocolType.Tls
                   | SecurityProtocolType.Tls11
                   | SecurityProtocolType.Tls12
                   | SecurityProtocolType.Ssl3;

Since these are flags, so you can use bitwise OR(|) operator to specifiy multiple protocols if your connection requires.

Another property is ServerCertificateValidationCallback, which is used by the client to perform custom validation for the server certificate. The sender parameter passed to the RemoteCertificateValidationCallback can be a host string name or an object derived from WebRequest (HttpWebRequest, for example) depending on the CertificatePolicy property.

If you trust the server and not using custom validation, you can simply return true from the callback method.

 
ServicePointManager.ServerCertificateValidationCallback =
             new RemoteCertificateValidationCallback(IgnoreCertificateErrorHandler);

Here is the definition of IgnoreCertificateErrorHandler, which will always return true.

private static bool IgnoreCertificateErrorHandler(object sender,
   X509Certificate certificate, X509Chain chain, SslPolicyErrors sslPolicyErrors)
{​​​​​​​
	return true;
}​​​​​​​

You can also replace the above callback method definition with a short-hand delegate syntax.

ServicePointManager.ServerCertificateValidationCallback += delegate { return true; };

References:

January 23, 2021

When to set ServicePointManager.SecurityProtocol Property

When communicating with external services using TLS/SSL through APIs (such as HttpClient, HttpWebRequest, FTPClient, SmtpClient, SslStream), .Net application uses ServicePointManager.SecurityProtocol Property as the version of the Secure Sockets Layer (SSL) or Transport Layer Security (TLS) protocol for new connections, existing connections aren't changed.

Summary points

  • No default value is listed for this property for .Net Framework versions prior to 4.6.2.
  • Since default protocols and protection levels are changed over time in order to avoid known weaknesses. Therefore defaults vary depending on individual machine configuration, installed software, and applied patches.
  • When developing custom applications, avoid the assumption that a given security level is used by default. Only if you are sure that a particular application connection requires an specific security level (SSL/TLS) then you can explicitly specify the matching level in your code.

Review the following points for TLS support in different .Net Frameworks.

  • Starting with the .NET Framework 4.7, the default value of this property is SecurityProtocolType.SystemDefault. Which means the default security protocols from the operating system (or from any custom configurations performed by a system administrator) will be inherited by .NET Framework's networking APIs based on SslStream (such as FTP, HTTP, and SMTP).
  • For .NET 4.6 and above: Includes a new security feature that blocks insecure cipher and hashing algorithms for connections. TLS 1.2 is supported by default.
  • For .NET 4.5: TLS 1.2 is supported, but it’s not a default protocol. You need set manually. The following code will make TLS 1.2 default, make sure to execute it before making a connection to secured resource:
        ServicePointManager.SecurityProtocol = SecurityProtocolType.Tls12
    
  • For .NET 4.0: TLS 1.2 is not supported, but if you have .NET 4.5 (or above) installed on the system then you still set for TLS 1.2 even if your application framework doesn’t support it. The problem is that SecurityProtocolType in .NET 4.0 doesn’t have an entry for TLS1.2, so you would have to use a numeric value and cast it to SecurityProtocolType enum:
        ServicePointManager.SecurityProtocol = (SecurityProtocolType)3072;
    
  • For .NET 3.5 or below: TLS 1.2 is not supported. Upgrade your application to more recent version of the framework.

References:

HTTP Error 500.19 - Internal Server Error - HRESULT: 0x8007000d

I added URL rewrite section in web.config file in .Net Core 2.2 Application, and it starts generating the error HTTP Error 500.19 - Internal Server Error.

Error Details:

    Server Error in Application "application name"
    HTTP Error 500.19 – Internal Server Error
    HRESULT: 0x8007000d
    Description of HRESULT
    The requested page cannot be accessed because the related configuration data for the page is invalid.

Cause

As per MSDN:

This problem occurs because the ApplicationHost.config or Web.config file contains a malformed XML element.

Resolution

As per MSDN:

Delete the malformed XML element from the ApplicationHost.config or Web.config file.

But since URL rewrite config section is not malformed as these are all valid config xml. In my case I found that URL rewrite module was not installed on the server, so installing the missing module fixed my issue.

You can download URL Rewrite Extension from Official Microsoft IIS Site:

Or use Direct MSI link for winx64

It should start working at this point.

Install .Net Core Hosting Bundle and reset IIS:

If it still not works, try to install / repair the .Net Core Hosting Bundle. e.g You can download version 6.0 from Download .NET 6.0

Finally, reset IIS by running the following command:

iisreset

You need to open the command prompt with Run as administrator option.

References:

December 19, 2020

WCF Proxy generation – using SvcUtil.exe

SvcUtil.exe is the the ServiceModel Metadata Utility tool used to generate service model code from the service URL or wsdl file.

In this example, we will generate client proxy classes by using service URL.

First make sure to have the target service up and running.

After verifying the service status go to Visual Studio Command Prompt and run the following command.

svcutil https://localhost:8081/OrderManagement/OrderManagement.svc /Language=c# 
		/t:Code /out:OrderManagementProxy.cs 
                /config:OrderManagementProxy.config

It contains following parameters:

  • First is the URL of the target service.
  • /Language specifies the output language in which we want to generate code.
  • /t Specifies the output to be generated by the tool, since we are generating proxy code so we will provide the value code.
  • /out Specifies the target file name for the generated code.
  • /config Specifies the filename for the generated configuration file, Default value is output.config

For config file you can also use another parameter /mergeConfig. It merges the generated configuration into an existing file, instead of overwriting the existing file. This will be useful if you provide your regular application's config file in the /config paramter, so in that case you dont want to overwrite that config file but to merge the new changes with existing configuration. For example like this:

svcutil https://localhost:8081/OrderManagement/OrderManagement.svc /Language=c# 
		/t:Code /out:OrderManagementProxy.cs 
                /config:app.config /mergeConfig

You can find the generated output code in the file OrderManagementProxy.cs in the current directory from where you run this command.

References:

Related Post(s):

March 22, 2020

Tuple Compile Error - TupleElementNamesAttribute cannot be found

Problem:

The first time you use tuples in C# Projects, you may encountered this error:

Cannot define a class or member that utilizes tuples because the compiler required type 'System.Runtime.CompilerServices.TupleElementNamesAttribute' cannot be found.

Solution:

All you have to do is install System.ValueTuple nuget package.

From Package Manager Console, run this command:

Install-Package System.ValueTuple -Version 4.5.0

You may want to change the version if required.

Or from Manage NuGet Packages... tab, search for System.ValueTuple and Install.

September 26, 2019

Authentication with ASP.Net Identity

This post will show you how to add ASP.Net Identity support in ASP.Net Webforms application. So it will allow you to enable authentication mechasnism for web requests.

I am using Visual Studio 2017 for this example. Lets create a new website with ASP.NET Web Application (.Net Framework) project template, in the next dialog box select the Empty template, it will make the Change Authentication button disabled.

In this example we will use the default implementation of IdentityUser, UserStore and UserManager classes which comes with EntityFramework package. So we have to install the following packages for this example:

  • Microsoft.AspNet.Identity.EntityFramework

  • Microsoft.AspNet.Identity.Owin
  • Microsoft.Owin.Host.SystemWeb

Add new Web Form named Register with the following content inside the form tag.

 <div style="margin-left:50px;">
  <asp:PlaceHolder runat="server" ID="phRegisterForm">

   <h4>Register</h4>
   <p>Please fill in this form to create an account.</p>
   <hr />
   <p>
    <asp:Label runat="server" ID="lblMsg" />
   </p>

   <label for="email"><b>User Name</b></label>
   <div>
    <asp:TextBox runat="server" ID="UserName" />
   </div>
   <br />
   <label for="psw"><b>Password</b></label>
   <div>
    <asp:TextBox runat="server" ID="Password" TextMode="Password" />
   </div>
   <br />

   <label for="psw-repeat"><b>Repeat Password</b></label>
   <div>
    <asp:TextBox runat="server" ID="ConfirmPassword" TextMode="Password" />
   </div>
   <hr/>

   <asp:Button runat="server" OnClick="CreateUser_Click" Text="Register" />
  </asp:PlaceHolder>
 </div>

In the Register.aspx.cs file, add following code for CreateUser_Click event handler (copied from Microsoft Docs)

protected void CreateUser_Click(object sender, EventArgs e)
      {
         // Default UserStore constructor uses the default connection string named: DefaultConnection
         var userStore = new UserStore();
         var manager = new UserManager(userStore);

         var user = new IdentityUser() { UserName = UserName.Text };
         IdentityResult result = manager.Create(user, Password.Text);

         if (result.Succeeded)
         {
            StatusMessage.Text = string.Format("User {0} was created successfully!", user.UserName);
         }
         else
         {
            lblMsg.Text = result.Errors.FirstOrDefault();
         }
      }

We have setup the Register page markup for user creation. Lets add the database which EntityFramework will use to store user identity data.

First create App_Data folder. Then add for the following connection string tag in web.config file.

  <connectionStrings>
    <add name="DefaultConnection" connectionString="Data Source=(localdb)\MSSQLLocalDB;AttachDbFilename=|DataDirectory|\WebFormsIdentity.mdf;Initial Catalog=WebFormsIdentity;Integrated Security=True" providerName="System.Data.SqlClient" />
   </connectionStrings> 

Since we have used default UserStore constructor, it needs the default connection string named DefaultConnection.

Note that we have only specified the connection string for database WebFormsIdentity.mdf in App_Data folder, but we did not yet created that. The database will be created at runtime by EntityFramework for the Identity entities.

Now you can run the project with start page of Register.aspx, enter user name and password. It will give you the success message.

We have completed the support for creating new users. Lets move to the next part, how to add authentication to login a user. We will use OWIN authentication for which we already have installed the packages Microsoft.AspNet.Identity.Owin and Microsoft.Owin.Host.SystemWeb.

From Microsoft Docs:

ASP.NET Identity uses Microsoft OWIN Authentication middleware for forms authentication. The OWIN Cookie Authentication is a cookie and claims based authentication mechanism that can be used by any framework hosted on OWIN or IIS. The Microsoft.Aspnet.Identity.Owin package contains a set of OWIN extension classes to manage and configure OWIN authentication middleware to be consumed by ASP.NET Identity Core packages. The Microsoft.Owin.Host.SystemWeb package contains an OWIN server that enables OWIN-based applications to run on IIS using the ASP.NET request pipeline. For more information see OWIN Middleware in the IIS integrated pipeline.

First we have to add OWIN startup and authentication configuration.

Right click on the project and click Add New Item, from the item dialog box, select OWIN Startup class, put the name Startup. Replace the content of this file with the following:

 using Microsoft.AspNet.Identity;
 using Microsoft.Owin;
 using Microsoft.Owin.Security.Cookies;
 using Owin;

 [assembly: OwinStartup(typeof(WebFormsIdentity.Startup))]

 namespace WebFormsIdentity // change to your project's namespace
 {
    public class Startup
    {
    public void Configuration(IAppBuilder app)
    {
    // For more information on how to configure your application, visit http://go.microsoft.com/fwlink/?LinkID=316888
    app.UseCookieAuthentication(new CookieAuthenticationOptions
    {
    AuthenticationType = DefaultAuthenticationTypes.ApplicationCookie,
    LoginPath = new PathString("/Login")
    });
    }
    }
 }

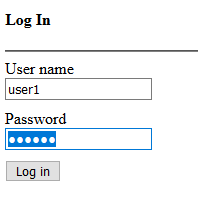
Add new Web Form and name it Login, and replace the html content with the following inside form tag.

 <div>
  <h4>Log In</h4>
  <hr />
  <asp:PlaceHolder runat="server" ID="phLoginStatus" Visible="false">
   <p>
    <asp:Label runat="server" ID="lblStatus" />
   </p>
  </asp:PlaceHolder>
  <asp:PlaceHolder runat="server" ID="phLoginForm" Visible="false">
   <label><b>User Name</b></label>
   <div>
    <asp:TextBox runat="server" ID="UserName" />
   </div>
   <br />

   <label><b>Password</b></label>
   <div>
    <asp:TextBox runat="server" ID="Password" TextMode="Password" />
   </div>
   <br />
   <div>
    <asp:Button runat="server" OnClick="SignIn_Click" Text="Log in" />
   </div>
  </asp:PlaceHolder>
  <asp:PlaceHolder runat="server" ID="phLogoutButton" Visible="false">
   <div>
    <div>
     <asp:Button runat="server" OnClick="SingOut_Click" Text="Log out" />
    </div>
   </div>
  </asp:PlaceHolder>
 </div>

Replace the Login.asps.cs file content with the following:

using Microsoft.AspNet.Identity;
using Microsoft.AspNet.Identity.EntityFramework;
using Microsoft.Owin.Security;
using System;
using System.Web;
using System.Web.UI.WebControls;

namespace WebFormsIdentity // change to your project's namespace
{
    public partial class Login2 : System.Web.UI.Page
    {
        protected void Page_Load(object sender, EventArgs e)
        {
            if (!IsPostBack)
            {
                if (User.Identity.IsAuthenticated)
                {
                    lblStatus.Text = string.Format("Hello {0}!!", User.Identity.GetUserName());
                    phLoginStatus.Visible = true;
                    phLogoutButton.Visible = true;
                }
                else
                {
                    phLoginForm.Visible = true;
                }
            }
        }

        protected void SignIn_Click(object sender, EventArgs e)
        {
            var userStore = new UserStore();
            var userManager = new UserManager(userStore);
            var user = userManager.Find(UserName.Text, Password.Text);

            if (user != null)
            {
                var authenticationManager = HttpContext.Current.GetOwinContext().Authentication;
                var userIdentity = userManager.CreateIdentity(user, DefaultAuthenticationTypes.ApplicationCookie);

                authenticationManager.SignIn(new AuthenticationProperties() { IsPersistent = false }, userIdentity);
                Response.Redirect("~/Login.aspx");
            }
            else
            {
                lblStatus.Text = "Invalid username or password.";
                phLoginStatus.Visible = true;
            }
        }

        protected void SingOut_Click(object sender, EventArgs e)
        {
            var authenticationManager = HttpContext.Current.GetOwinContext().Authentication;
            authenticationManager.SignOut();
            Response.Redirect("~/Login.aspx");
        }
    }
}

In the Page_Load we can check for the status of current user and take action based on its User.Identity.IsAuthenticated property.

Now run the website with Login.aspx set as Start Page. Try login with you user created from Register page. It will give you success and failed response messages based on the credentials you enter.

References:

September 22, 2019

ASP.NET Identity reset password

While learning ASP.NET Identity system, when used in my first ASP.Net Web Forms project I faced the problem how to reset a user's password. I found the following code works for me.

ApplicationDbContext context = new ApplicationDbContext();
UserStore userStore = new UserStore(context);
UserManager userManager = new UserManager(userStore);
String userId = "myuser"; //user name here...
String newPassword = "mypassword"; // password here...
String hashedNewPassword = userManager.PasswordHasher.HashPassword(newPassword);
ApplicationUser curentUser = await userStore.FindByIdAsync(userId);
await userStore.SetPasswordHashAsync(curentUser, hashedNewPassword);
await userStore.UpdateAsync(curentUser);