February 29, 2016

PHP Yii2 Framework - Internationalization

Internationalization enables the web application for greater usability for various languages and regions without re-designing your application specifically for each locale. In this post I will discuss how you can enable web application for internationalization using PHP Yii2 framework. As development environment, I am using XAMPP on windows 10.

To illustrate a demo application, I will add two text labels with language translations, English-Language, Arabic-Language and Urdu-Language.

A sample output of this demo will be like this:

With Arabic-Translator:

yii2-001-i18n-arabic

With Urdu-Translator:

yii2-001-i18n-urdu

With English-Translator:

yii2-001-i18n-english

We have to follow these steps in order to add internationalization to web application.

First add the following, sourceLanguage and configuration array for i18n component, in your web application's configuration.

 'sourceLanguage' => 'en-US',
    
    'i18n' => [
        'translations' => [
            'app*' => [
                'class' => 'yii\i18n\PhpMessageSource',
                'basePath' => 'path\to\your_project\messages',
                'sourceLanguage' => 'en-US',
                'fileMap' => [
                    'app' => 'app.php',
                    'app/error' => 'error.php',
                ],
            ],
        ],
    ],

Where basePath contains the path for messages folder, which contains the config file and all translations for different languages we want to add support for, in our application. For this demo, you can simply create a new folder named messages in your project's root directory, and place that folder path here in basePath key.

I assumed that your application is ready with source language as English, so in next step, we will use the yii's message command to extract all text strings used in the application, and placed in separate files for translations. But before make it work, we have to create a config file which tells the yii framework, what languages we are going to use in application. So open the command prompt, go to your project's root directory and issue the following command.

yii message/config D:\xampp\htdocs\yiidemo\messages\config.php

Here you change the project's path according to your local environment. It will create config.php file in message folder, open this file and find the key 'languages' => ['de'] in the configuration array. Here you can define what languages you want to support in your application, we will define languages here. For this demo, since English is the default language, I have to add two more languages Arabic and Urdu. So I make the following changes:

'languages' => ['ar-SA','ur-PK'],

After defining the languages for yii, next step is to setup different files for specific languages to which you can store translations. For this can easily issue the following command, it will do this job for you.

yii message/extract D:\xampp\htdocs\yiidemo\messages\config.php

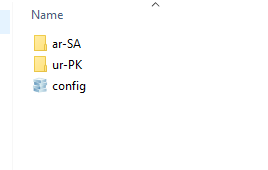
Of-course, you change the project's path according to your local environment. It will create new folder(s) inside messages folder, for each language you defined above. In my project, it looks like this:

yii2-001-i18n-messages folder

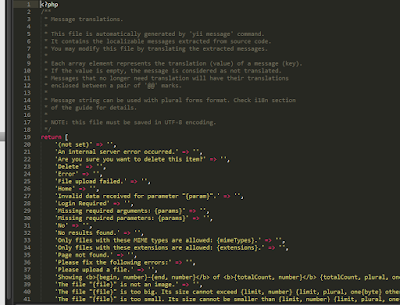
Notice that, since I defined languages as ar-SA and ur-PK, therefore it creates the folders with the same names. In each folder you will see two files app.php and yii.php. Where yii.php contains the default strings, yii is using for different purposes, like error messages, warnings etc. You have to put all your custom strings in app.php. Both files only contains associative arrays with english strings as keys, and in value parts, you have to put your translations for target language. Wherever yii encountered a text string matched in this array, it will simply put the alternative translated message in place of that string.For example, yii.php will be look like this:

yii2-001-i18n-yii-php

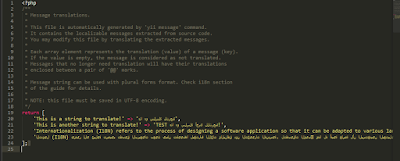
and app.php similar to this:

yii2-001-i18n-app-php

This is the place, you need to provide translated messages to yii framework. As you might noticed above in app.php in ar-SA folder, I added there 3 sample English strings with corresponding Arabic translations.

Now all your translations scheme is setup and is ready to use in project. To use the translated messages in your application, you need to do two things:

First you have to set the current language of the application, so that yii2 framework can translate messages accordingly. Using the following line:

// change target language to Arabic
\Yii::$app->language = 'ar-SA';

Second, wrap every string text that you want to be translated in a call to the Yii::t() method, as follows:

echo \Yii::t('app', 'This is a string to translate!');

Thats it. Now your application can display text messages in the languages you configured and provide translations. You can add more languages and also can add more message translations in associative array of app.php for desired languages.


References:

http://www.yiiframework.com/doc-2.0/guide-tutorial-i18n.html

February 18, 2016

PHP Yii2 Framework - Working with Behaviors

Behaviors are instances of yii\base\Behavior, or of a child class. Behaviors allow you to add functionality to an existing component class without modifying the original class or creating a new derived class. Once we attached the behavior's functions and properties to the component class, we can access those functions and properties on the object of that component class, as if these are regular class functions or properties.

Lets use Behavior in an example. We have a Customer component class, that has a regular public property name.

<?php

namespace app\components;

use yii\base\Component;

class Customer extends Component
{
    public $name = "Muhammad Idrees";
}

And we can access this public name property on $customer object as follows:

 ECHO $customer->name;

Now we need to add a new property to $customer object, but we don't want to modify the contents of original Customer class.

Here comes behaviors. To define a behavior, create a class that extends yii\base\Behavior. So we will create a new class CustomerBehavior with the following implementation.

<?php

namespace app\components;

use yii\base\Behavior;

class CustomerBehavior extends Behavior
{
    public $additionalProperty = "Some default value";

    public function additionalFunction()
    {
        $this->additionalProperty = "value changed";
    }
}

This CustomerBehavior class contains a new property additionalProperty and a new function additionalFunction. But at this moment this is just an empty behavior and has no effect on Customer class. To add this behavior functionality to an object of Customer class, we have to attach this behavior with Customer component.

There are two ways you can attach behavior to a component class:

  1. Static attachment

    To attach a behavior statically, we have to write the override behaviors() method of component class to which we want the behavior is being attached. The behaviors() method will return a list of behavior configurations which may contain a single behavior entry or multiple entries of behavior classes. In this example I used static approach, and attach the CustomerBehavior with override of behaviors() method. So the modified Customer class will become like this:

    <?php
    
    namespace app\components;
    
    use yii\base\Component;
    
    class Customer extends Component
    {
        public $name = "Muhammad Idrees";
    
        public function behaviors()
        {
      //return a list of behavior configurations
            return [
                CustomerBehavior::className()
            ];
        }
    }
    
  2. Dynamic attachment

    To attach a behavior dynamically to a component class, we have to call the yii\base\Component::attachBehavior() method of the component to which we want to attach the behavior. For example, to $customer object, we need to attach our newly defined CustomerBehavior, we have to call the attachBehavior() method as follows:

     // attach a behavior object
     $customer->attachBehavior('CustomerBehavior1', new CustomerBehavior);
    

    If you are using dynamic attachment of behaviors then you don't have to write the override behaviors() method in Customer class, attachBehavior() method will do the job.

Now we have defined desired behavior component, and also attached this behavior to the required component class. Now its time to actually use this behavior. Once a behavior is attached to a component, you can access the public members defined in the behavior through the component object:

 // "additionalProperty" a public property, defined in the CustomerBehavior class
 ECHO $customer->additionalProperty;

You can also call a public method of the behavior in the same way as it is a regular method defined within the original component class:

 // "additionalFunction" is a public function, defined in the CustomerBehavior class
 $customer->additionalFunction();

References:

http://www.yiiframework.com/doc-2.0/guide-concept-behaviors.html

February 11, 2016

PHP Yii2 Framework - Working with Events

An event is a way for a class to provide notifications to clients of that class when some action is occurred in an object to which the client classes may have interest. It provides a useful way for objects to signal state changes to clients of that object. When the event occurs, the handlers functions subscribed to it by its clients are invoked.

You can attach custom code to an event so that when the event is triggered, the code in the handler function gets executed. For example, a mailer object may trigger a messageSent event when it successfully sends a message. If you want to keep track of the messages that are successfully sent, you could then simply attach the tracking code to the messageSent event.

Yii2 provides a base class called yii\base\Component to support events. If you want a custom class needs to trigger events, you have to extend from yii\base\Component base class, or from a its child class.

Referenced from: http://www.yiiframework.com/doc-2.0/guide-concept-events.html

In this post I will demonstrate the events mechanism by developing an example.

Lets create a scenario, we have two classes Customer and Order, and both these classes we need to trigger an event on registration. We add methods RegisterCustomer and RegisterOrder to these classes, and will trigger events EVENT_CUSTOMER_REGISTERED and EVENT_ORDER_REGISTERED respectively. For demonstration purpose I will put a message in a session variable on each event, and for this we need to create a global function that will act as the single handler to events.

yii2-customer-order-trigger-event

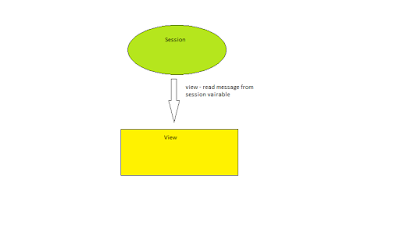
Then we use a separate view for displaying message reading from the session variable to verify if our event is successfully triggered and the handler function has actually placed an event message in session variable.

yii2-event-demo-view-read-message-from-session

I have download the basic project template for http://www.yiiframework.com/download/, and start adding our code to this project already have all things setup to start.

First create a Customer class by extending from yii\base\Component base class. Here is the code listing for Customer.php:

<?php

namespace app\components;

use yii\base\Component;
use yii\base\Event;

class Customer extends Component
{
    const EVENT_CUSTOMER_REGISTERED = 'CUSTOMER_REGISTERED';

    public function RegisterCustomer()
    {
        $this->trigger(self::EVENT_CUSTOMER_REGISTERED);
    }
}

You might noticed that the basic project tempalte folder you downloaded, do not have the components folder by-default, you can simply create this folder in the root directory and save Customer.php file in this folder.

Similary we can create Order.php as follows:

<?php

namespace app\components;

use yii\base\Component;
use yii\base\Event;

class Order extends Component
{
    const EVENT_ORDER_REGISTERED = 'ORDER_REGISTERED';

    public function RegisterOrder()
    {
        $this->trigger(self::EVENT_ORDER_REGISTERED);
    }
}

I created a TestController with Index view as the home page for this demo, providing two buttons to register customer and order.

yii2-events-demo-buttons

Register Customer button will call the actionRegisterCustomer action in TestController. Inside this action method, we create a Customer object, attach our global event handler function on this $customer object by using on function for attaching events. And finally for just demonstrating purpose I manually call RegisterCustomer function on $customer object which will trigger the event EVENT_CUSTOMER_REGISTERED. Then we simply return the render function call with view-message to display a message stored in session variable by global event handler function.

public function actionRegisterCustomer()
    {
        //create customer component object
        $customer = new Customer;

        //first clear session, so our event will set message in this session variable
        setSession('eventMessage', null);
 
        //attach event handler, 'genericEventHandlerFunction' is the name of global function with accepting one argument $event
        $customer->on(Customer::EVENT_CUSTOMER_REGISTERED, 'genericEventHandlerFunction','Customer register event data');
        
        //this function will trigger event
        $customer->RegisterCustomer();  

        //this view will display message generated by event
        return $this->render('view-message');
    }

Similarly the Register Order button will call the actionRegisterOrder action in TestController, and follows the same procedure for function call, attach event handler, event trigger function call, and finally return the same view-message;

public function actionRegisterOrder()
    {
        //create order component object
        $order = new Order;

        //first clear session, so our event will set message in this session variable
        setSession('eventMessage', null);
 
        //attach event handler, 'genericEventHandlerFunction' is the name of global function with accepting one argument $event
        $order->on(Order::EVENT_ORDER_REGISTERED, 'genericEventHandlerFunction','Order register event data');
        
        //this function will trigger event
        $order->RegisterOrder();  

        //this view will display message generated by event
        return $this->render('view-message');
    }

Now add a generic handler function which will store string message in session. Place this function in config\Globals.php file (if this file not already exists, you can create it to place all global functions or variables in one place).

function genericEventHandlerFunction($event)
{
    $msg = 'Event handled with data: ' . $event->data; 
    Yii::$app->session->set('eventMessage', $msg);
}

Finally let come to the view part, in our view-message.php, we extract the message from session and display it in the html.

<div class="alert alert-success"  >  

 <?php echo getSession('eventMessage'); ?>

</div>

It will display the following message when you clicked Register Customer button:

yii2-events-demo-customer-register-event-message

And you will get order registration message on Register Order button click:

yii2-events-demo-order-register-event-message

References:

http://www.yiiframework.com/doc-2.0/guide-concept-events.html

February 6, 2016

PHP Yii2 Framework - How to use JavaScript

In order to use JavaScript with Yii2 framework, we have to register scripts with yii\web\view object. Yii2 provides two methods for it

  • registerJs() for inline scripts
  • registerJsFile() for external script files.

registerJs() for inline scripts

Here is an example to register an inline script.

$script = "function test() {console.log('a meesage logged in console.'); alert('Hello World');}";

$this->registerJs($script, View::POS_END, 'my-options');

Where:

  1. First argument is the script content itself
  2. Second argument determines the place in the page where the script should be inserted, e.g. Head, Begin, End, Load etc.
  3. And the last argument is used to uniquely identify the code block

Here is our test html to call this javascript test() function.

&input type="button" value="Click Me" onclick="test();"\>

registerJsFile() for external script files.

An external JavaScript file can be added with the method registerJsFile().

$this->registerJsFile('http://localhost/yiidemo/js/main.js');

Registering with Asset Bundles

Another way to use JavaScript files in Yii2 framework is by registering it in asset bundles, and is preferred to use asset bundles instead of using JavaScript code/files directly You can use the following syntax to register current view for asset bundle.

\yiidemo\assets\AppAsset::register($this);

With the following javascipt configuration block in AppAsset.php

public $js = [
        '../assets/js/myjs1.js',
    ];

References:

http://www.yiiframework.com/doc-2.0/guide-output-client-scripts.html