December 21, 2017

C# - Using Enumeration types as bit flags

Enumeration allows you to define named integral constants that could be hold by a variable, which can be used in client code to clearly specify the valid values for a variable, because in Visual Studio, IntelliSense lists the defined values. You may have a scenario where you need to hold combination of more than one values, there comes the bit flags. You can use enum type to define bit flags, which allows the enumeration type to store a combination of the values that are defined in the enum list.

You can create bit flags enum by applying the Flags attribute and defining the values by including a named constant with a value of zero that means "no flags are set.", then define remaining items and set the value of each enumeration item to be a power of 2, this enables you to define the combination of more than one values, for example WeekDaysEnum.Friday | WeekDaysEnum.Monday.

Lets start with following enum of week days.

 [Flags]
 public enum WeekDaysEnum : short
 {
  None = 0, //Use None as the name of the flag constant whose value is zero.
  Friday = 1,
  Saturday = 2,
  Sunday = 4,
  Monday = 8,
  Tuesday = 16,
  Wednesday = 32,
  Thursday = 64
 }

In our client code, we can use this enum as:

 private void Test()
 {
  //Initialize with single value 'Friday'
  WeekDaysEnum visitingDays1 = WeekDaysEnum.Friday;
  
  // assign with two flags using bitwise OR.
  WeekDaysEnum visitingDays2 = WeekDaysEnum.Friday | WeekDaysEnum.Monday;
  // Add more flags using bitwise OR.
  visitingDays2 = visitingDays2 | WeekDaysEnum.Thursday;
  
  // Print visitingDays2 variable, it will give you the output : 
  // Selected days are Friday, Monday, Thursday
  // Note that, it will automatically prepare string of comma separated values.
  Console.WriteLine("Selected days are {0}", visitingDays2);
  
  //Similarly you can remove a flag from variable, using bitwise XOR
  visitingDays2 = visitingDays2 ^ WeekDaysEnum.Thursday;
 }

You can use bitwise AND operator to check whether the variable contains a specific flag/value.

 if ((visitingDays2 & WeekDaysEnum.Friday) == WeekDaysEnum.Friday)
 {
  Console.WriteLine("Friday visit is open.");
 }
 else
 {
  Console.WriteLine("Friday visit is not allowed.");
 }

I hope you find this post helpful. You can find more info about the flags attribute and its usage at:

November 26, 2017

C# Winforms - Localized translations using ResourceManager

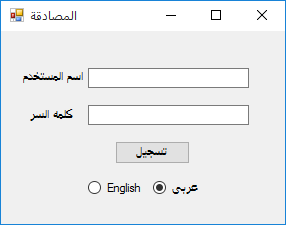
In this post I will explain how to implement localization in Windows Forms Application using ResourceManager class. We will see an example application with Login form, and change the strings/labels with two different locales (in this example I am using English and Arabic locales). So lets start with this sample Login form.

We want to see the form display with English locale similar to the following screenshot

winforms english translations

And with Arabic locale, the form should display similar to this screenshot

winforms arabic translations

First we have to create separate resource files for separate locales (English and Arabic in this example)

Here is the resource file for English locale Messages.en.resx.

resource english strings

And here is the resource file for Arabic locale Messages.ar.resx.

resource arabic strings

Note that the resource file names are ended with .en and .ar and then the actual file extension .resx. Similarly if you want to create resource files for any other language, you have to create separate resource file with correct file name ending with .[locale-name]

In this example I have placed these two resources files in MyResources folder, solution explorer seems like this:

solution explorer resources

We have written the labels translations in resource files. Its time to write real C# code to use these resource files and display the target translated labels on corresponding controls. For this we are using ResourceManager class found in namespace System.Resources.

Lets create a function which accepts the lang argument, and set labels/controls texts with corresponding string translations from resource files by passing the target CultureInfo argument. To get the desired translated string, we are using helper method rm.GetString().

 private void ChangeLang(string lang)
 {
  CultureInfo ci = new CultureInfo(lang);

  System.Resources.ResourceManager rm = new System.Resources.ResourceManager("WindowsFormsApplication1.MyResources.Messages", typeof(Form1).Assembly);
  lblUserName.Text = rm.GetString("UserName", ci);
  lblPassword.Text = rm.GetString("Password", ci);
  btnLogin.Text = rm.GetString("Login", ci);
  rbEnglish.Text = rm.GetString("English", ci);
  rbArabic.Text = rm.GetString("Arabic", ci);
  this.Text = rm.GetString("Authentication", ci);
 }

Note that ResourceManager constructor accepts argument as the complete assembly name, folder, and resource file name concatenating with dots ("WindowsFormsApplication1.MyResources.Messages" in this case).

Now run the application and you should be able to see the login form displaying the strings/translations based on selected locales.

I hope you have found this article helpful, I welcome your comments and suggestions to analyze this technique, and find if there is any better alternative for implementing localization.

October 19, 2017

WCF Service - How to log custom messages using Trace.Write()

In this post I will explain how to write custom logging messages in WCF tracing. I found many articles showing how to enable tracing and can see the default messages when service gets invoked. A good post from MSDN I found is:

https://docs.microsoft.com/en-us/dotnet/framework/wcf/samples/tracing-and-message-logging

It works well and get enabled to view default messages for different WCF methods. But I was facing problem when tried to write custom messages within WCF service.

After searching I found following trick to work for me. This will allow you to write custom messages from coding.

This is how your write log message from C# code using Trace class.

Trace.WriteLine("Custom message goes here...")
// We need to call Flush() method to empty the output buffer for tracing.
Trace.Flush();

Next step is to add a listener in the Listeners Collection to get the receive messages from trace output methods, you can do this adding following lines in your app.config or web.config file.

<configuration>
  <system.diagnostics>
    <trace autoflush="false" indentsize="4">
      <listeners>
        <add name="myListener" type="System.Diagnostics.TextWriterTraceListener" initializeData="C:\Test\WcfTracingExample.log" />
        <remove name="Default" />
      </listeners>
    </trace>
  </system.diagnostics>
</configuration>

I used the path C:\Test\WcfTracingExample.log for log file, you may want to change according to your environment, just make sure that you have write permissions enabled for this directory and file.

You can also use other methods from Trace class apart from Write():

System.Diagnostics.Trace.TraceError("TraceError: GetData");
System.Diagnostics.Trace.TraceInformation("TraceInformation: GetData");
System.Diagnostics.Trace.TraceWarning("TraceWarning: GetData");
System.Diagnostics.Trace.WriteLine("WriteLine: GetData");
// Then call the Flush() method to empty the buffer.
System.Diagnostics.Trace.Flush();

September 17, 2017

SQL Running-Total with reset option

I received this question from one of my colleague and found worth sharing with you. The scenario is that we need to display the running total for amount field which could be done in different ways, as discussed in the post Calculate Running Total. But the requirement slightly differs in this case, because we need to reset running-total field if it encounters any negative value.

Lets start with a simple example.

We have a table @tblItems with some dummy data as follows:

declare @tblItems table(
 ID int identity(1, 1),
 Amount decimal(12, 3),
 RunningTotal decimal(12, 3) default(0)
)

insert into @tblItems(Amount)
values
 (50),
 (20),
 (-100),
 (5),
 (10)
;

Now if you apply the technique Update with Local Variable, as discussed in the post mentioned earlier:

DECLARE @RunningTotal decimal(12, 3) = 0;

UPDATE @tblItems
SET @RunningTotal = RunningTotal = @RunningTotal + Amount
FROM @tblItems;

SELECT ID, Amount, RunningTotal
FROM @tblItems
ORDER BY ID;

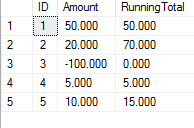
You will get output like this:

running total regular

But the problem is that we need Running Total value as 0 for ID = 3 which in this case is showing -30.

To reset running total value, we can simply add a case statement and return 0 if there is any negative value. So the script will become this:

UPDATE @tblItems
SET @RunningTotal = RunningTotal = case when Amount < 0 then 0 else (@RunningTotal + Amount) end
FROM @tblItems;

And the output will be:

running total with reset

August 13, 2017

HTML5 - Display Arrows for Array Items on Canvas

I received this question from one of my followers, How to Display Data on Canvas. I found this interesting and dedicated some time to work on this requirement. In this post I will explain how did I achieve drawing arrows among array items' positions before and after sorting. Lets start with the same example as posted in this question.

We have the following array along-with a sorting function:

 var selectionSort = function(arr) {
  var j,i;
  var smallest;
  for(j = 0; j < arr.length ; j++)
  {
   smallest = j;
   for(i = j + 1; i < arr.length ; i++)
   {
    if(arr[i] < arr[smallest])
   {
    smallest = i;
   }
   }
  var temp;
  arr[temp] = arr[smallest];
  arr[smallest] = arr[j];
  arr[j] = arr[temp];
 }
 return arr;
 };

 var array = [6,5,4,3,2,1];
 
 array2 = selectionSort(array.slice()).slice();

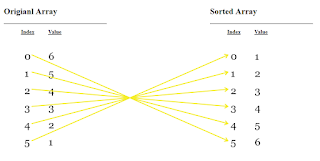
At this point, we have two arrays, array is the original unsorted array and array2 is the final sorted one. And we want to display both arrays on screen with drawing arrows to show the possible movement of items in positions inside the array.

Let first setup our UI to have canvas containers where we want to display array, here is the HTML I used for this example:

 <body>

  <div id="myocontainer" style="width:70%;margin-left:100px;">
   <div style="width:300px;float: left;">
    <h2>Origianl Array</h2>
    <hr/>
    <h4 style="float:left; margin-left:50px;margin-top:5px;"><u>Index</u></h4>
    <h4 style="float:left; margin-left:40px;margin-top:5px;"><u>Value</u></h4>
    <canvas id="cnvTable1" width="100%" height="100%"></canvas>
   </div>
   <div style="width:300px;float:left; margin-left:300px;">
    <h2>Sorted Array</h2>
    <hr/>
    <h4 style="float:left; margin-left:50px;margin-top:5px;"><u>Index</u></h4>
    <h4 style="float:left; margin-left:40px;margin-top:5px;"><u>Value</u></h4>
    <canvas id="cnvTable2"></canvas>
   </div>
  </div>
  
 </body>

To make things simpler I created a class ArrayItem to represent array items by maintaining their index, value and with two helper functions getPosX, getPosY. getPosX, getPosY respectively describes the position of items being drawn on canvas for that particular item. Here is the code for this class:

 function ArrayItem(indx, val) {
   this.index = indx;
   this.value = val;
   
   this.getPosX = function() {
  return 50;
   };
   
   this.getPosY = function() {
  return this.index * 50;
   };
 }

Since we are drawing objects on screen, in order to have better display on screen I have hard-coded values for positionX and relative value for positionY.

Next part is to create temp array of ArrayItem objects for both array and array2.

 var array1Items = [];
 $.each(array, function( index, value ) {
  array1Items.push(new ArrayItem(index, value));
 });
 
 var array2Items = [];
 $.each(array2, function( index, value ) {
  array2Items.push(new ArrayItem(index, value));
 });

Now comes the tricky part how to display array items on canvas. I write this printArray() function to display items on canvas.

 function printArray(arr1, canvasID, offsetX, offsetY)
 {
  var c = document.getElementById(canvasID);
  var ctx = c.getContext("2d");
  c.width  = 800;
  c.height = 1000;

  ctx.font="30px Georgia";
  var tempX = 50;
  var tempY = 50;
  
  $.each(arr1, function( index, value ) {
   tempX = value.getPosX() + offsetX;
   tempY = value.getPosY() + offsetY;
   
   ctx.fillText(index, tempX, tempY);
   ctx.fillText(value.value, tempX + 70, tempY);
  });
 }

It takes following parameters:

  • arr1: the array we need to print
  • canvasID: container, where we have to print array items
  • offsetX: offset of X position, or left margin from the container.
  • offsetY: offset of Y position, or top margin from the container.

Using this function we can print our arrays:

 printArray(array1Items, "cnvTable1", 10, 50);
 printArray(array2Items, "cnvTable2", 10, 50);

Now comes the final part how to draw arrows showing possible movement among array items before and after sorting process. I have used this jQuery plugin Curved Arrow to draw arrows, you can download this js file and add reference to this along-with jQuery.

 $.each(array1Items, function( index, value ) {
  offsetX = 140;
  offsetY = 170;
  
  var newArrayItem = getArrayItemAfterSort(value.value);
  if(newArrayItem != undefined)
  {
   console.log(index  + " - " + value.value + " - " + newArrayItem.index);
   
   $("#myocontainer").curvedArrow({
    p0x: value.getPosX() + offsetX,
    p0y: value.getPosY() + offsetY,
    p1x: value.getPosX() + offsetX,
    p1y: value.getPosY() + offsetY,
    p2x: newArrayItem.getPosX() + 570 + offsetX,
    p2y: newArrayItem.getPosY() + offsetY,
    lineWidth: 3,
    size:10
   });
   
  }
 }); 
 
 function getArrayItemAfterSort(valueToFind)
 {
  var arrayItem = undefined;
  
  for (i = 0; i < array2Items.length; i++) {
   if(array2Items[i].value == valueToFind)
   {
    arrayItem = array2Items[i];
    break;
   }
  }
  
  return arrayItem;
 }

We are done with drawing arrows for array items. Lets try running this code and with the array items used in this example, you will see output similar to this:

array items

Slightly changing the sequence of array items, i.e. var array = [6,4,1,5,2,3]; , you will see output like this:

array items

August 6, 2017

MS SQL Server - Calculate Running Total

In this post we will see different ways to calculate running total using T-SQL. I am using Microsoft SQL SERVER 2008 R2. Let first setup a target table we want to calculate running values. Create a new table (say @tblItems) with the following script.

 declare @tblItems table(
  ID int identity(1, 1),
  Amount decimal(12, 3),
  RunningTotal decimal(12, 3) default(0)
 )

Populate @tblItems table with some dummy records.

 insert into @tblItems(Amount)
 values
  (50),
  (20),
  (100),
  (430),
  (80)
 ;

SELF JOIN

This is the first way we are calculating running total using INNER JOIN.

 SELECT t1.ID, t1.Amount, RunningTotal = SUM(t2.Amount)
 FROM @tblItems AS t1
 INNER JOIN @tblItems AS t2
   ON t1.ID >= t2.ID
 GROUP BY t1.ID, t1.Amount
 ORDER BY t1.ID;

But this technique is not recommended for large tables, because as the table gets larger, each incremental row requires reading n-1 rows in the table. This may lead to failures, timeouts, or low performance.

Update with Local Variable:

 DECLARE @RunningTotal decimal(12, 3) = 0;

 UPDATE @tblItems
 SET @RunningTotal = RunningTotal = @RunningTotal + Amount
 FROM @tblItems;

 SELECT ID, Amount, RunningTotal
 FROM @tblItems
 ORDER BY ID;

This method is more efficient than the above, but since the behavior is not properly documented, there are no guarantees about order.

Nested / Sub-Query

 SELECT ID, Amount,
  (SELECT SUM(amount) 
   FROM @tblItems t2 WHERE t2.ID <= t1.ID
          ) 
  as RunningTotal 
    
 FROM @tblItems as t1

This method performs similar to self join technique, as the table gets larger, this may lead to failures, timeouts, or low performance.

OVER Clause (For SQL Server 2012 or above)

New window functions introduced in SQL Server 2012 make this task a lot easier.

 SELECT ID, Amount, 
   SUM(Amount) OVER (ORDER BY ID) as RunningTotal 
 FROM @tblItems 

It performs better than all of the above techniques.

July 26, 2017

AngularJS - ng-change is not working for input type file

In this post I will share the code how to detect the change event for HTML file input. We are supporting an old application written with AngularJS, and encountered this problem. If you are using default ng-change attribute, it will not work in AngularJS because of no binding support for file input control. I will show you I solved this problem in my case. I made a custom directive to listen for file input changes which enables us to invoke the custom event handler function. Lets start coding this solution:

Here is the custom directive fileOnChange definition:

 myApp.directive('fileOnChange', function () {
  return {
   restrict: 'A',
   link: function (scope, element, attrs) {
    var onChangeHandler = scope.$eval(attrs.fileOnChange);
    element.bind('change', onChangeHandler);
   }
  };
 });

Here is the HTML for file input showing how to bind this directive to listen for file changes.

 <input type="file" file-on-change="onFileChange"> </input>

Now the final part of this task, write the handler function to do the actual work required on file change. Within the target controller, I write this handler function, in this example it is only showing the selected file name in alert box.

 $scope.onFileChange = function (event) {
  var filename = event.target.files[0].name;
  alert('File name: ' + filename);
 };

July 6, 2017

How to remove all comment tags from XmlDocument

In this post I will share C# code to remove comments from XML string or file. I am using XMl file in this example: I found two possible ways to achieve this.

Lets say we need a function named RemoveCommentsFromXMLFile(string sourceFilePath, string destinationFilePath), which reads xml from source file and then save a copy of same xml content to destination file after removing comments.

  • Remove comments from XML content before loading from a source.

    public static void RemoveCommentsFromConfigFile(string sourceFilePath, string destinationFilePath)
    {
     XmlReaderSettings readerSettings = new XmlReaderSettings();
     readerSettings.IgnoreComments = true; //set this flag in readsettings to read xml without comments.
    
     XmlReader reader = XmlReader.Create(sourceFilePath, readerSettings);
    
     XmlDocument xmlDoc = new XmlDocument();
     xmlDoc.Load(reader);
     reader.Close();
     xmlDoc.Save(destinationFilePath);
    }
    
  • Remove comments from XML content after loading from a source.

    public static void RemoveCommentsFromConfigFile(string sourceFilePath, string destinationFilePath)
    {
     System.Xml.XmlDocument xmlDoc = new System.Xml.XmlDocument();
     xmlDoc.Load(sourceFilePath);
    
     System.Xml.XmlNodeList list = xmlDoc.SelectNodes("//comment()");
    
     foreach (System.Xml.XmlNode node in list)
     {
      node.ParentNode.RemoveChild(node);
     }
    
     xmlDoc.Save(destinationFilePath);
    }
    

June 12, 2017

Open New Window from Server Side in ASP.Net using C#

Here Is the question I received from one of my colleagues, how to open new page from server side in a new window. There could be two possible ways to get it work.

  • First option is to add javascript code to the button's OnClientClick handler. But this handler should be attached before the control is rendered, let's say in button's OnPreRender event.

    protected void MyButton_OnPreRender(object sender, EventArgs e)
    {
        string newPageUrl = "NewPage.aspx";
        MyButton.OnClientClick = "window.open('" + newPageUrl + "'); return false;";
    }
    

    This technique would not let the request post back to the server, so it could save this round-trip.

  • Second option could be use of Response.Write() method on regular button click event.

       Response.Write("<script>window.open('http://www.google.com.hk/','_blank');</script>"); 
    

    This would send a post back to the server, but the advantage to this method could be that it will allow you write code on button click you may want to execute before opening a new window.

June 5, 2017

C# - Delete files older than N number of Days/Months

In this post, I will share C# code to delete files from specific directory, with the condition that only files which are older than N number of Days or Month or any other time unit. Why I come to this code because recently we faced this problem because of not deleting the older files.

I was working on a small utility program to automate repeated tasks, one of which is to take daily backups for my project's database. This was done before, but after some time we faced this problem because we were running out of space, it happens for the reason that we have lot of backup files generated and no one is going to delete older files which are of no-use. The best solution come to my mind is to modify the program code to delete older files by it-self.

Here is the C# code for this task.

string[] files = Directory.GetFiles(directoryPath);

foreach (string file in files)
{
   FileInfo fi = new FileInfo(file);
   
   if (fi.LastAccessTime < DateTime.Now.AddMonths(-1))
   {
       fi.Delete();   
   }
}

Obviously you can change DateTime.Now.AddMonths method to AddDays, AddHours or other units according to your requirements.

May 25, 2017

How to generate script for multiple objects using SSMS

In this post, I will explain how to script multiple objects using SQL Server Management Studio. You may be aware of generating script by right clicking on specific object (Table / Stored Procedure / Function / View etc), or also you may generate scripts by right clicking on the database node, select Tasks, and then click on Generate Scripts... option. In this second option you can generate script for all objects or for some selected objects with advanced scripting options.

But in this post I will explain a short trick to generate script for multiple objects without going through the Generate Scripts... wizard. Obviously it will not provide other advanced options that we can have while using the Generate Script wizard, but it will let you create script for Create / Drop scenarios.

Following are the steps required to generate script for multiple objects, here I am considering generate Create script for selected tables.

  • Within SQL Server Management Studio, select your database.
  • Since I am going to generate script for tables, so I selected the Tables node, you may want to select Stored Procedures, Functions or Views etc.
  • On the right hand side you may see Object Explorer Details view, if not, you can make it visible from menu View > Object Explorer Details, or simply you can hit F7 shortcut key.
  • In details view, select the required objects.
  • Right click on the selected objects > Script Table as > Create To > New Query Editor Window (or other option)

    SQL SERVER - Table details view

April 13, 2017

IIS - How to add Module Mapping for PHP

In this post, I will explain how to enable IIS for hosting PHP websites by Add Module Mapping for PHP files.

Following are the steps required to add module mapping.

  • Open the IIS Manager, from the Connections panel on the left, click on the hostname of your server.
  • Double-click on the Handler Mappings option.

    IIS default website
  • On right side of the Handler Mappings screen, from Actions panel, click on Add Module Mapping.

    IIS actions add module mapping
  • Type the following information into the appropriate text boxes, and then click OK.

    • Request path: *.php
    • Module: FastCGImodule
    • Executable: C:\php\php-cgi.exe
    • Name: PHP_via_FastCGI

    IIS actions add module mapping dialog
  • On the confirmation dialog for creating FastCGI Application, Click Yes.

    IIS actions add module mapping confirmation dialog

Now, your IIS should enable to host PHP files. IIS has to be restarted to make new changes in effect.

March 26, 2017

How to Install Laravel framework on Windows with XAMPP

In this post, I will explain how to install Laravel framework on Windows, with XAMPP as PHP development environment.

First you have to install XAMPP you can find here: XAMPP Installer

You can install Laravel framework by using Composer. You can download composer from https://getcomposer.org/download/. Composer setup will ask for PHP installation path, in my XAMPP installation it is:

D:\xampp\php\php.exe

You can verify if composer is correctly installed, by executing the command composer in command prompt. If you get an error message, it means it is not added in the Environment Variables, so you have to add the composer.exe folder path in Environment Variables.

composer console

In-case if you have already have installed composer, its better to update it-self to the latest version before moving forward. Run the following command to update composer it-self.

composer self-update

Here we finished installing composer, and now we have to install Laravel. Move to a web-accessible folder, the folder where we usually place all web projects. In my XAMPP installation it is D:\xampp\htdocs

Now go to command prompt, move to the above mentioned web-accessible folder, and execute following command:

composer create-project --prefer-dist laravel/laravel myweb

composer console - install laravel

It will install Laravel framework to a folder named myweb inside the htdocs folder, you can use your own project name in place of myweb (last part in the above command). Then composer will download and configure all the required dependencies, and finally your Laravel basic application is now ready.

If you have PHP installed locally with XAMPP and you may use PHP's built-in development server to serve your application. To make our development envrionment to server this website we have to use the artisan command. This command will start a development server.

You can try access it by localhost path:

http://localhost:8000

You should see the following home page for Laravel in your browser.

laravel welcome page

And it's done. We have successfully installed Laravel framework on our machine.

References

https://laravel.com/docs

February 22, 2017

Power BI Desktop - Error: The user was not authorized

In this post, I am sharing a solution for a problem I faced while I started using Power BI. When you try to connect with SQL Server as Data Source, you may encounter this error message:

The user was not authorized

And it will not let you proceed.

There could be two possibilities for this problem you can try and fix it. First of all, of-course check if the user credentials are correct for login purpose. In my case, I am using a user name which letting me login to my SQL Server successfully, but when I try to connect through Power BI by same user name, it starts giving me the above error message.

Here is how I fixed it.

Solution 1:

  • Go to SQLSERVERNAME > Security > Logins > select you desired user name

  • Right click on selected user, select Properties, and go to Server Roles page.

    sql login server - roles page

  • Assign sysadmin role by setting the checkbox as true.

  • Click OK.

Now if you try login from Power BI desktop client, it should login successfully.

Just in cause, if it still not logged-in, you may try this second option. I don't know the real reason for this behavior but I found on internet while searching for my problem and find this workaround, so I am sharing it here if it may help someone facing similar problem.

Solution 2:

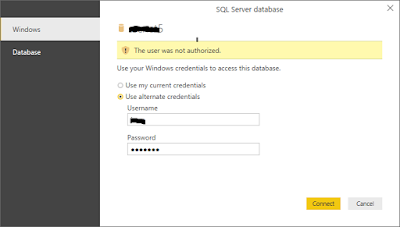
Your log-in screen may be similar to this:

user was not authenticated

Note that here Windows tab is selected and providing two options as Use my current credentials and Use alternate credentials. You might have tried both and it did not worked.

The trick is that, just use the second tab below Windows, named Database. Similar to this:

user was not authenticated database page

Put your user name and password in this tab, and it should work now.

I hope you find this post helpful. I would be happy to receive your thoughts about this, if you have encountered similar problem and fixed it. In case if you have tried some other option, please just mention in the comments below and I will add in this post so others people could get benefit.

February 9, 2017

Cannot open backup device. Operating System error 5

I created small utility program for different routine tasks to run on different schedules, one of which is to take database backup to a local folder, and it was working fine. To have access it across network for selected users, and making it available for copy/move to other backup devices, we shared this folder on network. This was the moment I start getting this error in utility error log. In this post I will show the trick I used to solve this problem in our case. First let me share the script I used to take backups, here it is:

BACKUP DATABASE MyDatabaseName
TO DISK = 'D:\DBBackups\mydb-datetimestamp.Bak'  
 

After sharing the folder on network for specific users, it started generating the following error message:

    Msg 3201, Level 16, State 1, Line 1
    Cannot open backup device 'D:\DBBackups\mydb-datetimestamp.Bak'. Operating system error 5(Access is denied.).

    Msg 3013, Level 16, State 1, Line 1
    BACKUP DATABASE is terminating abnormally.

Solution

  • Open Windows Services Screen. (Start > Administration > Services)
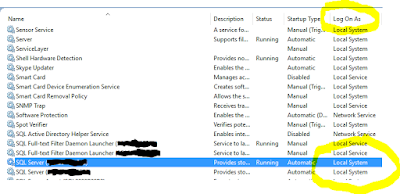
  • Find the Service in the list with name SQL Server (MSSQLSERVER), check for the Log On As column (if it doesn't already exist in the list, you can add it from the View menu > Add / Remove Columns...).

    sql backup OS error 5

    The name of the account you see in Log on As column, is the account you need to give permissions to the directory where you want to place backups.

  • Right click on the folder. Go to > Properties > Share and Security tabs. And add permissions for required account.
  • Click Apply / OK, and let the permissions take effect.

Now try taking new backup, and it should work successfully.

January 15, 2017

Crystal report document load hangs

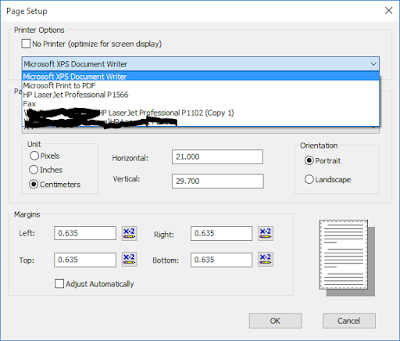
I faced this problem after I made some changes in Crystal Report design. Somehow in Page Setup dialog box, the printer is changed in drop-down list, pointing to my local PC printer. And it was working fine at local PC but getting stuck when crystal report document is calling its Load() method on server.

Here is how I fixed it in my case:

  • Open report in Crystal Report Designer and Right Click
  • Select Design > Page Setup..., Page Setup Dialog box appears.

    crystal report load hang - right click

  • From the printer drop-down list, select Microsoft XPS Document Writer.

    crystal report load hang - right click printerdropdown

  • Click OK button.

Then I deployed the new report file on server, it stars working.