Showing posts with label Windows. Show all posts

January 28, 2024

git shows files as modified after adding to .gitignore

In Visual Studio, once the .Net project is setup with git, you might notice that it will keep track for extra files, like autogenerated files in obj/debug folders.

You can ignore these selected folders/files by using .gitignore file.

To ignore debug, release, bin and obj folders etc., you can make these entries in .gitignore file.

[Dd]ebug/
[Rr]elease/
[Bb]in/
[Oo]bj/

After settings these changes you might notice that git is still tracking the files in these folders.

The reason is that these are the changes before the .gitignore file is updated.

To fix this issue you need to removes all files that have been cached (as being 'tracked'), then re-add files based on the .gitignore file entries.

Here are the steps, notice the dot (.) in the end of first 2 commands, this . is part of command syntax:

  • Remove all files recursively from index that are cached (being tracked).
    git rm -r --cached .
    

    rm is to remove files, -r is to remove recursively.

  • Add all files that have changed (re-add the files). This command will add all files except those which are mentioned in .gitignore.
    git add .
    
  • This command will commit your files again and remove the files you want to ignore, but keep them in your local directory.
    git commit -am "Remove ignored files"
    

January 27, 2024

How to set up git server on local machine (Windows)

To configure git server on local windows machine, you can follow these steps:

Setup Git Server Repo:

  1. Go to folder, where you want to initialize the server, specify a name without spaces (else you will need to use quotes whenever accessing this folder)
  2. Open this folder in command prompt and type this command to initiate server repo.
    //git init <repo-name>.git --bare
    
    git init mylocalrepo.git --bare


    mylocalrepo is the repository name.

    (Note: to avoid any issues later, its better to append the suffix '.git' to the repository name)

The git server repo is setup.

Setup Git Client/Clone:

  1. Go to the folder, where you want to initialize the client.
  2. Open this folder in command prompt and type this command to initiate client repo.
    //git clone <path_to_your_server>
    
    git clone C:\_Data\Test\GitServer\mylocalrepo.git
    
    You may need to change the back-slash "\" to forward-slash "/" in the path.

The client repo is setup.

You can try to make chages in client repo and push to git server.

Manually create a new file (readme.txt) in client folder, and make some changes.

You can stage this file:

git add .

Commit the changes with custom message:

git commit -m "added readme file"

Push the changes to git server:

git push

August 19, 2021

.NET Core Worker Service - Implementing by BackgroundService

In this post we will see an example how to define Worker Service by inheriting the BackgroundService abstract base class.

I am using Visual Studio 2019 Community Edition and .Net Core framework 3.1. Lets start creating new project.

Create a new project.

Select the template Worker Service from all the available templates. You can search with relevant keywords from the top search bar.

Next, give project a name, in this example it is WorkerService1.

Next, select the target framework. (.Net Core 3.1 is selected in this example)

Define the service

Once the project is created, create a new class, say ProcessMessageService with this code:

    public class ProcessMessageService : BackgroundService
    {
        public ProcessMessageService()
        {

        }

        protected override async Task ExecuteAsync(CancellationToken stoppingToken)
        {
            while (!stoppingToken.IsCancellationRequested)
            {
                //do actual work here...
                //we are writing log to text file every 5 seconds

                string folderPath = @"C:\Test\WorkerService\";
                string fileName = "ProcessMessageService-" + DateTime.Now.ToString("yyyyMMdd-HH") + ".txt";
                string filePath = System.IO.Path.Combine(folderPath, fileName);
                string content = DateTime.Now.ToString("yyyyMMdd-HH:mm:ss") + " - ProcessMessageService is running" + Environment.NewLine;

                System.IO.File.AppendAllText(filePath, content);

                await Task.Delay(5000, stoppingToken);
            }
        }
    }
	

ProcessMessageService class is inherited from BackgroundService abstract base class, which in turn implements the IHostedService interface, so ProcessMessageService class can override two functions:

  • public Task StartAsync(CancellationToken cancellationToken): will be called when the service is started.
  • public async Task StopAsync(CancellationToken cancellationToken): will be called when the service is shutdown/stopped.

But in this example, we have only override the BackgroundService's abstract method ExecuteAsync():

    protected abstract Task ExecuteAsync(CancellationToken stoppingToken);
	
Whithin this method, we have defined the actual work for the service, in this exmaple it is writing to text log file by every 5 seconds. We have implemented the indefinite while loop which will keep checking for stoppingToken.IsCancellationRequested bool property as a termination condition.
	while (!stoppingToken.IsCancellationRequested)
	
One each iteration we are suspending the execution by 5 seconds using Task.Delay() method.
	await Task.Delay(5000, stoppingToken);
	

Install required dependencies

Make sure you have installed the following Nuget Packages for .Net Core 3.1, which are required to succefully build and publish the service and enable it to host in windows services.

  • Install-Package Microsoft.CodeAnalysis.Common -Version 3.11.0
  • Install-Package Microsoft.Extensions.Hosting -Version 3.1.17
  • Install-Package Microsoft.Extensions.Hosting.WindowsServices -Version 3.1.17

If you are using some later version of .Net Core, you may need to change the version of these Nuget Packages.

Register the IHostedService

In Program.cs file, you will find the function CreateHostBuilder() as:

public static IHostBuilder CreateHostBuilder(string[] args) =>
	Host.CreateDefaultBuilder(args)
	.ConfigureServices((hostContext, services) =>
	{
		services.AddHostedService<ProcessMessageService>();
	});
		

Make sure that in builder's ConfigureServices() method, you are adding your service through services.AddHostedService() function call.

Another important point is to call UseWindowsService() method from builder's object, otherwise you may get errors when you host this windows service and try to start it.

After making this change, the function will be like this:

public static IHostBuilder CreateHostBuilder(string[] args) =>
	Host.CreateDefaultBuilder(args)
	.UseWindowsService()
	.ConfigureServices((hostContext, services) =>
	{
		services.AddHostedService<ProcessMessageService>();
	});
		

References:

Related Post(s):

SC – Service Console commands

The Service Controller utility SC is a powerful command-line utility for managing Windows services. It modifies the value of a service's entries in the registry and in the Service Control Manager database. As a command-line utility, it is being avialable for scripts and enables the user to Create, Start or Stop or Delete windows services.

If you run the command sc without any arguments, it will list down all the available commands/options with short a description of each command.

If you append a command name (without options), it will display help about that particular command.

You can use the following commands to Create, Start, Stop and Delete a service.

Create a Service

create: Creates a service. (adds service to the registry).

sc.exe create <servicename>  binpath= <binpath> 

Where <servicename> is the name of service and <binpath> is the path to the service's exe file.

For example, this command will create a service from MyWorkerService.exe.

sc.exe create MyWorkerService  binpath= "C:\Apps\MyWorkerService.exe" 

This will create a new service, but it will not be started automatically, if you want to auto start the service you can use the option start= auto

Above command will become:
sc.exe create MyWorkerService  binpath="C:\Apps\MyWorkerService.exe" start= auto

Auto option enables the service to automatically start each time the computer is restarted and runs even if no one logs on to the computer.

Start a Service

start: it will send a START request to the service.

sc.exe start "MyWorkerService"

Stop a Service

stop: it will send a STOP request to the service.

sc.exe start "MyWorkerService"

Delete a Service

delete: Deletes a service from SC Manager and (from the registry).

sc.exe delete "MyWorkerService"
A Note for .Net Core Worker Service

If you are deploying .Net Core Worker Service's exe, make sure to add these NuGet Packages before publishing.

  • Install-Package Microsoft.Extensions.Hosting -Version 3.1.17
  • Install-Package Microsoft.Extensions.Hosting.WindowsServices -Version 3.1.17

Version mentioned in above commands is compatible with .Net Core 3.1. If you are using some later version of .Net Core, you may need to change the version of these Nuget Packages.

References:

Related Post(s):

August 17, 2021

Publish .NET Core Worker Service

In the last post we have created a new Worker Service Project, now we will publish that as a single exe file.

To host the .NET Worker Service app as a Windows Service, it will need to be published as a single file executable.

Before moving forward to publish to project, make sure you have installed the following Nuget Packages for .Net Core 3.1.

  • Install-Package Microsoft.CodeAnalysis.Common -Version 3.11.0
  • Install-Package Microsoft.Extensions.Hosting -Version 3.1.17
  • Install-Package Microsoft.Extensions.Hosting.WindowsServices -Version 3.1.17

If you are using some later version of .Net Core, you may need to change the version of these Nuget Packages.

To publish our .Net Worker Service project as a single file exe, we have to make some changes in WorkerService1.csproj file.

Right click on the project and select Edit Project File.

Add the following childe nodes inside PropertyGroup node.

  • <OutputType>exe</OutputType>
  • <PublishSingleFile>true</PublishSingleFile>
  • <RuntimeIdentifier>win-x64</RuntimeIdentifier>
  • <PlatformTarget>x64</PlatformTarget>
  • <IncludeNativeLibrariesForSelfExtract>true</IncludeNativeLibrariesForSelfExtract>

Here is the description of each line (Credits Microsoft Docs ).

  • <OutputType>exe</OutputType>: Creates a console application.
  • <PublishSingleFile>true</PublishSingleFile>: Enables single-file publishing.
  • <RuntimeIdentifier>win-x64</RuntimeIdentifier>: Specifies the RID of win-x64.
  • <PlatformTarget>x64</PlatformTarget>: Specify the target platform CPU of 64-bit.
  • <IncludeNativeLibrariesForSelfExtract>true</IncludeNativeLibrariesForSelfExtract>: Embeds all required .dll files into the resulting .exe file.

To publish the project from Visual Studio wizard, you need to create a publish profile.

Right click on the project and select Publish...

Select Add a publish profile, Publish dialog will apear, select Folder from the Target tab, and click Next.

In Folder location textbox set the target path where you want to publish the output content.

Click Next, and it will display the Publish profile view.

Select Show all settings link. Profile settings dialog will appear.

Change the Deployment mode to Self-Contained.

Under File publish options, select all the CheckBoxes as true:

  • Produce single file
  • Enable ReadyToRun compilation
  • Trim unused assemblies (in preview)

Click Save button on the Profile settings dialog.

Finally, click the Publish button. It will rebuild the project, and the resulting exe file will be published to the /publish output directory.

Alternatively, you could use the .NET CLI to publish the app, run this command from project root directory:

dotnet publish --output "C:\MyPath\PublishedOutput"

After the publish operation succeeded, it will generate files similar to the following:

We have published Worker Service project in a single exe file. Next step is to host this exe as a Windows Service, which will be covered in the next post.

References:

Related Post(s):

August 16, 2021

.NET Core Worker Service - Implementing by IHostedService

In ASP.NET Core, background tasks can be implemented as hosted services.

ASP.NET Core 3 offers a new feature to implement Windows Service, i.e. Worker Service.

Worker Service is an ASP.NET Core project template that allows you to create long-running background services. The interesting point is that dependency injection is available natively with Worker Service project template.

You can implement Worker Service class by two ways:

  • Implement the IHostedService interface
  • Derive from BackgroundService abstract base class

In this post we will see an example how to define Worker Service by implementing the IHostedService interface.

I am using Visual Studio 2019 Community Edition and .Net Core framework 3.1. Lets start creating new project.

Create a new project.

Select the template Worker Service from all the available templates. You can search with relevant keywords from the top search bar.

Next, give project a name, in this example it is WorkerService1.

Next, select the target framework. (.Net Core 3.1 is selected in this example)

Define the service

Once the project is created, create a new class, say ProcessMessageService with this code:

public class ProcessMessageService : IHostedService
    {
        public Task StartAsync(CancellationToken cancellationToken)
        {
            DoWork(cancellationToken).GetAwaiter().GetResult();
            
            return Task.CompletedTask;
        }

        private async Task DoWork(CancellationToken cancellationToken)
        {
	//check if service is not canceled
            while (!cancellationToken.IsCancellationRequested)
            {
		//do actual work here...
		//we are writing log to text file every 5 seconds
				
		string folderPath = @"C:\Test\WorkerService\";
                string fileName = "ProcessMessageService-" + DateTime.Now.ToString("yyyyMMdd-HH") + ".txt";
                string filePath = System.IO.Path.Combine(folderPath, fileName);
                string content = DateTime.Now.ToString("yyyyMMdd-HH:mm:ss") + " - ProcessMessageService is running" + Environment.NewLine;

                System.IO.File.AppendAllText(filePath, content);

                await Task.Delay(5000, cancellationToken);
            }
        }

        public async Task StopAsync(CancellationToken cancellationToken)
        {
            await Task.Delay(-1, cancellationToken);

            cancellationToken.ThrowIfCancellationRequested();
        }
    }
	

ProcessMessageService class has implemented the interface IHostedService, so it have to define two functions:

  • public Task StartAsync(CancellationToken cancellationToken): will be called when the service is started.
  • public async Task StopAsync(CancellationToken cancellationToken): will be called when the service is shutdown/stopped.

Inside StartAsync() method, we have called our custom method DoWork() which will actually do the job we want this service to do. In this exmaple it is writing to text log file by every 5 seconds.

Install required dependencies

Make sure you have installed the following Nuget Packages for .Net Core 3.1.

  • Install-Package Microsoft.CodeAnalysis.Common -Version 3.11.0
  • Install-Package Microsoft.Extensions.Hosting -Version 3.1.17
  • Install-Package Microsoft.Extensions.Hosting.WindowsServices -Version 3.1.17

If you are using some later version of .Net Core, you may need to change the version of these Nuget Packages.

Register the IHostedService

In Program.cs file, you will find the function CreateHostBuilder() as:
public static IHostBuilder CreateHostBuilder(string[] args) =>
	Host.CreateDefaultBuilder(args)
	.ConfigureServices((hostContext, services) =>
	{
		services.AddHostedService<ProcessMessageService>();
	});
		

Make sure that in builder's ConfigureServices() method, you are adding your service through services.AddHostedService() function call.

Another important point is to call UseWindowsService() method from builder's object, otherwise you may get errors when you host this windows service and try to start it.

After making this change, the function will be like this:

public static IHostBuilder CreateHostBuilder(string[] args) =>
	Host.CreateDefaultBuilder(args)
	.UseWindowsService()
	.ConfigureServices((hostContext, services) =>
	{
		services.AddHostedService<ProcessMessageService>();
	});
		

The coding part is done, next step is to publish the Worker Service to an exe file, which will be covered in next post.

References:

Related Post(s):

February 14, 2019

Take SQL Server database backup using batch file

In this post, I will share the script to take SQL database backup from batch file. There may be scenarios where you want to automate SQL database backups, in that case this script will be useful. Although there is SQL Server Agent feature available which helps you to automate and perform different set of powerful tasks including database backups. But at times you may need a custom solution like a batch file which could take the backup.

We will use sqlcmd command for this purpose. Following are the parameters we need to pass to sqlcmd.

  • -S (server name)
  • -U (user name)
  • -P (password)
  • -d (database name)
  • -Q (query)

In our script we will first define the parameter's values required to connect the desired database server. These are server, dataBase, user and password.

Next we will define variable targetPath, declaring the target folder path where we want to save the backup file.

These are the 5 variables we need to pass as arguments to sqlcmd.

Often we prefer to add timestamp in backup file name. To add current date/time stamp in file name please refer to my last post Get date-time value to string variable in batch file. However I want to keep this post simple, so I am not using timestamp string sufix in filename for this example.

Here is the final script:

:: Off commands display
@echo off

:: This batch file create backup for SQL Server Database
:: Written by Muhammad Idrees


:: set database connection parameters
:: ---------------------------------------------------------------------------------------------

:: Your server name. I am using server name 'MyServer'
SET server=MyServer

:: Your database name. I am using database name 'MyDatabase'
SET dataBase=MyDatabase

:: Your database-server's user name. My user name is 'sa'
SET user=sa

:: Your database-server's password. My password is '123'
SET password=123

:: ---------------------------------------------------------------------------------------------

:: Set destination path name to save the backup file.
SET targetPath=C:\Backups\

:: Set full name of the backup.
SET fullName=MyDatabase_FullBackup 

:: *****************************************************************************

sqlcmd -S %server% -U %user% -P %password% -d %dataBase% -Q "BACKUP DATABASE %dataBase% TO  DISK = '%targetPath%%dataBase%.bak' WITH NOFORMAT, INIT,  NAME = N'%fullName%', SKIP, NOREWIND, NOUNLOAD,  STATS = 10;"

ECHO Backup finished...

I hope this helps someone looking for batch file solution of taking SQL server backups. I welcome your feedback and suggestions in the comments section below.

Related Posts:

December 6, 2018

Directory Junction vs SYMLINK (Symbolic Link)

In the last post Create a Symbolic Link in Windows, we have seen how to create different Symbolic Links, i.e, Hard Link, Directory Symbolic Link and Directory Junction Link. If you have not read the last post I recommend to have a look, it will help you understand better.

In this post we will see how Symbolic Link and Directory Junction fits in different scenarios. At some extent Symbolic Link and Directory Junctions look similar, but they serve different purpose. Here is a list of some of the differences between a junction and a symbolic link.

  • A junction point is designed to target local directories, but a symbolic link can be used for directories and files.
  • A junction can only be linked to a local volume path. Symbolic links can be used to link both local and remote/network path. For example, a symbolic link can link to the network share e.g. \\officenetwork\shared\some-folder.

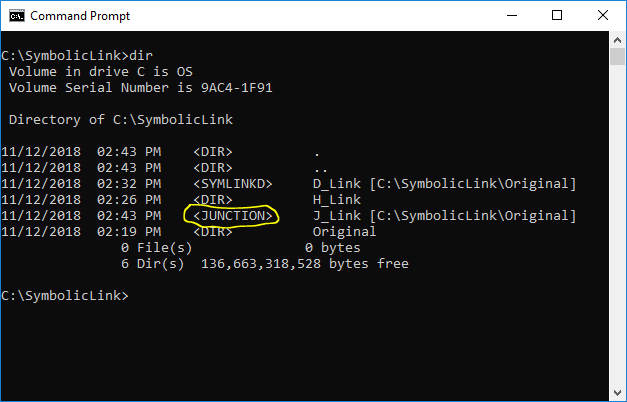
In windows explorer, the icons displayed for both Symbolic Link and Directory Junction seems identical and you can't differentiate if the created link is a Symbolic Link or a Directory Junction by seeing it. But from the command prompt, you can easily identify the correct type by using DIR command. If you have seen my last post (mentioned above), you may notice that the Directory Junction item will be displayed with <JUNCTION> type in console.

If you try to create a Directory Junction Link to some remote path, it will give you an error message. You have to use Directory Symbolic Link when you need to create a link for remote path. Lets understand this with an example:

Create a Directory Junction Link

In this example, I will create a Directory Symbolic Link to Target remote folder named TestFolder. The directory linked will be created at path C:\SymbolicLink\Network\J_Link.

  • Open the command prompt and go to the path C:\SymbolicLink\Network
  • Run the following command:

       mklink /J "C:\SymbolicLink\Network\J_Link" "\\officenetwork\IT-Developmnet\Idrees\TestFolder"
      

    You will see the error message as follows:

       Local volumes are required to complete the operation.
      
    Directory Junction Link for network path giving error

Create a Directory Symbolic Link

In this example, I will create a Directory Symbolic Link to Target remote folder named TestFolder. The directory linked will be created at path C:\SymbolicLink\Network\J_Link.

  • Open the command prompt and go to the path C:\SymbolicLink\Network
  • Run the following command:

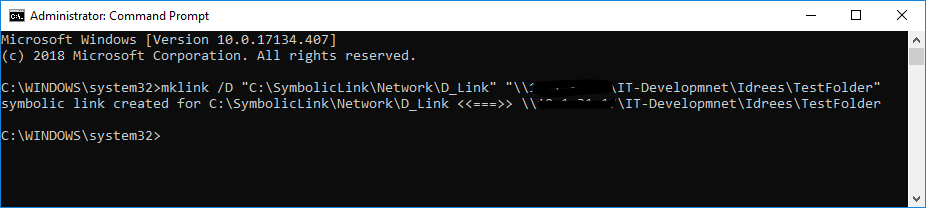
       mklink /D "C:\SymbolicLink\Network\D_Link" "\\officenetwork\IT-Developmnet\Idrees\TestFolder"
      

    You will see the success message as follows:

       symbolic link created for C:\SymbolicLink\Network\D_Link <<===>> \\officenetwork\IT-Developmnet\Idrees\TestFolder
      
    Directory Symbolic Link for network path

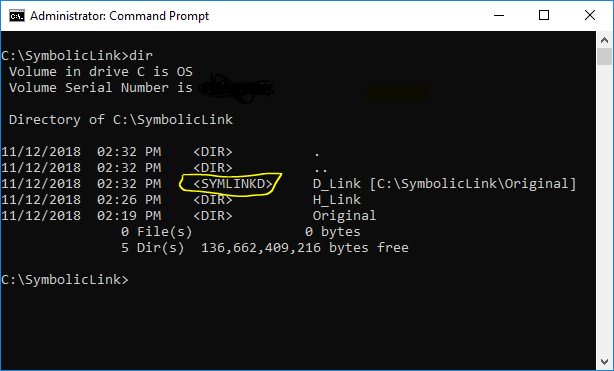
    If you run the DIR command at C:\SymbolicLink\Network, you will see that the newly created directory link will be displayed as <SYMLINKD>.

    Directory Symbolic Link for network path - in command prompt

I hope you find this post helpful. I welcome your suggestions or feedback in the comments section below.

December 3, 2018

Create a Symbolic Link in Windows

Symbolic Link, Soft Link or SymLink referred to the same thing, is a file that is linked to another file or directory, which can be on the same computer or any other on the network. You can create Symbolic Link by using mklink command, which is available since Windows Vista.

Syntax of mklink is:

MKLINK [[/D] | [/H] | [/J]] Link_File_Or_Directory_Path Target_File_Or_Directory_Path

As you can see from the above syntax, mklink allows following 3 switches to create different types of Symbolic Links.

  • /D Directory symbolic link.
  • /H Creates a hard link instead of a symbolic link.
  • /J Directory junction.

The default is a file symbolic link, i.e. if you did not specify and switch than the link created will be File Symbolic Link.

Lets start create each type of link with an example:

First we setup he environment for examples to follow. I created a folder named Symbolic Links at C:/. Inside Symbolic Links folder created another folder named Original, which will be act as Target Folder of symbolic links and contains two files file1.txt and file2.txt.

Create a Hard Link

In this example, I will create a Hard Link to file1.txt which we created inside our Target Folder named Original. The linked file will be created at path C:\SymbolicLink\H_Link.

  • Open the command prompt and go to the path C:\SymbolicLink
  • Create new directory H_Link with the following command

       mkdir H_Link
      
  • Run the following command:

       mklink /H "C:\SymbolicLink\H_Link\file1.txt" "C:\SymbolicLink\Original\file1.txt"
      

    If you get the following error message:

       You do not have sufficient privilege to perform this operation.
      

    Then just restart the command prompt with Administrator Privileges. If you are already running command prompt with Administrator Privileges then you will see the success message as follows:

       Hardlink created for C:\SymbolicLink\H_Link\file1.txt <<===>> C:\SymbolicLink\Original\file1.txt
      

    We have successfully create the Symbolic Link to a file (also know as Hard Link).

Create a Directory Symbolic Link

In this exmaple, I will create a Directory Symbolic Link to Target Folder named Original. The directory linked will be created at path C:\SymbolicLink\D_Link.

  • Open the command prompt and go to the path C:\SymbolicLink
  • Run the following command:

       mklink /D "C:\SymbolicLink\D_Link" "C:\SymbolicLink\Original"
      

    If you get the following error message:

       You do not have sufficient privilege to perform this operation.
      

    Then just restart the command prompt with Administrator Privileges. If you are already running command prompt with Administrator Privileges then you will see the success message as follows:

       symbolic link created for C:\SymbolicLink\D_Link <<===>> C:\SymbolicLink\Original
      

    If you run the DIR command at C:\SymbolicLink, you will see that the newly created directory link will be displayed as .

    Create symbolic links

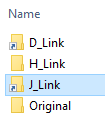
    In windows explorer, the linked directory will be shown with icon similar to the shortcut icon, like this:

    Create symbolic links

Create a Directory junction

In this exmaple, I will create a Directory Symbolic Link to Target Folder named Original. The directory linked will be created at path C:\SymbolicLink\J_Link.

  • Open the command prompt and go to the path C:\SymbolicLink
  • Run the following command:

       mklink /J "C:\SymbolicLink\J_Link" "C:\SymbolicLink\Original"
      

    You will see the success message as follows:

       Junction created for C:\SymbolicLink\J_Link <<===>> C:\SymbolicLink\Original
      

    If you run the DIR command at C:\SymbolicLink, you will see that the newly created directory link will be displayed as .

    Create symbolic links

    In windows explorer, the linked directory will be shown with the icon similar to Directory Symbolic Link:

    Create symbolic links

It seems like Directory Symbolic Link and Directory junction works in the same way. But there is a difference. I will explain the difference in next post soon.