November 20, 2019

Unable to configure HTTPS endpoint. No server certificate was specified, and the default developer certificate could not be found.

Problem:

During development in Visual Studio, ASP.Net Core WebAPI project started throwing this error.

Unable to configure HTTPS endpoint. No server certificate was specified, and the default developer certificate could not be found. To generate a developer certificate run 'dotnet dev-certs https'. To trust the certificate (Windows and macOS only) run 'dotnet dev-certs https --trust'.

Solution:

As suggested in the error message, we have to run the command dotnet dev-certs https.

  • First close the browser or stop Visual Studio debugger if you are directly running from Visual Studio.
  • Open the command prompt, go to the project's root folder and run this command.

     dotnet dev-certs https --clean
    

    It cleans all HTTPS development certificates from the machine. It will give you following message.

    Cleaning HTTPS development certificates from the machine. A prompt might get displayed to confirm the removal of some of the certificates.

    It may give you a prompt for the removal of certificate, if so, just accept.

  • Second run this command:

     dotnet dev-certs https -t
    

    To make it trust the certificate on the current platform.

November 14, 2019

Deploy ASP.NET Core app in IIS

Hosting models

ASP.Net Core apps support two hosting models.

In-process hosting model

In-process hosting provides improved performance over out-of-process hosting because ASP.NET Core app runs in the same process as its IIS worker process.

Out-of-process hosting model

In this model, ASP.NET Core Module is required for process management, because ASP.NET Core apps run in a process separate from the IIS worker process. The module starts the process for the ASP.NET Core app when the first request arrives and restarts the app if it shuts down or crashes.

Install the .NET Core Hosting Bundle

The ASP.NET Core Module allows ASP.NET Core apps to run behind IIS. You can install .NET Core Hosting Bundle on the hosting system, This bundle installs the .NET Core Runtime, .NET Core Library, and the ASP.NET Core Module.

Create IIS website

  • In IIS Manager, Right-click the Sites folder. Select Add Website from the contextual menu. Enter a Site name and set the Physical path to the app's published folder path. Provide the Binding configuration, enter Host name and click OK.

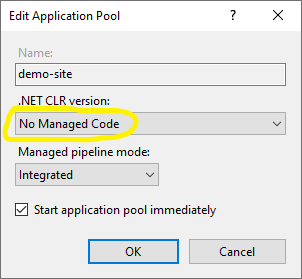
  • Under Application Pools, Right-click the site's app pool and select Basic Settings from the contextual menu. In the Edit Application Pool window, set the .NET CLR version to No Managed Code.

  • For ASP.NET Core 2.2 or later: For a 64-bit (x64) self-contained deployment that uses the in-process hosting model, you need to disable the app pool for 32-bit (x86) processes. For this, In the Actions sidebar of IIS Manager > Application Pools, select Advanced Settings.

  • Locate Enable 32-Bit Applications and set the value to False.

October 24, 2019

What is JSON Web Token

JSON Web Token (JWT) is an open standard used for securely transmitting information between different parties. It helps to accomodate the integrity of the information being passed by using digital signature. Hence the information can be verified and trusted that nobody has tempered the content after being issued by the authority.

Most commonly it is being used for authorization purpose among different web applications. After the user is logged in, each subsequent request will include the JWT, to identity the user and corresponding claims in order to assign access on the server side. Single Sign On is a feature that widely uses JWT.

JSON Web Token structure

JSON Web Tokens consist of three parts separated by dots (.), which are:

  • Header
  • Payload
  • Signature

A JWT typically looks like the following.

 xxxxx.yyyyy.zzzzz

where xxxxx, yyyyy and zzzzz respresents Base64Url encoded values of the header, payload, and signature part of JWT.

Header

Header is the first part of JWON Web Token. It typically consists of two parts: signing algorithm being used for encryption i.e. HMAC SHA256 or RSA, and the type of the token, which is JWT.

For example:

{
  "alg": "HS256",
  "typ": "JWT"
}

Payload

The second part of the token is the payload, which contains the claims. Claims are additional metadata or information we want to transmit. We define claims as simple key-value pairs. There are three types of claims: registered, public, and private claims.

For example, these are the claims usually we store in JWT:

{
  "UserName": "idrees",
  "given_name": "Muhammad",
  "family_name": "Idrees",
  "email": "idrees@test.com"
}

The payload is then Base64Url encoded to form the second part of the JSON Web Token.

Signature

Signature will be generated by combining the encoded JWT Header and the encoded JWT Payload, and then sign it using a strong encryption algorithm, such as HMAC SHA-256 or RSA. A secret key will be used by the server to sign this content, so it will be able to verify existing tokens and sign new ones. Signature's logical calculation looks similar to this code sample:

 $encodedContent = base64UrlEncode(header) + "." + base64UrlEncode(payload);
 $signature = hashHmacSHA256($encodedContent);

To create the signature part you have to take the encoded header, the encoded payload, a secret, the algorithm specified in the header, and sign that.

Review

The output is three Base64-URL strings separated by dots, being more compact when compared to XML-based standards such as SAML.

The following shows a JWT that has the header and payload encoded, and the calculated signature.

eyJhbGciOiJIUzI1NiIsInR5cCI6IkpXVCJ9.eyJqdGkiOiI5NjBiMTExZS04NGQ2LTQxYjAtYmMxNS1lYTFiODU1NjY4ZmQiLCJuYW1laWQiOiIzYWI1ODYyMy0yMTY2LTQwMzktOTA1NS03N2JkZGY5YTYyMWEiLCJVc2VyTmFtZSI6ImlkcmVlcyIsImdpdmVuX25hbWUiOiJNdWhhbW1hZCIsImZhbWlseV9uYW1lIjoiSWRyZWVzIiwiZW1haWwiOiJpZHJlZXNAdGVzdC5jb20iLCJodHRwOi8vc2NoZW1hcy5taWNyb3NvZnQuY29tL3dzLzIwMDgvMDYvaWRlbnRpdHkvY2xhaW1zL3JvbGUiOiJBZG1pbmlzdHJhdG9yIiwibmJmIjoxNTcxODI4OTQ2LCJleHAiOjE1NzE4NzIxNDYsImlzcyI6Imh0dHA6Ly9sb2NhbGhvc3Q6MTY5NjMvIiwiYXVkIjoiaHR0cDovL2xvY2FsaG9zdDoxNjk2My9BcGkvQXV0aCJ9.glPa_uFQrn9wUJt8ZBOMQ64llYjPU98zqwv8Qu56ErU 

When decoded, by a tool like jwt.io, you will be able to see the content of this token:

HEADER: ALGORITHM & TOKEN TYPE
{
  "alg": "HS256",
  "typ": "JWT"
}

PAYLOAD: DATA
{
  "jti": "960b111e-84d6-41b0-bc15-ea1b855668fd",
  "nameid": "3ab58623-2166-4039-9055-77bddf9a621a",
  "UserName": "idrees",
  "given_name": "Muhammad",
  "family_name": "Idrees",
  "email": "idrees@test.com",
  "http://schemas.microsoft.com/ws/2008/06/identity/claims/role": "Administrator",
  "nbf": 1571828946,
  "exp": 1571872146,
  "iss": "http://localhost:16963/",
  "aud": "http://localhost:16963/Api/Auth"
}

Note that, the header and payload is a Base64Url encoded value, it is still in readable form, so do not put confidential information anywhere in the token content.

October 21, 2019

MS SQL Server - Create and change Schema

A database schema could be think of as a container of objects. It is used to logically group objects such as tables, views, stored procedures etc. It serves the similar purpose as namespace in C# or other programming languages. It helps preventing name clashes between objects from different schemas, so you can have different objects with same name in different schemas. For example, Person table is created in schema hr, you can create another table with same name Preson in some other schema i.e. vendor.

Create Schema:

Using SQL Server Management Studio you can create schema by:

  • Navigating to your DATABASE node > Security > Schemas.

  • Right click on Schemas and select New Schema

    SQL Server database Create New Schema
  • In the new Schema dialog, write the name for your schema, you can also specify schema owner, and then click OK button.

    SQL Server database New Schema Dialog

Or you can create schema using T-SQL:

CREATE SCHEMA hr;

Change Schema for an object:

There may be case when you want to transfer objects from one schema to another. Lets say you have table Person currently exists in schema hr, and you want to move this table to another schema vendor. You can use following T-SQL to change schema.

ALTER SCHEMA vendor TRANSFER hr.Person

Same command could be used to change schema for other objects like views, stored procedures, functions.

September 26, 2019

Authentication with ASP.Net Identity

This post will show you how to add ASP.Net Identity support in ASP.Net Webforms application. So it will allow you to enable authentication mechasnism for web requests.

I am using Visual Studio 2017 for this example. Lets create a new website with ASP.NET Web Application (.Net Framework) project template, in the next dialog box select the Empty template, it will make the Change Authentication button disabled.

In this example we will use the default implementation of IdentityUser, UserStore and UserManager classes which comes with EntityFramework package. So we have to install the following packages for this example:

  • Microsoft.AspNet.Identity.EntityFramework

  • Microsoft.AspNet.Identity.Owin
  • Microsoft.Owin.Host.SystemWeb

Add new Web Form named Register with the following content inside the form tag.

 <div style="margin-left:50px;">
  <asp:PlaceHolder runat="server" ID="phRegisterForm">

   <h4>Register</h4>
   <p>Please fill in this form to create an account.</p>
   <hr />
   <p>
    <asp:Label runat="server" ID="lblMsg" />
   </p>

   <label for="email"><b>User Name</b></label>
   <div>
    <asp:TextBox runat="server" ID="UserName" />
   </div>
   <br />
   <label for="psw"><b>Password</b></label>
   <div>
    <asp:TextBox runat="server" ID="Password" TextMode="Password" />
   </div>
   <br />

   <label for="psw-repeat"><b>Repeat Password</b></label>
   <div>
    <asp:TextBox runat="server" ID="ConfirmPassword" TextMode="Password" />
   </div>
   <hr/>

   <asp:Button runat="server" OnClick="CreateUser_Click" Text="Register" />
  </asp:PlaceHolder>
 </div>

In the Register.aspx.cs file, add following code for CreateUser_Click event handler (copied from Microsoft Docs)

protected void CreateUser_Click(object sender, EventArgs e)
      {
         // Default UserStore constructor uses the default connection string named: DefaultConnection
         var userStore = new UserStore();
         var manager = new UserManager(userStore);

         var user = new IdentityUser() { UserName = UserName.Text };
         IdentityResult result = manager.Create(user, Password.Text);

         if (result.Succeeded)
         {
            StatusMessage.Text = string.Format("User {0} was created successfully!", user.UserName);
         }
         else
         {
            lblMsg.Text = result.Errors.FirstOrDefault();
         }
      }

We have setup the Register page markup for user creation. Lets add the database which EntityFramework will use to store user identity data.

First create App_Data folder. Then add for the following connection string tag in web.config file.

  <connectionStrings>
    <add name="DefaultConnection" connectionString="Data Source=(localdb)\MSSQLLocalDB;AttachDbFilename=|DataDirectory|\WebFormsIdentity.mdf;Initial Catalog=WebFormsIdentity;Integrated Security=True" providerName="System.Data.SqlClient" />
   </connectionStrings> 

Since we have used default UserStore constructor, it needs the default connection string named DefaultConnection.

Note that we have only specified the connection string for database WebFormsIdentity.mdf in App_Data folder, but we did not yet created that. The database will be created at runtime by EntityFramework for the Identity entities.

Now you can run the project with start page of Register.aspx, enter user name and password. It will give you the success message.

We have completed the support for creating new users. Lets move to the next part, how to add authentication to login a user. We will use OWIN authentication for which we already have installed the packages Microsoft.AspNet.Identity.Owin and Microsoft.Owin.Host.SystemWeb.

From Microsoft Docs:

ASP.NET Identity uses Microsoft OWIN Authentication middleware for forms authentication. The OWIN Cookie Authentication is a cookie and claims based authentication mechanism that can be used by any framework hosted on OWIN or IIS. The Microsoft.Aspnet.Identity.Owin package contains a set of OWIN extension classes to manage and configure OWIN authentication middleware to be consumed by ASP.NET Identity Core packages. The Microsoft.Owin.Host.SystemWeb package contains an OWIN server that enables OWIN-based applications to run on IIS using the ASP.NET request pipeline. For more information see OWIN Middleware in the IIS integrated pipeline.

First we have to add OWIN startup and authentication configuration.

Right click on the project and click Add New Item, from the item dialog box, select OWIN Startup class, put the name Startup. Replace the content of this file with the following:

 using Microsoft.AspNet.Identity;
 using Microsoft.Owin;
 using Microsoft.Owin.Security.Cookies;
 using Owin;

 [assembly: OwinStartup(typeof(WebFormsIdentity.Startup))]

 namespace WebFormsIdentity // change to your project's namespace
 {
    public class Startup
    {
    public void Configuration(IAppBuilder app)
    {
    // For more information on how to configure your application, visit http://go.microsoft.com/fwlink/?LinkID=316888
    app.UseCookieAuthentication(new CookieAuthenticationOptions
    {
    AuthenticationType = DefaultAuthenticationTypes.ApplicationCookie,
    LoginPath = new PathString("/Login")
    });
    }
    }
 }

Add new Web Form and name it Login, and replace the html content with the following inside form tag.

 <div>
  <h4>Log In</h4>
  <hr />
  <asp:PlaceHolder runat="server" ID="phLoginStatus" Visible="false">
   <p>
    <asp:Label runat="server" ID="lblStatus" />
   </p>
  </asp:PlaceHolder>
  <asp:PlaceHolder runat="server" ID="phLoginForm" Visible="false">
   <label><b>User Name</b></label>
   <div>
    <asp:TextBox runat="server" ID="UserName" />
   </div>
   <br />

   <label><b>Password</b></label>
   <div>
    <asp:TextBox runat="server" ID="Password" TextMode="Password" />
   </div>
   <br />
   <div>
    <asp:Button runat="server" OnClick="SignIn_Click" Text="Log in" />
   </div>
  </asp:PlaceHolder>
  <asp:PlaceHolder runat="server" ID="phLogoutButton" Visible="false">
   <div>
    <div>
     <asp:Button runat="server" OnClick="SingOut_Click" Text="Log out" />
    </div>
   </div>
  </asp:PlaceHolder>
 </div>

Replace the Login.asps.cs file content with the following:

using Microsoft.AspNet.Identity;
using Microsoft.AspNet.Identity.EntityFramework;
using Microsoft.Owin.Security;
using System;
using System.Web;
using System.Web.UI.WebControls;

namespace WebFormsIdentity // change to your project's namespace
{
    public partial class Login2 : System.Web.UI.Page
    {
        protected void Page_Load(object sender, EventArgs e)
        {
            if (!IsPostBack)
            {
                if (User.Identity.IsAuthenticated)
                {
                    lblStatus.Text = string.Format("Hello {0}!!", User.Identity.GetUserName());
                    phLoginStatus.Visible = true;
                    phLogoutButton.Visible = true;
                }
                else
                {
                    phLoginForm.Visible = true;
                }
            }
        }

        protected void SignIn_Click(object sender, EventArgs e)
        {
            var userStore = new UserStore();
            var userManager = new UserManager(userStore);
            var user = userManager.Find(UserName.Text, Password.Text);

            if (user != null)
            {
                var authenticationManager = HttpContext.Current.GetOwinContext().Authentication;
                var userIdentity = userManager.CreateIdentity(user, DefaultAuthenticationTypes.ApplicationCookie);

                authenticationManager.SignIn(new AuthenticationProperties() { IsPersistent = false }, userIdentity);
                Response.Redirect("~/Login.aspx");
            }
            else
            {
                lblStatus.Text = "Invalid username or password.";
                phLoginStatus.Visible = true;
            }
        }

        protected void SingOut_Click(object sender, EventArgs e)
        {
            var authenticationManager = HttpContext.Current.GetOwinContext().Authentication;
            authenticationManager.SignOut();
            Response.Redirect("~/Login.aspx");
        }
    }
}

In the Page_Load we can check for the status of current user and take action based on its User.Identity.IsAuthenticated property.

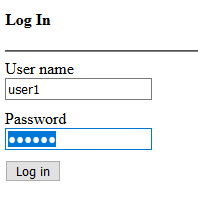
Now run the website with Login.aspx set as Start Page. Try login with you user created from Register page. It will give you success and failed response messages based on the credentials you enter.

References: