December 23, 2021

Angular - Using RxJS Operators mergeMap and concatMap

The Angular MergeMap and ConcatMap are used to map each value from the source observable into an inner observable. It internally subscribes to the source observable, and then starts emitting the values from it, in palce of the original value. A new inner observable will be created for every value it receives from the Source. It merges the values from all of its inner observables and emits the values back into the stream.

Difference between MergeMap and ConcatMap is that ConcatMap maintains the order of its inner observables, while MergeMap can process the source observables in any order depending on the execution time-period of each observable.

ConcatMap operator

ConcatMap processes the source observables in a serialized fashion waiting for each one to complete before moving to the next.

Lets see any example:

////on the top of the file, import the operator
//import { concatMap } from 'rxjs/operators';

//an observable of numbers (milliseconds), we use as its values to cause the delay 
const source = of(2000, 1000);

// map value from source into inner observable, once its completes, then it will move to next value in the source observable
const newSource = source.pipe(
  concatMap(val => of(`Delayed by: ${val} ms`).pipe(delay(val))) //creates a new observable, the following section is actually subscribe to this observable
);

//subscribe to the new observable (internally created by concatMap)
const subscribe = newSource.subscribe(val =>
  console.log(`With concatMap: ${val}`)
);

This code is performing the following actions:

  • A source observable is defined with two values 2000 and 1000 representing milliseconds.
  • concatMap is used to receive values from source and emit its own values from the new observable. Before emitting the value, the inner observable is calling the delay function to simulate delay in execution. As per the values provided in the source observable, first value cause delay for 1 second and second value will cause a delay for 2 seconds.
  • The new observable is assigned to the variable newSource.
  • In the end, we subscribe to the newSource observable, and write the output to the console.

Here is the sample output from above code:

With concatMap: Delayed by: 2000 ms 
With concatMap: Delayed by: 1000 ms

From this output, its clear that the concatMap will keep the original order of values emitted from the source. The values are being displayed in the same order as we supplied in the source observable. Even the second value has shorter delay of 1 second, but it will wait for the first value (with longer delay of 2 seconds) to complete before moving to next value in the source observable.

The concatMap assures the original sequence of values. If we have multiple inner Observables, the values will be processed in sequential order. Next value will only be processed after the previous one is completed.

MergeMap operator

MergeMap is similar to the contactMap with one difference that it processes the source observables without any assurance of the order of provided values.

Lets see any example, we use the same source observable (used in above exmaple):

////on the top of the file, import the operator
//import { mergeMap } from 'rxjs/operators';

//an observable of numbers (milliseconds), we use as its values to cause the delay 
const source = of(2000, 1000);

// map value from source into inner observable, it will move to next value (whenever available) in the source observable, will not wait for the previous one to complete
const newSource = source.pipe(
  mergeMap(val => of(`Delayed by: ${val} ms`).pipe(delay(val))) //creates a new observable, the following section is actually subscribe to this observable
);

//subscribe to the new observable (internally created by mergeMap)
const subscribe = newSource.subscribe(val =>
  console.log(`With mergeMap: ${val}`)
);

This code is performing the following actions:

  • A source observable is defined with two values 2000 and 1000 representing milliseconds.
  • mergeMap is used to receive values from source and emit its own values from the new observable. Before emitting the value, the inner observable is calling the delay function to simulate delay in execution. As per the values provided in the source observable, first value cause delay for 1 second and second value will cause a delay for 2 seconds.
  • The new observable is assigned to the variable newSource.
  • In the end, we subscribe to the newSource observable, and write the output to the console.

Here is the sample output from above code:

With mergeMap: Delayed by: 1000 ms 
With mergeMap: Delayed by: 2000 ms

From this output, we know that the mergeMap do not keep the original order of values emitted from the source. The values can be displayed in the order of their execution time-period. The sooner the value is processed, it will be emitted to the subscription. Since the second value has shorter delay of 1 second, it does not wait for the first value (with greater delay of 2 seconds) to complete, and hence it gets processed before the first.

The mergeMap does not assure the original sequence of values. If we have multiple inner Observables, the values may be overlapped over time, because values will be emitted in parallel.

References:

Related Post(s):

December 16, 2021

Angular - Using RxJS Operators take and skip

take and skip operators are used to limit the number of values emitted from the source observable.

take operator

take operator returns the observable which will limit the number of values emitted and receive the first n number of values. It will take a count argument representing the max number of values expecting to be received. Usually it is being used by passing 1 as count argument, to take only the first value emitted from an observable. After receiving the n number of values, it will complete the observable, so any more values emitted after the first one will be ignored (or not received).

Lets see this example:

const sourceObservable = of(1, 2, 3, 4, 5);
const wrapperObserable = sourceObservable.pipe(take(1));
const subscribe = wrapperObserable.subscribe(val => console.log('Received Value: ' + val));

The output will be:

Received Value: 1

Here, we created a source observable which will emit values 1,2,3,4,5. Then we used the take operator with count argument as 1, and the wrapper observable will be able to emit only 1 value, hence the subscription will receive 1 value.

Lets change the count argument to 3:

const wrapperObserable = sourceObservable.pipe(take(1));
const subscribe = wrapperObserable.subscribe(val => console.log('Received Value: ' + val));

This time, the output will be:

Received Value: 1
Received Value: 2
Received Value: 3

Note that, we are not making any changes to the source observable, but we changed the count argument to the take operator to receive the desired number of values.

skip operator

skip operator also returns the observable which will limit the number of values emitted, but it works in opposite to the take operator. It will ignore the first n number of vaues and receive all of the remaining values. It will take a count argument representing the max number of values expecting to be skipped.

Lets see this example:

const sourceObservable = of(1, 2, 3, 4, 5);
const wrapperObserable = sourceObservable.pipe(skip(1));
const subscribe = wrapperObserable.subscribe(val => console.log('Received Value: ' + val));

The output will be:

Received Value: 2
Received Value: 3
Received Value: 4
Received Value: 5

Here, we created a source observable which will emit values 1,2,3,4,5. Then we used the skip operator with count argument as 1, and the wrapper observable will be able to skip 1 value, and the subscription will receive remaining all values 2,3,4,5.

Lets change the count argument to 3:

const wrapperObserable = sourceObservable.pipe(skip(1));
const subscribe = wrapperObserable.subscribe(val => console.log('Received Value: ' + val));

This time, the output will be:

Received Value: 4
Received Value: 5

References:

Related Post(s):

November 25, 2021

Angular - Using Takeuntil RxJS Operator in Base Class

In the last post , we have seen how to use takeuntil operator to automatically unsubscribe from an observable. takeuntil operator makes it easier to manage the control to unsubscribe from multiple observables.

In that exmaple we have implemented the takeuntil operator in a single component. If you need to implement the same technique in multiple components then you have to repeat the same logic in every component.

In this post we will see how we can implement takeUntil operator in a base class, so that we dont have to repeat the similar code in multiple components.

Here is the code for base class:

import { Subject } from 'rxjs';
import { Component, OnDestroy } from '@angular/core';


@Component({
    template: ''
})
export abstract class BaseComponent implements OnDestroy {

protected componentDestroyed$ = new Subject();

    constructor() { }

    ngOnDestroy() {
        this.componentDestroyed$.next();
        this.componentDestroyed$.complete();
    }
}

And the ChildComponent inheriting the BaseComponent class defined above.

import { Component, OnInit, OnDestroy } from '@angular/core';
import { takeUntil } from 'rxjs/operators';
import { Service1 } from 'Service1';
import { Service2 } from 'Service2';
import { BaseComponent } from 'src/app/models/base-component.model';

@Component({ ... })
export class ChildComponent extends BaseComponent implements OnInit  {

  constructor(private myservice1: Service1, private myservice2: Service2) {}

  ngOnInit() {
    
    this.myservice1.getData()
    .pipe(takeUntil(this.componentDestroyed$)) //componentDestroyed$ is defined in BaseComponent
    .subscribe(({data}) => {
      console.log(data);
    });
	
    this.myservice2.getData()
    .pipe(takeUntil(this.componentDestroyed$))
    .subscribe(({data}) => {
      console.log(data);
    });	
  }
 
 }

Note that, we don't need to implment OnDestroy (ngOnDestroy handler) in ChildComponent to call the next() and complete() methods for subject componentDestroyed$, because we have already defined this in the BaseComponent.

References:

Related Post(s):

November 4, 2021

Angular - Using Takeuntil RxJS Operator

In the last post , we have seen different types of observable. Observable is basically a container which produces asynchronous stream of data, and emit values over time. We have to subscribe to an observable in order to consume or receive data. But you have to be careful with observables as it may leads to memory leaks and affect the application performance. To avoid this issue, one approach is to keep the reference at the time of subscription and unsubscribe from the observable by using the same reference when you no longer need to receive observable's data stream.

Lets see the example code:

import { Component, OnInit, OnDestroy } from '@angular/core';
import { Subscription } from 'rxjs';
import { Service1 } from 'Service1';
import { Service2 } from 'Service2';

@Component({ ... })
export class AppComponent implements OnInit, OnDestroy {
  mySubscription1: Subscription;
  mySubscription2: Subscription;

  constructor(private myservice1: Service1, private myservice2: Service2) {}

  ngOnInit() {
    
    this.mySubscription1 = this.myservice1.getData()
    .subscribe(({data}) => {
      console.log(data);
    });
	
    this.mySubscription2 = this.myservice2.getData()
    .subscribe(({data}) => {
      console.log(data);
    });
	
  }
 
  ngOnDestroy() {
    this.mySubscription1.unsubscribe();
    this.mySubscription2.unsubscribe();
  }
 
 }

In this code snippet, we have two services to consume Service1 and Service2. In ngOnInit handler, we maintained the subscription references for both the services in two different variables mySubscription1 and mySubscription2. Then in the ngOnDestroy handler, we are using the same reference variables to unsubscribe from the observable.

The above code works perfectly, but it would be cumbersome to maintain in long term when you have more number of subscriptions which makes you to keep the references for each subscription and then unsubscribe from each one in ngOnDestroy handler.

A better approach is to use takeUntil operator from RxJS library, it is used to automatically unsubscribe from an observable. takeUntil refelects the source Observable. It also monitors a second Observable (the notifier) that you provide. If the notifier emits a value, the output Observable stops reflecting the source Observable and completes itself.

Here is the same exmaple, this time unsubscribe using takeUntil operator.

import { Component, OnInit, OnDestroy } from '@angular/core';

import { Subject, interval } from 'rxjs';
import { takeUntil } from 'rxjs/operators';
import { Service1 } from 'Service1';
import { Service2 } from 'Service2';

@Component({ ... })
export class AppComponent implements OnInit, OnDestroy {
  destroy$: Subject = new Subject();

  constructor(private myservice1: Service1, private myservice2: Service2) {}

  ngOnInit() {

    this.myservice1.getData()
    .pipe(takeUntil(this.destroy$))
    .subscribe(({data}) => {
      console.log(data);
    });
	
    this.myservice2.getData()
    .pipe(takeUntil(this.destroy$))
    .subscribe(({data}) => {
      console.log(data);
    });
  }

  ngOnDestroy() {
    this.destroy$.next(true);
    this.destroy$.unsubscribe();
    
    ////some people prefer to call complete() on destroy$ here, instead of unsubscribe()
    //this.destroy$.complete();
  }
} 

This code snippet also behaves the same as before, but its easier to manage when you have more number of subscriptions. In ngOnDestroy handler, we have called the unsubscribe() method, some people may prefer to call complete() method instead. But in the end it does not make much difference in this context, the purpose here is just to stop receiving more values from this subject.

References:

October 21, 2021

Angular - Validate autocomplete against available options

I used the angular-ng-autocomplete for dropdown lists and its being quite useful and works extremely good with filter.

The issue I faced with validation and it does not behave as per the expectation.

When a user searches for an option by entering the keyword text (but doesn't pick any of the available options), then the required validator failed here. If the input box is empty then the requried validator is working fine on its way. But when the input box has some text, then the requried validator will not trigger. The ng-autocomplete do not have the chance to raise the selected event, and so do not properly set the binded control's value. Since the input box has some value, the form will pass the validation, and when submitted(with null value) it will take the undefined value for the control to the server API.

The html for ng-autocomplete is:

<div class="ng-autocomplete">
	<ng-autocomplete
	  [data]="citiesList"
	  [searchKeyword]="cityName"
	  formControlName="CityId"
	  (selected)="citySelected($event)"
	  (inputChanged)="onChangeCitySearch($event)"
	  [itemTemplate]="itemTemplate"
	  [notFoundTemplate]="notFoundTemplate"
	>
	</ng-autocomplete>

	<ng-template #itemTemplate let-item>
	  <a [innerHTML]="item.Name"></a>
	</ng-template>

	<ng-template #notFoundTemplate let-notFound>
	  <div [innerHTML]="notFound"></div>
	</ng-template>
</div>

In .ts file, I am filling the citiesList from the API:

onChangeCitySearch(search: string) {
   
    //if user has entered at-least 2 characters, then call the api for search
    if (search && search.trim().length >= 2) {
      this.commonDataService
        .getCities(search)
        .subscribe((res) => {
          this.citiesList = res.Data;
        });
    }
  }

I do not want to permit the user to post the form unless one of the suggested options is selected from the list. I fixed the issue by defining a custom validator.

We could have two possible scenarios with ng-autocomplete when validating against a list of options:

  • Array of strings - Available options are defined as an array of strings.
  • Array of objects - Available options are as (an object property i.e. id, name etc, defined on) an array of Objects.

Bind with Array of strings

To validate autocomplete against an array of string options, we can pass the array of options to the the validator, and check if the control's value is exists in the array.

function autocompleteStringValidator(validOptions: Array<string>): ValidatorFn {
  return (control: AbstractControl): { [key: string]: boolean } | null => {
    if (validOptions.indexOf(control.value) !== -1) {
      // null means we dont have to show any error, a valid option is selected
      return null;
    }
	
    //return non-null object, which leads to show the error because the value is invalid
    return { match: false };
  }
}

This is how we can add the validator to the FormControl along with other built-in validators.

public cityControl = new FormControl('', 
    { validators: [Validators.required, autocompleteStringValidator(this.citiesList)] })

Bind with Array of Objects

We can validate the controls value when its binds to an array of objects by using the same technique as above. But I will use a slightly different version, instead of checking the index of input value in the array, here I am using filter method to find the matching item. If it founds any matching record, then the user has properly selected an option from the given list.

function autocompleteObjectValidator(myArray: any[]): ValidatorFn {
    return (control: AbstractControl): { [key: string]: boolean } | null => {
    let selectboxValue = control.value;
    let matchingItem = myArray.filter((x) => x === selectboxValue);

    if (matchingItem.length > 0) {
        // null means we dont have to show any error, a valid option is selected
        return null;
    } else {
        //return non-null object, which leads to show the error because the value is invalid
        return { match: false };
    }
    };
}

The good thing about this technique is that, you can also check for any particular property of the object in the if condition. Lets suppose, if the object has a property Id, we can check if the value of Id is matched on both objects.

let matchingItem = myArray.filter((x) => x.Id === selectboxValue.Id);

Another simpler technique can be applied by checking the type of control.value. For a valid option being selected from the list of objects, its type will be object, and in case the user types the text manully, than the type of control.value will be a simple string. So we can check, if the type is string, then it shows the fact that user has not selected any of the available options from objects list.

function autocompleteObjectValidator(): ValidatorFn {
  return (control: AbstractControl): { [key: string]: boolean } | null => {
    if (typeof control.value === 'string') {
        //return non-null object, which leads to show the error because the value is invalid
        return { match: false };
    }
	
    // null means we dont have to show any error, a valid option is selected
    return null;
  }
}

References:

October 18, 2021

Angular - Lazy-loading feature modules

NgModule is a set of cohesive block of code defines a particular application area, has a closely related set of capabilities. A typical NgModule file declares components, directives, pipes, and services. A module can import functionality from other NgModules that are exported, also a module can also export its own functionality for external use.

Every Angular application has at least one NgModule class which is actually the root module, and conventionally named AppModule. It resides in a file named app.module.ts. The application will be launched by bootstrapping the root NgModule, which actually launch the AppComponent resides in the file app.component.ts.

A small application might have only one NgModule which could be suffice, but as the application grows, we need more feature modules for better maintenance and optimization. So its a good approach to develop your application with multiple modules covering different areas of the application.

One of the main advantages of NgModules is that they can be lazy loaded. Lazy loading is the process of loading components or modules of an application as they're required. In the default application created by Angular, with a single module, all of its components are loaded at once. This means that a lot of unnecessary libraries or modules might be loaded as well, and that could be fine with small applications. But as the application grows, the users will start experiencing performance issues, because the load time will increase if everything is loaded at once. Here we can utilize Lazy loading, which allows Angular to load components and modules only when when they are needed.

Let’s sees an example, how we can configure lazy loading.

In this example, we will create two modules, ModuleUser and ModuleOrder, which will be lazy loaded.

Create a new Angular project (myapp) by executing the below command:

ng new myapp --routing

Here, we are creating a new project with routing.

Open your project in VS Code.

code myapp

By default, a root module(AppModule) is created under /src/app. Below is the content of NgModule(app.module.ts) file that's created.

import { NgModule } from '@angular/core';
import { BrowserModule } from '@angular/platform-browser';

import { AppRoutingModule } from './app-routing.module';
import { AppComponent } from './app.component';

@NgModule({
  declarations: [
    AppComponent
  ],
  imports: [
    BrowserModule,
    AppRoutingModule
  ],
  providers: [],
  bootstrap: [AppComponent]
})
export class AppModule { }

Typically, it imports all the required modules and components.

The @NgModule decorator states that the AppModule class is a type of NgModule. @NgModule() decorator takes a single metadata object, whose properties describe the module. The most important properties are as follows.

  • declarations: The components, directives, and pipes in this NgModule.
  • imports: Other modules that are required in this NgModule.
  • providers: The services that this NgModule provides to global collection of services; they become accessible in all parts of the application.
  • bootstrap: The root component that Angular inserts into the index.html web page, this component will host all other application views. Only the root NgModule should set the bootstrap property.
  • exports: In above code snippet, we dont have this porperty by default, but if we are defining new modules, we can use this to indicate a subset of declarations that should be visible and usable by other NgModules.

Lets go back to the application, and create two buttons in the app.component.html. Replace your app.component.html file with the contents below.

<button routerLink="user">Load Module User</button>
<button routerLink="order">Load Module Order</button>
<router-outlet></router-outlet>

These buttons will allow the user to load and navigate to corresponding modules.

Let’s define the modules for routes user & order.

To create lazy loaded modules, execute the below commands:

ng generate module moduleuser --route user --module app.module
ng generate module moduleorder --route order --module app.module

The commands will generate two folders called moduleuser and moduleorder. Each folder will contain its own default files, i.e. module.ts, routing.ts and component files.

If you check your app-routing.module.ts you will see the below code for routes:

const routes: Routes = [
  { path: 'user', loadChildren: () => 
           import('./moduleuser/moduleuser.module').then(m => m.ModuleuserModule) },
  { path: 'order', loadChildren: () => 
           import('./moduleorder/moduleorder.module').then(m => m.ModuleorderModule) }
];

For both paths (user & order), it uses loadChildren() function which means when the route user or order is visited, it loads their respective modules.

Run the project with

ng serve

You will see the below screen:

Click the Load Module User button, you will be redirected to the user page. This is how your screen should look:

When you click on Load Module Order button, you should see the similar output with moduleorder's content.

So far, we have create two modules and loaded in our application. But how can we verify if these modules are really being loaded lazily.

In order to verify that these modules files are lazily loaded, open the browser's Developer Tools by pressing F12, visit the Network tab. When you refresh the page it will show a few files that were requested and loaded.

Lets clear your list of requests by hitting the Clear button. Now When you click on the Load Module User button on the page, you will see a request for moduleuser-moduleuser-module.js as in the screenshot below. This verifies that Module User is lazily loaded.

Similarly, when you click Load Module Order, the moduleorder-moduleorder-module.js file is loaded. This verifies that Module Order is loaded lazily.

Once these files are loaded, when you try to click the buttons another time, it will not load these js files again.

References:

October 15, 2021

Angular - Observables vs Subjects vs Behavior Subjects

In this post I will explain different observables with example that would help you to understand what actually is the observable and which type of observable should you use in different scenarios where it makes more sense.

Observables are asynchronous stream of data, emit values over time. It is just a container of values you can subscribe, to receive data when available.

Observables provide support for passing messages between parts of your application. They are used frequently in Angular and are a technique for event handling, asynchronous programming, and handling multiple values.

We have different types of observables avilable in RxJS Library, lets explore each one.

Observable

Basically its just a function, and do not maintain state. Observable will not execute until we subscribe to them using the subscribe() method. It emits three types of notifications, i.e. next, error and complete. Observable code is run for each observer, i.e. if it is making an HTTP request, then that request will be called for each observer/subscribers, hence not a single instance of data is shared, but each obeserver will receive a copy of data. The observer(subscriber) could not assign a value to observable, it can only consume the data.

Lets see an example, first define the observer using the constructor new Observable().

let obs = new Observable((observer) => {
  
  setTimeout(() => { observer.next("1") }, 1000);
  setTimeout(() => { observer.next("2") }, 1000);
  setTimeout(() => { observer.next("3") }, 1000);
  //setTimeout(() => { observer.error("error emitted") }, 1000);    //send error event. observable stops here
  //setTimeout(() => { observer.complete() }, 1000);   //send complete event. observable stops here
  setTimeout(() => { observer.next("4") }, 1000);          //this code is never called, if error or complete event is triggered
  setTimeout(() => { observer.next("5") }, 1000);

})

This observer is emitting values on an interval of 1 second.

There are many operators available with the RxJS library, which makes the task of creating the observable easy. Using these operators you can create observable from an array, string, promise, any iterable, etc. Some of these operators are create, defer, empty, from, fromEvent, interval, of, range, throwError, timer.

Remember that observable will not execute until we subscribe to it. Here we subscribe to all 3 notifications i.e. next, error and complete.

obs.subscribe(
  val=> { console.log('next value received from observer: ' + val) },
  error => { console.log("error event received from observable")},
  () => {console.log("completed event received from observable")}
)

In our Observable definition, we have commented out the lines for error and complete events. Whenver any of these event is triggered, the observable will stop running, so you will not receive any more values if the error or complete event is triggerd on an obeservable.

Subject:

It is technically a sub-type of Observable because Subject is an observable with specific qualities. Subjects are also asynchronous stream of data, emit values. The observer need to subscribe to the Subject in order to receive notifications. The observer would start to receive the values after subscription, and all prior values that might emitted before, would be missed. Observer also have the option to assign value to the observable(Subject). Unlike observable mentioned in previous exmaple, the same code will run for all observers and hence the same data will be shared between all observers.

Lets see an exmaple for Subject,

let subject = new Subject(); 

//subject emits first value, but this will be missed, because till here we have not subscribed to this subject.
subject.next("b");

//first subscription to the subject
subject.subscribe(value => {
  console.log("Subscription received value: ", value); // Subscription wont get anything at this point, the first value "b" emitted above, is missed.
});

//subject emit more values, this time we already have one subscription, so it will receive these values.
subject.next("c"); 
subject.next("d"); 

BehaviorSubject:

It is a special type of Subject, a Subject that requires an initial value and emits its current value to new subscribers. It stores data in memory, and same code run only once for all observers so the same data is shared to all observers. Since it needs an initial value, so it always return a value on subscription even if it hasn't received a next(). Unlike the Subject, once an observer subscribe to it, the observer will immediately receive the current value without having to wait for future next() call.

Lets see an example for BehaviorSubject:

//BehaviorSubject is initialized with initial value "a" through its constructor
let bSubject = new BehaviorSubject("a"); 

//BehaviorSubject emits second value, so the current value here is "b". But still we dont have any subscription.
bSubject.next("b");

//first subscription to the BehaviorSubject, soon we subscribe, the current value "b" will be received.
bSubject.subscribe(value => {
  console.log("Subscription received value: ", value); // Subscription got current value "b", 
});

//BehaviorSubject emit more values, that will be received by our subscription.
bSubject.next("c"); 
bSubject.next("d"); 

ReplaySubject

It is another special type of Subject, a Subject that wil replay the message stream. It stores data in memory, and same code run only once for all observers so the same data is shared to all observers. Unlike the BehaviorSubject, once an observer subscribe to it, the observer will receive the all the previous values that might have emitted before its subscription. No matter when you subscribe the replay subject, you will receive all the broadcasted messages.

Lets see an example:

let rSubject = new ReplaySubject(); 

//ReplaySubject emits three values "a", "b" and "c". But still we dont have any subscription.
rSubject.next("a");
rSubject.next("b");
rSubject.next("c");

rSubject.subscribe(value => {
  console.log("Subscription received value: ", value); // Subscription will get all three values "a", "b" and "c".
});

//ReplaySubject emit more values, that will be received by our subscription.
rSubject.next("d"); 
rSubject.next("e"); 

References:

September 27, 2021

Angular - Include web.config file with build

In the last post (Deploy Angular Application in IIS) , We finished the deployment of our anguar app in IIS. But we have manually created the web.config file in our applicaiton's folder inside IIS wwwroot. A better approach could be to add this file in the src folder so that it will be automatically included in the build's generated output artifacts, so that we can simply deploy our application as single package and no need to create web.config file manually in IIS wwwroot.

For this, we have to follow two steps:

Copy web.config file into the src folder (myapp\src)

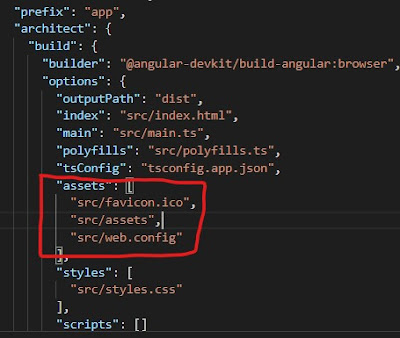
Add web.config file entry in the assets property in our project’s angular.json (or .angular-cli.json in older versions) file like this:

  • In angular.json file:

                "assets": [
                  "src/favicon.ico",
                  "src/assets",
                  "src/web.config"
                ],
    
  • In .angular-cli.json file(in older versions)

    "assets": [
        "assets",
        "favicon.ico",
        "web.config"
    ],
    

After making these changes, now when you build the project:

ng build --base-href "/myapp/" --prod

You can verify that the web.config is copied to the dist folder.

It enables us to deploy our application by copying the contents of dist folder to the IIS wwwroot\myapp folder, while web.config file is already included in the build output.

Related Post(s):

Deploy Angular Application in IIS

In this post, I will explain how you can deploy an Angular application under IIS.

For this example, I will use the Angular's Tour of Heroes tutorial application. You can download it from the this page. Extract it to a folder called myapp.

Go to your myapp folder and run this command to install all the required dependencies.

npm install

Once it finished installing all dependencies, we can test the Tour of Heroes application in our development environment by running:

ng serve

Point your browser at:

http://localhost:4200

You should see the Tour of Heroes application loaded and display the dashboard.

Since this is Single Page Application, it uses the Angular Router which enables you to view different UIs when you click on Dashboard and Heroes links. Angular Router manages all URL related stuff and enables us to navigate the site with different URLs in the browser like refreshing, browser back/forward button, directly navigating to a particular URL etc.

Setup Internet Information Services

To mimic a Production Environment we will deploy our Tour of Heroes application to IIS. If you are planning to deploy angular application to the web root directory then there is no need to make any changes in IIS specially for Angular App. But if you want to deploy this app in a sub-folder then we need to install an extension URL Rewrite Module (download from URL Rewrite extension home page ) and make some configuration changes in web.config file.

After successfull installation of URL Rewrite module, you will see the URL Rewrite icon in IIS for selected website's Features View.

Deployment in Web Root folder:

Lets deploy our application in IIS web root folder. First we need to build the application with --prod flag. Run this command:

ng build --prod

This builds your application and generate the output to the path defined by outputPath property defined in angular.json file(or outDir in .angular-cli.json in older versions). By default, in our case, this will be myapp\dist (folder named dist in the project's root directory).

Copy the content of this(myapp\dist) folder and paste it in the web server's default root directory C:\inetpub\wwwroot.

Point your browser at: http://localhost and you should see the Tour of Heroes dashboard displayed. Since the default website for IIS runs on port 80, there is no need to provide the port in URL, so http://localhost simply will work.

Deploying into a Sub-folder

Deploying an Angular Router app to a sub-folder inside the web root requires a bit more effort. Before proceeding this, make sure to delete all the files for angular app from C:\inetpub\wwwroot folder, which we copied in previous step.

Lets create a new folder in our web root called myapp (C:\inetpub\wwwroot\myapp). Copy the contents of myapp\dist folder to your C:\inetpub\wwwroot\myapp folder.

Now if you try to use the Tour of Heroes application by going to http://localhost/myapp/index.html we will get a 404 error in the console.

Here we need to make some changes in angular build and also create web.config file.

The base-href Flag

The HTML <base href="..."/> specifies a base path for resolving relative URLs to assets such as images, scripts, and style sheets. For example, given the <base href="/my/app/">, the browser resolves a URL such as some/place/foo.jpg into a server request for my/app/some/place/foo.jpg. During navigation, the Angular router uses the base href as the base path to component, template, and module files.

You'd add base tag near the top of index.html:

<base href="/">

We placed href="/" because / is the root of the application.

If the application is in a sub-folder like C:\inetpub\wwwroot\myapp then it would be pointed towards that:

<base href="/myapp/">

When you build the angular project, you need to supply another flag --base-href with the sub-folder name. The base tag tells the Angular application where it will be deployed relative to IIS webroot folder.

Lets build our Tour of Heroes application again with --base-href flag to tell ng build that we will be deploying to the myapp sub-folder in the web root directory.

ng build --base-href "/myapp/" --prod

When it completes, copy the contents of of your project’s myapp\dist folder into your IIS wwwroot > myapp (C:\inetpub\wwwroot\myapp) folder.

Until this step, we are partially done. If you go to http://localhost/myapp/index.html you should see the application working and you will be able to navigate the site by clicking on Dashboard and Heroes.

However, if you try to refresh the page, by hitting F5 for example, you will get an error. That’s because our web server is not able to handle the Angular Router URLs. We need to add some configuration that tells our web server to fallback to index.html page, and allow the Angular Router to handle those URLs for us.

Server Configuration with web.config

For our deployment in IIS, we have to create a web.config file in the root the app folder with the following content.

<?xml version="1.0" encoding="utf-8"?>
<configuration>

<system.webServer>
  <rewrite>
    <rules>
      <rule name="Angular Routes" stopProcessing="true">
        <match url=".*" />
        <conditions logicalGrouping="MatchAll">
          <add input="{REQUEST_FILENAME}" matchType="IsFile" negate="true" />
          <add input="{REQUEST_FILENAME}" matchType="IsDirectory" negate="true" />
        </conditions>
        <action type="Rewrite" url="./index.html" />
      </rule>
    </rules>
  </rewrite>
</system.webServer>

</configuration>

This configuration enables the web server to serve the index.html file as main fallback.

You can find the details at Angular's Server configuration page.

Now our Tour of Heroes application deployment is done with IIS. Navigate the site and notice that the routes work correctly. Also, if we copy a URL and paste it into another browser window it works just fine.

References:

Related Post(s):

August 23, 2021

HttpPostedFile vs HttpPostedFileBase

While working with posted files in .Net MVC, you might have stuck with HttpPostedFileBase and HttpPostedFile. These classes have the same properties, but are not related. You can not cast one to the other, because they are completely different objects to .net.

HttpPostedFileBase is an abstract class, used solely for the purpose of being derived from. It is used to mock certain things in sealed class HttpPostedFile. To make things consistent, HttpPostedFileWrapper was created to convert HttpPostedFile to HttpPostedFileBase.

  • HttpPostedFile is a class representing posted files, its definitation looks like this:

    public sealed class HttpPostedFile
    

    This class can't be inherited and can't be mocked for unit testing.

  • HttpPostedFileBase is a unified abstraction, enables the developer to create mockable objects.

    public abstract class HttpPostedFileBase
    
  • HttpPostedFileWrapper is an implementation of HttpPostedFileBase that wraps HttpPostedFile. It looks like this:

    public class HttpPostedFileWrapper : HttpPostedFileBase
    {
    	public HttpPostedFileWrapper(HttpPostedFile httpPostedFile) 
    	{
    		//
    	};
    	//...
    

Create HttpPostedFileBase object from HttpPostedFile:

You can use HttpPostedFileWrapper class, which will accept HttpPostedFile object as a parameter to its constructor.

//suppose httpPostedFile is an object of HttpPostedFile class
HttpPostedFileWrapper httpPostedFileWrapper = new HttpPostedFileWrapper(httpPostedFile);
HttpPostedFileBase httpPostedFileBase = httpPostedFileWrapper; //HttpPostedFileBase is the parent class

Thanks to polymorphism, you can pass an instance of derived class (HttpPostedFileWrapper), to method accepting base class(HttpPostedFileBase)

Create HttpPostedFile object from HttpPostedFileBase:

Creating HttpPostedFile object is not straight similar as it is in above case. You have to make use of System.Reflection to achieve this:

var constructorInfo = typeof(HttpPostedFile).GetConstructors(BindingFlags.NonPublic | BindingFlags.Instance)[0];
var httpPostedFile = (HttpPostedFile)constructorInfo
		  .Invoke(new object[] { httpPostedFileBase.FileName, httpPostedFileBase.ContentType, httpPostedFileBase.InputStream });

August 19, 2021

.NET Core Worker Service - Implementing by BackgroundService

In this post we will see an example how to define Worker Service by inheriting the BackgroundService abstract base class.

I am using Visual Studio 2019 Community Edition and .Net Core framework 3.1. Lets start creating new project.

Create a new project.

Select the template Worker Service from all the available templates. You can search with relevant keywords from the top search bar.

Next, give project a name, in this example it is WorkerService1.

Next, select the target framework. (.Net Core 3.1 is selected in this example)

Define the service

Once the project is created, create a new class, say ProcessMessageService with this code:

    public class ProcessMessageService : BackgroundService
    {
        public ProcessMessageService()
        {

        }

        protected override async Task ExecuteAsync(CancellationToken stoppingToken)
        {
            while (!stoppingToken.IsCancellationRequested)
            {
                //do actual work here...
                //we are writing log to text file every 5 seconds

                string folderPath = @"C:\Test\WorkerService\";
                string fileName = "ProcessMessageService-" + DateTime.Now.ToString("yyyyMMdd-HH") + ".txt";
                string filePath = System.IO.Path.Combine(folderPath, fileName);
                string content = DateTime.Now.ToString("yyyyMMdd-HH:mm:ss") + " - ProcessMessageService is running" + Environment.NewLine;

                System.IO.File.AppendAllText(filePath, content);

                await Task.Delay(5000, stoppingToken);
            }
        }
    }
	

ProcessMessageService class is inherited from BackgroundService abstract base class, which in turn implements the IHostedService interface, so ProcessMessageService class can override two functions:

  • public Task StartAsync(CancellationToken cancellationToken): will be called when the service is started.
  • public async Task StopAsync(CancellationToken cancellationToken): will be called when the service is shutdown/stopped.

But in this example, we have only override the BackgroundService's abstract method ExecuteAsync():

    protected abstract Task ExecuteAsync(CancellationToken stoppingToken);
	
Whithin this method, we have defined the actual work for the service, in this exmaple it is writing to text log file by every 5 seconds. We have implemented the indefinite while loop which will keep checking for stoppingToken.IsCancellationRequested bool property as a termination condition.
	while (!stoppingToken.IsCancellationRequested)
	
One each iteration we are suspending the execution by 5 seconds using Task.Delay() method.
	await Task.Delay(5000, stoppingToken);
	

Install required dependencies

Make sure you have installed the following Nuget Packages for .Net Core 3.1, which are required to succefully build and publish the service and enable it to host in windows services.

  • Install-Package Microsoft.CodeAnalysis.Common -Version 3.11.0
  • Install-Package Microsoft.Extensions.Hosting -Version 3.1.17
  • Install-Package Microsoft.Extensions.Hosting.WindowsServices -Version 3.1.17

If you are using some later version of .Net Core, you may need to change the version of these Nuget Packages.

Register the IHostedService

In Program.cs file, you will find the function CreateHostBuilder() as:

public static IHostBuilder CreateHostBuilder(string[] args) =>
	Host.CreateDefaultBuilder(args)
	.ConfigureServices((hostContext, services) =>
	{
		services.AddHostedService<ProcessMessageService>();
	});
		

Make sure that in builder's ConfigureServices() method, you are adding your service through services.AddHostedService() function call.

Another important point is to call UseWindowsService() method from builder's object, otherwise you may get errors when you host this windows service and try to start it.

After making this change, the function will be like this:

public static IHostBuilder CreateHostBuilder(string[] args) =>
	Host.CreateDefaultBuilder(args)
	.UseWindowsService()
	.ConfigureServices((hostContext, services) =>
	{
		services.AddHostedService<ProcessMessageService>();
	});
		

References:

Related Post(s):

SC – Service Console commands

The Service Controller utility SC is a powerful command-line utility for managing Windows services. It modifies the value of a service's entries in the registry and in the Service Control Manager database. As a command-line utility, it is being avialable for scripts and enables the user to Create, Start or Stop or Delete windows services.

If you run the command sc without any arguments, it will list down all the available commands/options with short a description of each command.

If you append a command name (without options), it will display help about that particular command.

You can use the following commands to Create, Start, Stop and Delete a service.

Create a Service

create: Creates a service. (adds service to the registry).

sc.exe create <servicename>  binpath= <binpath> 

Where <servicename> is the name of service and <binpath> is the path to the service's exe file.

For example, this command will create a service from MyWorkerService.exe.

sc.exe create MyWorkerService  binpath= "C:\Apps\MyWorkerService.exe" 

This will create a new service, but it will not be started automatically, if you want to auto start the service you can use the option start= auto

Above command will become:
sc.exe create MyWorkerService  binpath="C:\Apps\MyWorkerService.exe" start= auto

Auto option enables the service to automatically start each time the computer is restarted and runs even if no one logs on to the computer.

Start a Service

start: it will send a START request to the service.

sc.exe start "MyWorkerService"

Stop a Service

stop: it will send a STOP request to the service.

sc.exe start "MyWorkerService"

Delete a Service

delete: Deletes a service from SC Manager and (from the registry).

sc.exe delete "MyWorkerService"
A Note for .Net Core Worker Service

If you are deploying .Net Core Worker Service's exe, make sure to add these NuGet Packages before publishing.

  • Install-Package Microsoft.Extensions.Hosting -Version 3.1.17
  • Install-Package Microsoft.Extensions.Hosting.WindowsServices -Version 3.1.17

Version mentioned in above commands is compatible with .Net Core 3.1. If you are using some later version of .Net Core, you may need to change the version of these Nuget Packages.

References:

Related Post(s):

August 17, 2021

Publish .NET Core Worker Service

In the last post we have created a new Worker Service Project, now we will publish that as a single exe file.

To host the .NET Worker Service app as a Windows Service, it will need to be published as a single file executable.

Before moving forward to publish to project, make sure you have installed the following Nuget Packages for .Net Core 3.1.

  • Install-Package Microsoft.CodeAnalysis.Common -Version 3.11.0
  • Install-Package Microsoft.Extensions.Hosting -Version 3.1.17
  • Install-Package Microsoft.Extensions.Hosting.WindowsServices -Version 3.1.17

If you are using some later version of .Net Core, you may need to change the version of these Nuget Packages.

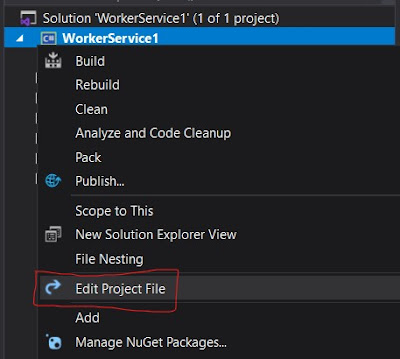
To publish our .Net Worker Service project as a single file exe, we have to make some changes in WorkerService1.csproj file.

Right click on the project and select Edit Project File.

Add the following childe nodes inside PropertyGroup node.

  • <OutputType>exe</OutputType>
  • <PublishSingleFile>true</PublishSingleFile>
  • <RuntimeIdentifier>win-x64</RuntimeIdentifier>
  • <PlatformTarget>x64</PlatformTarget>
  • <IncludeNativeLibrariesForSelfExtract>true</IncludeNativeLibrariesForSelfExtract>

Here is the description of each line (Credits Microsoft Docs ).

  • <OutputType>exe</OutputType>: Creates a console application.
  • <PublishSingleFile>true</PublishSingleFile>: Enables single-file publishing.
  • <RuntimeIdentifier>win-x64</RuntimeIdentifier>: Specifies the RID of win-x64.
  • <PlatformTarget>x64</PlatformTarget>: Specify the target platform CPU of 64-bit.
  • <IncludeNativeLibrariesForSelfExtract>true</IncludeNativeLibrariesForSelfExtract>: Embeds all required .dll files into the resulting .exe file.

To publish the project from Visual Studio wizard, you need to create a publish profile.

Right click on the project and select Publish...

Select Add a publish profile, Publish dialog will apear, select Folder from the Target tab, and click Next.

In Folder location textbox set the target path where you want to publish the output content.

Click Next, and it will display the Publish profile view.

Select Show all settings link. Profile settings dialog will appear.

Change the Deployment mode to Self-Contained.

Under File publish options, select all the CheckBoxes as true:

  • Produce single file
  • Enable ReadyToRun compilation
  • Trim unused assemblies (in preview)

Click Save button on the Profile settings dialog.

Finally, click the Publish button. It will rebuild the project, and the resulting exe file will be published to the /publish output directory.

Alternatively, you could use the .NET CLI to publish the app, run this command from project root directory:

dotnet publish --output "C:\MyPath\PublishedOutput"

After the publish operation succeeded, it will generate files similar to the following:

We have published Worker Service project in a single exe file. Next step is to host this exe as a Windows Service, which will be covered in the next post.

References:

Related Post(s):

August 16, 2021

.NET Core Worker Service - Implementing by IHostedService

In ASP.NET Core, background tasks can be implemented as hosted services.

ASP.NET Core 3 offers a new feature to implement Windows Service, i.e. Worker Service.

Worker Service is an ASP.NET Core project template that allows you to create long-running background services. The interesting point is that dependency injection is available natively with Worker Service project template.

You can implement Worker Service class by two ways:

  • Implement the IHostedService interface
  • Derive from BackgroundService abstract base class

In this post we will see an example how to define Worker Service by implementing the IHostedService interface.

I am using Visual Studio 2019 Community Edition and .Net Core framework 3.1. Lets start creating new project.

Create a new project.

Select the template Worker Service from all the available templates. You can search with relevant keywords from the top search bar.

Next, give project a name, in this example it is WorkerService1.

Next, select the target framework. (.Net Core 3.1 is selected in this example)

Define the service

Once the project is created, create a new class, say ProcessMessageService with this code:

public class ProcessMessageService : IHostedService
    {
        public Task StartAsync(CancellationToken cancellationToken)
        {
            DoWork(cancellationToken).GetAwaiter().GetResult();
            
            return Task.CompletedTask;
        }

        private async Task DoWork(CancellationToken cancellationToken)
        {
	//check if service is not canceled
            while (!cancellationToken.IsCancellationRequested)
            {
		//do actual work here...
		//we are writing log to text file every 5 seconds
				
		string folderPath = @"C:\Test\WorkerService\";
                string fileName = "ProcessMessageService-" + DateTime.Now.ToString("yyyyMMdd-HH") + ".txt";
                string filePath = System.IO.Path.Combine(folderPath, fileName);
                string content = DateTime.Now.ToString("yyyyMMdd-HH:mm:ss") + " - ProcessMessageService is running" + Environment.NewLine;

                System.IO.File.AppendAllText(filePath, content);

                await Task.Delay(5000, cancellationToken);
            }
        }

        public async Task StopAsync(CancellationToken cancellationToken)
        {
            await Task.Delay(-1, cancellationToken);

            cancellationToken.ThrowIfCancellationRequested();
        }
    }
	

ProcessMessageService class has implemented the interface IHostedService, so it have to define two functions:

  • public Task StartAsync(CancellationToken cancellationToken): will be called when the service is started.
  • public async Task StopAsync(CancellationToken cancellationToken): will be called when the service is shutdown/stopped.

Inside StartAsync() method, we have called our custom method DoWork() which will actually do the job we want this service to do. In this exmaple it is writing to text log file by every 5 seconds.

Install required dependencies

Make sure you have installed the following Nuget Packages for .Net Core 3.1.

  • Install-Package Microsoft.CodeAnalysis.Common -Version 3.11.0
  • Install-Package Microsoft.Extensions.Hosting -Version 3.1.17
  • Install-Package Microsoft.Extensions.Hosting.WindowsServices -Version 3.1.17

If you are using some later version of .Net Core, you may need to change the version of these Nuget Packages.

Register the IHostedService

In Program.cs file, you will find the function CreateHostBuilder() as:
public static IHostBuilder CreateHostBuilder(string[] args) =>
	Host.CreateDefaultBuilder(args)
	.ConfigureServices((hostContext, services) =>
	{
		services.AddHostedService<ProcessMessageService>();
	});
		

Make sure that in builder's ConfigureServices() method, you are adding your service through services.AddHostedService() function call.

Another important point is to call UseWindowsService() method from builder's object, otherwise you may get errors when you host this windows service and try to start it.

After making this change, the function will be like this:

public static IHostBuilder CreateHostBuilder(string[] args) =>
	Host.CreateDefaultBuilder(args)
	.UseWindowsService()
	.ConfigureServices((hostContext, services) =>
	{
		services.AddHostedService<ProcessMessageService>();
	});
		

The coding part is done, next step is to publish the Worker Service to an exe file, which will be covered in next post.

References:

Related Post(s):

July 19, 2021

AngularJS - Sharing data among Controllers

In AngularJS, you can share data among different componenets, e.g. Controllers, by multiple ways.

Using HTML5 storage features

HTML5 provides localStorage and sessionStorage, but using HTML5's localStorage, you would require to serialize and deserialize the objects before saving or reading them.

For example:

var myObj = {
firstname: "Muhammad",
lastname: "Idrees"
}

//serialize data before saving to localStorage
window.localStorage.set("myObject", JSON.stringify(myObj));

//deserialize to get object
var myObj = JSON.parse(window.localStorage.get("myObject"));

Using ngStorage

To use ngStorage, you have to include the ngStorage.js in your index.html alongwith angular.min.js.

<head>
<title>Angular JS ngStorage Example</title>
<script src="https://ajax.googleapis.com/ajax/libs/angularjs/1.8.2/angular.min.js"></script>
<script src="https://cdnjs.cloudflare.com/ajax/libs/ngStorage/0.3.11/ngStorage.js" ></script>
</head>

ngStorage provides two storage options: $localStorage and $sessionStorage.

You need to add ngStorage (as require) in the module, and then inject the services.

Suppose, if myApp is the name of the app module, you would be injecting ngStorage in myApp module as following:

var app = angular.module('myApp', ['ngStorage']);

After that, you can simply inject $localStorage and $sessionStorage services in controller function.

app.controller('controllerOne', function($localStorage, $sessionStorage) {

// an object to share
var myObj = {
firstname: "Muhammad",
lastname: "Idrees"
}

$localStorage.someValueToShare = myObj;
$sessionStorage.someValueToShare = myObj;
})

.controller('controllerTwo', function($localStorage, $sessionStorage) {

//here you can read data from $localStorage & $sessionStorage
console.log('localStorage: '+ $localStorage +'sessionStorage: '+$sessionStorage);
})

$localStorage and $sessionStorage are globally accessible through any controllers as long as you inject those services in the controller functions.

Using Service

You can create a service to hold the data that need to be shared among different controllers. Then you can simply inject that service in the controller function where you want to use it.

Here is the service code:

app.service('myDataService', function() {
var someData = {};
getData: function() { return someData; },
setData: function(dataToShare) { someData = dataToShare; }
});

Here is how controllers will consume the service myDataService and share data:

app.controller('controllerOne', ['myDataService',function(myDataService) {

// To set the data from the one controller
var myObj = {
firstname: "Muhammad",
lastname: "Idrees"
}
myDataService.setData(myObj);
}]);
app.controller('controllerTwo', ['myDataService',function(myDataService) {

// To get the data from the another controller
var result = myDataService.getData();
console.log(result); 
}]);

July 18, 2021

Dynamic where clause in Linq to Entities

Suppose you want to write Linq Query to filter the records by multiple parameters.

For example you have following method which will filter records based on the array of paramters specified.

public static List<Product> GetProducts(string[] params)
{
	var myQuery = from p in ctxt.Products
				select p;

	foreach(string param in params)
	{
	   myQuery = myQuery.Where(p => p.Description.Contains(param);
	}

	var prodResult = prod.ToList();

	return prodResult;
}

This query works fine if you need the AND concatenation of all parameter filters, you want to fetch records when all the paramters need to be statisfied.

What if you want to write the same query but with OR concatenation, as if any of the parameter is passed, it should return the records.

Here comes the PredicateBuilder by Pete Montgomery which will work with Linq-to-SQL and EntityFramework as well.

There is another PredicateBuilder by albahari , but it does not work well with EntityFramework.

You can use the following code for PredicateBuilder (copied from Pete Montgomery's post).

/// 
/// Enables the efficient, dynamic composition of query predicates.
/// 
public static class PredicateBuilder
{
    /// 
    /// Creates a predicate that evaluates to true.
    /// 
    public static Expression<Func<T, bool>> True<T>() { return param => true; }
 
    /// 
    /// Creates a predicate that evaluates to false.
    /// 
    public static Expression<Func<T, bool>> False<T>() { return param => false; }
 
    /// 
    /// Creates a predicate expression from the specified lambda expression.
    /// 
    public static Expression<Func<T, bool>> Create<T>(Expression<Func<T, bool>> predicate) { return predicate; }
 
    /// 
    /// Combines the first predicate with the second using the logical "and".
    /// 
    public static Expression<Func<T, bool>> And<T>(this Expression<Func<T, bool>> first, Expression<Func<T, bool>> second)
    {
        return first.Compose(second, Expression.AndAlso);
    }
 
    /// 
    /// Combines the first predicate with the second using the logical "or".
    /// 
    public static Expression<Func<T, bool>> Or<T>(this Expression<Func<T, bool>> first, Expression<Func<T, bool>> second)
    {
        return first.Compose(second, Expression.OrElse);
    }
 
    /// 
    /// Negates the predicate.
    /// 
    public static Expression<Func<T, bool>> Not<T>(this Expression<Func<T, bool>> expression)
    {
        var negated = Expression.Not(expression.Body);
        return Expression.Lambda<Func<T, bool>>(negated, expression.Parameters);
    }
 
    /// 
    /// Combines the first expression with the second using the specified merge function.
    /// 
    static Expression<T> Compose<T>(this Expression<T> first, Expression<T> second, Func<Expression, Expression, Expression> merge)
    {
        // zip parameters (map from parameters of second to parameters of first)
        var map = first.Parameters
            .Select((f, i) => new { f, s = second.Parameters[i] })
            .ToDictionary(p => p.s, p => p.f);
 
        // replace parameters in the second lambda expression with the parameters in the first
        var secondBody = ParameterRebinder.ReplaceParameters(map, second.Body);
 
        // create a merged lambda expression with parameters from the first expression
        return Expression.Lambda<T>(merge(first.Body, secondBody), first.Parameters);
    }
 
    class ParameterRebinder : ExpressionVisitor
    {
        readonly Dictionary<ParameterExpression, ParameterExpression> map;
 
        ParameterRebinder(Dictionary<ParameterExpression, ParameterExpression> map)
        {
            this.map = map ?? new Dictionary<ParameterExpression, ParameterExpression>();
        }
 
        public static Expression ReplaceParameters(Dictionary<ParameterExpression, ParameterExpression> map, Expression exp)
        {
            return new ParameterRebinder(map).Visit(exp);
        }
 
        protected override Expression VisitParameter(ParameterExpression p)
        {
            ParameterExpression replacement;
 
            if (map.TryGetValue(p, out replacement))
            {
                p = replacement;
            }
 
            return base.VisitParameter(p);
        }
    }
}

This will provide extension methods that you can use to write your queries. Here is an example how to write the above query with OR concatenation.

public static List<Product> GetProducts(string[] params)
{
	var myQuery = from p in ctxt.Products
				select p;

	Expression<Func<Product, bool>> x = null;

	int i = 1;

	foreach(string param in params)
	{
	   if (i == )
	   {
	      x = L => L.Description.Contains(param);
	   }
	   else 
	   {
	      Expression<Func<Product, bool>> y = L => L.Description.Contains(param); 
	      x = x.Or(y); 
	   }

   	   i = i + 1;
	}

	myQuery = myQuery.Where(x); 
	
	var prodResult = myQuery.ToList();

	return prodResult;
}

References:

June 24, 2021

SQL Server - Extended Events to trace Stored Procedure call

Extended Events enable users to collect necessary data to troubleshoot or identify a performance problem. Extended Events is configurable and scalable, because its a lightweight performance monitoring system that uses minimal performance resources.

Extended Events are replacing the deprecated SQL Trace and SQL Server Profiler features

SQL Server Management Studio provides a graphical user interface for Extended Events to create and modify sessions and display and analyze session data.

In this post I will explain how to create a session to collect data for a particular case, for example, trace execution of an SQL Statement.

Lets start creating our first session.

In SSMS, expand server node > Management > Extended Events > Sessions.

Right click on Sessions node and click New Session...

In New Session dialog > General Page > enter Session name, i.e. MySession

On the Events Page, in the textbox under Events library label, type sql_statement. Event list will be filtered.

Select sql_statement_completed, and click > button to move this event to Selected events list.

Click on the Configure button.

Select Filter (Predicate) tab

Click on the first row of grid and select field sqlserver.sql_text

In Operator column, select like_i_sql_unicode_string

In Value column, type the part of query for which you want to collect data. For example, I have written the name of Stored Procedure (MyProcedue) to collect data whenever this SP is called.

On Data Storage Page, In targets grid.

Select type event_file.

In the below pane, provide a file name where it will write the data.

On the Advanced Page, enter 3 seconds for Maximum dispatch latency.

Click OK.

Extended Events Session is created successfully.

By default the Session is not started (it gives you the option on General Page to start the session at creation, we have not selected that option in this exmaple).

We have to start the session manually by right click and select Start Session.

Once started, our Session is able to catch tracing data whenver the event occurs which we have defined in Events Page. In our example, we are checking for the query text that runs the SP MyProcedure. Try executing the SP a few times and see how this data is captured by the Session.

After the desired event is triggered (i.e. ran the SP MyProcedure in our case), Session has captured the data and stored in the target file which we have defined in Data Storage Page.

Expand the session node, and right click on package0.event_file and select View Target Data.

It will display the grid with event name (sql_statement_completed) and the timestamp when this event has occurred. Click any row to see more details about that particular event.

References: