In the last post we have created a new Worker Service Project, now we will publish that as a single exe file.
To host the .NET Worker Service app as a Windows Service, it will need to be published as a single file executable.
Before moving forward to publish to project, make sure you have installed the following Nuget Packages for .Net Core 3.1.
- Install-Package Microsoft.CodeAnalysis.Common -Version 3.11.0
- Install-Package Microsoft.Extensions.Hosting -Version 3.1.17
- Install-Package Microsoft.Extensions.Hosting.WindowsServices -Version 3.1.17
If you are using some later version of .Net Core, you may need to change the version of these Nuget Packages.
To publish our .Net Worker Service project as a single file exe, we have to make some changes in WorkerService1.csproj file.
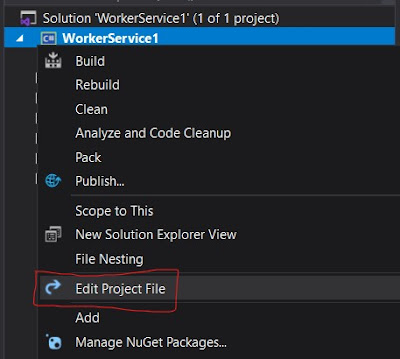
Right click on the project and select Edit Project File.
Add the following childe nodes inside PropertyGroup node.
- <OutputType>exe</OutputType>
- <PublishSingleFile>true</PublishSingleFile>
- <RuntimeIdentifier>win-x64</RuntimeIdentifier>
- <PlatformTarget>x64</PlatformTarget>
- <IncludeNativeLibrariesForSelfExtract>true</IncludeNativeLibrariesForSelfExtract>
Here is the description of each line (Credits
Microsoft Docs
).
- <OutputType>exe</OutputType>: Creates a console application.
- <PublishSingleFile>true</PublishSingleFile>: Enables single-file publishing.
- <RuntimeIdentifier>win-x64</RuntimeIdentifier>: Specifies the RID of win-x64.
- <PlatformTarget>x64</PlatformTarget>: Specify the target platform CPU of 64-bit.
- <IncludeNativeLibrariesForSelfExtract>true</IncludeNativeLibrariesForSelfExtract>: Embeds all required .dll files into the resulting .exe file.
To publish the project from Visual Studio wizard, you need to create a publish profile.
Right click on the project and select Publish...
Select Add a publish profile, Publish dialog will apear, select Folder from the Target tab, and click Next.
In Folder location textbox set the target path where you want to publish the output content.
Click Next, and it will display the Publish profile view.
Select Show all settings link. Profile settings dialog will appear.
Change the Deployment mode to Self-Contained.
Under File publish options, select all the CheckBoxes as true:
- Produce single file
- Enable ReadyToRun compilation
- Trim unused assemblies (in preview)
Click Save button on the Profile settings dialog.
Finally, click the Publish button. It will rebuild the project, and the resulting exe file will be published to the /publish output directory.
Alternatively, you could use the .NET CLI to publish the app, run this command from project root directory:
dotnet publish --output "C:\MyPath\PublishedOutput"
After the publish operation succeeded, it will generate files similar to the following:
We have published Worker Service project in a single exe file. Next step is to host this exe as a Windows Service, which will be covered in the next post.
References:


No comments:
Post a Comment