December 24, 2020

dotnet-svcutil - Generate Proxy Code with namespace

dotnet-svcutil helps you generate WCF Client proxy code for target service, for example:

dotnet-svcutil https://localhost:8081/OrderManagement/OrderManagement.svc 
               -d "Connected Services/MyOrderManagementService"

In this command we have provided directory path where we want to generate the proxy code output. In this case we have the path Connected Services/MyOrderManagementService from current directory.

You may notice that in the output code, it will generate the namespace with similar name, i.e. namespace Connected_Services_MyOrderManagementService:

If you want to change the namespace, you can use n (namespace) parameter.

Using this command:

dotnet-svcutil https://localhost:8081/OrderManagement/OrderManagement.svc 
               -d "Connected Services/MyOrderManagementService"
               -n "*,MyNewNamespaceForOrderManagementService"

This time, the output code will contain the namespace MyNewNamespaceForOrderManagementService.

References:

Related Post(s):

December 23, 2020

dotnet-svcutil - Generate Proxy Code with directory path

dotnet-svcutil helps you generate WCF Client proxy code for target service, for example:

dotnet-svcutil https://localhost:8081/OrderManagement/OrderManagement.svc

It will create a directory named ServiceReference, and generate Reference.cs file contains proxy code within ServiceReference directory.

ServiceReference directory will be created at the root from where you have executed above command.

If we run this command from the root of the .Net Core Project directory, it will create the same directory named ServiceReference.

Usualy we want it to generate proxy code under Connected Services directory.

For this we need to use the parameter d to provide directory to create files in.

dotnet-svcutil https://localhost:8081/OrderManagement/OrderManagement.svc 
               -d "Connected Services/MyOrderManagementService"

This will create the output at path Connected Services/MyOrderManagementService within the current directory where you are executed it.

References:

Related Post(s):

dotnet-svcutil - Generate Proxy Code With Collection Types

In the last post (WCF Proxy generation – using dotnet-svcutil) we have seen how to generate WCF proxy code using dotnet-svcutil.

You might have noticed that dotnet-svcutil has generated the collection types as arrays. For example, if the target service has any collection type in contract property like List<string>, then it is shown as array of string (string[]) in generated code.

You have to tell dotnet-svcutil to use that collection type by specifying a collection type parameter ct. But also you have to specify another reference parameter r to provide full path for the System.Collections assembly, otherwise it will give you error.

First run this command without providing the assembly path for System.Collection.

dotnet-svcutil https://localhost:8081/OrderManagement/OrderManagement.svc 
               -ct "System.Collections.Generic.List`1"

You will get this error message:

Error: No type could be loaded for the value 'System.Collections.Generic.List1' 
passed to the --collectionType option. Ensure that the assembly this type belongs 
to is specified via the --reference option.

Now provide a valid assembly path for System.Collection in r parameter:

dotnet-svcutil https://localhost:8081/OrderManagement/OrderManagement.svc
	-ct "System.Collections.Generic.List`1" 
	-r "C:\Program Files\dotnet\sdk\NuGetFallbackFolder\
           microsoft.netcore.app\2.2.0\ref\netcoreapp2.2\System.Collections.dll"

This command will create a Reference.cs file within ServiceReference folder, this time with collection type List<string> rather than string[].

Note: If you are running this command from powershell you might still get above error. Try to run from Windows Command Prompt and it will run successfully.

References:

Related Post(s):

December 22, 2020

WCF Proxy generation – using dotnet-svcutil

In the last post (WCF Proxy generation – using SvcUtil.exe) we have seen how to generate WCF proxy code using SvcUtil.exe.

In this post we will be looking into another option dotnet-svcutil.

This is a .NET Core CLI tool and is available cross-platform on Linux, macOS, and Windows.

Following are some of the reasons you may want to use dotnet-svcutil:

  • You can easily install it as NuGet package.
  • It will work even if you have a lower version of Visual Studio like the VS2017 (15.5 or less) version.
  • Since it is not bounded with Visual Studio version, you can also use it with free VS Code.
  • It is available cross-platform on Linux, macOS, and Windows.

From Visual Studio you can install using Nuget package manager as below:

Another option is to install it globally through the command line so that it can be used across the system.

You can use below command to install globally:

dotnet tool install --global dotnet-svcutil --version 2.0.2

Once installed, use this command to generate proxy code:

dotnet-svcutil https://localhost:8081/OrderManagement/OrderManagement.svc

This command will create a Reference.cs file within ServiceReference folder.

References:

Related Post(s):

December 19, 2020

WCF Proxy generation – using SvcUtil.exe

SvcUtil.exe is the the ServiceModel Metadata Utility tool used to generate service model code from the service URL or wsdl file.

In this example, we will generate client proxy classes by using service URL.

First make sure to have the target service up and running.

After verifying the service status go to Visual Studio Command Prompt and run the following command.

svcutil https://localhost:8081/OrderManagement/OrderManagement.svc /Language=c# 
		/t:Code /out:OrderManagementProxy.cs 
                /config:OrderManagementProxy.config

It contains following parameters:

  • First is the URL of the target service.
  • /Language specifies the output language in which we want to generate code.
  • /t Specifies the output to be generated by the tool, since we are generating proxy code so we will provide the value code.
  • /out Specifies the target file name for the generated code.
  • /config Specifies the filename for the generated configuration file, Default value is output.config

For config file you can also use another parameter /mergeConfig. It merges the generated configuration into an existing file, instead of overwriting the existing file. This will be useful if you provide your regular application's config file in the /config paramter, so in that case you dont want to overwrite that config file but to merge the new changes with existing configuration. For example like this:

svcutil https://localhost:8081/OrderManagement/OrderManagement.svc /Language=c# 
		/t:Code /out:OrderManagementProxy.cs 
                /config:app.config /mergeConfig

You can find the generated output code in the file OrderManagementProxy.cs in the current directory from where you run this command.

References:

Related Post(s):

November 2, 2020

.Net Core - Call WCF Service with Https link

In last post , we have seen how to add WCF reference in .Net Core Application. In this example we will see how we can call different WCF operations or methods both with Http link and Https link.

If the target WCF link is Http link then you can create the WCF client instance using following code snippet:

BasicHttpBinding basicHttpBinding = new BasicHttpBinding();
EndpointAddress endpointAddress = 
              new EndpointAddress("https://localhost:8081/OrderManagement/OrderManagement.svc");
OrderManagementClient wcfClient = 
              new OrderManagementClient(basicHttpBinding, endpointAddress);
var result = wcfClient.GetOrderByID(1);

However if the WCF link is bound over Https, then you have to make small changes in order to consume service with Https. You have to by-pass SSL Certificate Authentication. You can use following code snippet to consume WCF Service with Https link:

BasicHttpBinding basicHttpBinding = new BasicHttpBinding();
EndpointAddress endpointAddress = 
                new EndpointAddress("https://localhost:8082/OrderManagement/OrderManagement.svc");
OrderManagementClient wcfClient = 
                new OrderManagementClient(basicHttpBinding, endpointAddress);

//wcfClient.ClientCredentials.ServiceCertificate.SslCertificateAuthentication
//is need to be set for Https certificate authentication
wcfClient.ClientCredentials.ServiceCertificate.SslCertificateAuthentication =
	new X509ServiceCertificateAuthentication()
	{
		CertificateValidationMode = X509CertificateValidationMode.None,
		RevocationMode = System.Security.Cryptography.X509Certificates.X509RevocationMode.NoCheck
	};

var result = wcfClient.GetOrderByID(1);

Related Post:

November 1, 2020

.Net Core - Add WCF Reference

In this post, I will explain how you can add reference for a WCF Service in .Net Core Application, this will be a little bit different then how we consume WCF Service in regular .Net Framework.

In this example I have a WCF service already created, and I want to consume in .Net Core Console Application.

In Solution Explorer, right click on Connected Services node, and select Add Connected Service.

In Connected Services window, click on Microsoft WCF Web Service Reference Provider.

In the Service Endpoint tab, Enter the URL of WCF Service in the URL textbox and click Go button.

Type the desired namespace in Namespace textbox and click Next.

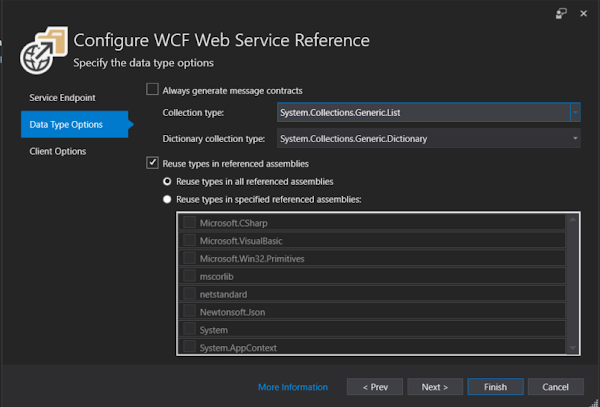
In the next tab Data Type Options, it will allow to change default options to generate client proxy. For example you can change Collection Type, the type from System.Array to System.Collections.Generic.List. Once you done with the changes click Next.

In Client Options tab, It will ask you to change the access level for generated classes. Default access level is public.

Click Finish button, and it will generate the required proxy classes to call WCF.

When the process completed, you are done with adding WCF reference.

Once you are done with adding reference, you can create an instance of the generated WCF client type and invoke the service operations as follows:

	BasicHttpBinding basicHttpBinding = new BasicHttpBinding();
	EndpointAddress endpointAddress = 
          		new EndpointAddress("http://localhost:8081/OrderManagement/OrderManagement.svc");
	OrderManagementClient wcfClient =
    			new OrderManagementClient(basicHttpBinding, endpointAddress);
	var result = wcfClient.GetOrderByID(1);

References:

Related Post(s):

October 31, 2020

OpenSSL - Creating CSR with -subj switch

If you are creating a CSR file by using a generated private key, you may use this command:

	openssl req -new -key mycertificate.key -out mycertificate.csr

You will be asked a series of questions after entering the above command:

  • Country Name (2 letter code)
  • State or Province Name (full name)
  • Locality Name (e.g., city)
  • Organization Name (e.g., company)
  • Organizational Unit Name (e.g., section)
  • Common Name (e.g., server FQDN)
  • Email Address
  • A challenge password
  • An optional company name

Using the -subj Switch

-subj allows you to provide all necessary information within the command itself. This switch disables the question prompts when generating a CSR, hence you can generate the CSR without having to provide the answers for questions being asked after entering the command.

	openssl req -new -key mycertificate.key -out mycertificate.csr 
		-subj "/C=SA/ST=Riyadh/L=Riyadh/O=MyCompanyLtd/OU=IT/CN=mycompany"

References:

Related Post(s):

OpenSSL - Check and display a certificate request (CSR)

In this series of OpenSSL, we have seen how to create CSR, Private Key, and generate Certificate , and then sign a child certificate using a Self-Signed Root CA . CSR is the required file use to generate certificate from, because it actually contains the information about the company for which the certificate is being generated.

Once a CSR is created, it is difficult to verify what information is contained in it because it is encoded. Since certificate authorities use the information in CSRs to create the certificate, you need to decode CSRs to make sure the information is accurate.

To check the CSR content you can use this command to view the information it contained (here mycertificate.csr is the file for which we need to view the content)

openssl req -noout -text -in mycertificate.csr

You will receive the output similar to this:

Certificate Request:
    Data:
        Version: 0 (0x0)
        Subject: C=SA, ST=Riyadh, L=Riyadh, O=BCB, OU=IT, CN=mycompany/emailAddress=idrees@mycompany.com
        Subject Public Key Info:
            Public Key Algorithm: rsaEncryption
                Public-Key: (4096 bit)
                Modulus:
                    00:d3:16:4c:b0:57:35:99:c9:a7:88:9e:04:24:e0:
                    61:59:3b:0e:46:4e:44:50:08:c6:de:58:40:12:2e:
                    fd:1a:f1:fa:49:be:25:49:f8:e2:93:d1:68:fa:a2:
                    ca:a7:95:93:ba:16:b9:1a:75:4a:04:70:59:87:39:
                    ff:75:d0:0b:5a:68:4f:7d:e0:32:c8:3f:16:17:bf:
                    1f:11:15:59:17:3d:ef:24:f6:3c:77:e2:4f:b7:f6:
                    10:70:29:cb:c4:e4:db:f7:4c:56:ed:b3:94:f6:37:
                    2f:bc:3e:f9:b6:69:e1:95:0a:61:af:7e:dd:64:03:
                    d8:0d:24:60:74:4d:31:22:f5:d3:10:c1:44:4f:b3:
                    e3:dc:ce:ca:5c:ac:82:5e:d3:45:eb:86:64:e9:aa:
                    37:48:55:52:09:e2:58:b1:14:59:d4:e6:08:fb:b2:
                    71:5e:af:a3:de:68:16:f8:88:a9:86:b1:6a:c1:cf:
                    be:0e:f6:2f:f2:f8:80:7f:bd:b2:77:9b:6a:76:28:
                    ad:44:13:29:46:46:e3:74:33:c4:03:29:20:63:76:
                    94:d2:09:e4:16:5f:f5:c9:ac:ba:46:12:22:f0:d3:
                    2d:26:d9:08:89:65:4b:1c:0a:fe:a3:f7:ed:73:ec:
                    57:a0:14:eb:2e:48:12:5c:9e:fd:17:8d:4d:e8:97:
                    ed:a8:8c:62:8e:a5:00:e4:20:85:69:30:39:87:b8:
                    18:be:df:40:18:97:ac:89:bf:3f:ab:ed:a1:ed:16:
                    0a:92:d6:c9:23:d6:60:cb:44:58:2b:bc:05:8d:41:
                    16:26:1f:65:04:bf:e1:71:51:54:f3:83:82:87:33:
                    dc:d9:d0:b3:6a:fc:15:88:ad:1a:c0:ed:c9:a7:f6:
                    dc:ef:9f:00:b3:43:db:32:34:a4:9c:ec:2b:7c:25:
                    74:72:59:25:ef:1d:66:80:e5:78:25:5d:39:81:8e:
                    6a:fa:65:2a:b8:14:af:f3:e7:20:b6:bd:bc:4e:b1:
                    de:07:31:64:22:9e:73:54:0b:7a:45:80:2e:d3:71:
                    98:08:5a:0f:58:d8:f0:4f:a8:4c:63:fb:80:f6:aa:
                    a4:a3:3e:3a:b2:c5:b7:43:c8:09:bd:7d:f9:40:9e:
                    2d:c9:e1:c1:40:9a:01:25:38:c0:04:0f:2a:13:56:
                    30:f8:fa:6d:86:16:5b:df:5e:31:0e:39:69:06:8e:
                    a0:6d:e3:d6:b6:ba:0e:d3:6d:ec:78:8a:2f:e7:fb:
                    71:4c:51:c1:d6:b2:1d:63:be:ef:0c:ef:59:34:db:
                    1f:5c:0e:1c:93:51:51:7c:de:19:fa:74:a0:8b:a6:
                    ae:2a:29:25:d6:d8:25:2f:3e:b2:ff:9a:d9:cb:2b:
                    aa:4a:1b
                Exponent: 65537 (0x10001)
        Attributes:
            challengePassword        :mypassword
            unstructuredName         :My Optional Company Name
    Signature Algorithm: sha256WithRSAEncryption
         14:fd:eb:04:ce:57:cc:ef:c2:ac:4c:c3:34:30:b5:25:e0:e2:
         ca:04:34:6c:d4:d1:ad:c7:b6:3a:c7:2a:86:6f:9a:2a:0d:f4:
         48:90:75:2b:a6:d3:30:be:c7:10:c2:f3:76:3f:67:6a:4e:58:
         a7:33:39:78:9a:2b:04:c8:83:8b:da:cb:c9:6f:39:c0:5f:b6:
         2d:61:33:1d:e7:89:cd:c6:03:c9:ae:e9:9d:5a:20:01:0a:42:
         a1:1e:ca:03:36:b3:27:5b:aa:e3:8e:ee:ca:59:7b:0b:75:e1:
         e2:fb:a4:c1:a9:07:65:42:7d:c6:24:da:47:fa:68:86:81:b1:
         5e:b9:bd:f9:88:1a:01:d2:33:cb:30:9a:77:67:bc:b2:07:e2:
         3c:9b:10:1d:15:bb:78:29:3b:b5:28:a0:55:31:c2:04:bd:07:
         59:88:96:e5:92:9e:9e:a2:38:26:b2:a5:d4:68:b5:75:2d:26:
         6d:cd:df:01:a0:d8:a6:2c:c4:2e:2c:d9:4d:b3:a3:d2:cd:21:
         30:00:90:df:67:6f:fc:3b:3b:ba:c2:a8:13:86:ab:ac:06:97:
         56:d0:2d:19:e1:14:2f:28:66:ea:79:33:24:c3:59:fc:d9:93:
         b1:33:34:d4:40:85:c7:02:e7:1d:f0:73:76:97:f1:2e:b5:0a:
         f2:cf:28:c7:15:cb:ce:77:2f:c5:0f:33:d5:69:aa:c8:e6:b4:
         5f:0f:84:4c:a1:10:a5:71:b1:05:5d:2a:6f:ca:8f:9e:24:cc:
         4a:49:72:ce:07:b1:e6:74:01:d3:d1:28:29:a9:36:18:45:f2:
         6c:45:44:b0:2c:ca:e5:e2:fd:d2:1b:6a:f8:be:52:20:21:10:
         da:6f:e5:83:28:7d:22:25:38:62:88:6c:8e:bc:24:ee:7e:ba:
         7b:1c:a8:d0:eb:bf:59:03:f1:97:9e:ba:37:a3:32:9d:2a:62:
         0a:cf:22:e2:96:1c:29:48:1c:e6:f9:23:a4:5c:63:8d:5f:76:
         35:c7:b1:32:0d:69:48:d7:2f:6d:a3:0f:e2:8a:6d:a0:ca:16:
         26:eb:32:d6:19:b5:a1:52:1c:21:f8:9e:62:fc:b6:3e:b4:12:
         96:74:e9:ca:d0:33:98:68:77:cb:71:1e:ed:ef:e6:9a:bf:17:
         db:8e:3a:09:f3:6b:28:3a:16:a4:31:54:10:58:a4:f7:46:da:
         45:30:ea:e4:cc:99:a6:a4:ce:95:69:31:f9:b3:c7:ca:83:82:
         14:69:8e:fa:7c:2f:96:2c:fd:d5:2c:98:b6:dd:f1:bc:29:63:
         fb:f7:6b:28:86:b7:f4:d8:83:64:ce:7d:7d:81:91:e6:01:3e:
         93:11:80:04:69:84:01:51

If you also want to verify the CSR you can add -verify operator in the same command.

openssl req -noout -text -verify -in mycertificate.csr

If the command successfully completed and verifies the CSR, it will also display the message verify OK alonwith previous output.

verify OK

References:

Related Post(s):

October 17, 2020

OpenSSL - extfile parameter to pass custom config file

In this post you will see how to pass external/custom config file to openssl while signing a child certificate from Root CA. To pass external config file we will use extfile parameter.

-extfile filename

file containing certificate extensions to use. If not specified then no extensions are added to the certificate.

In following command we are using this parameter to override default extensions by providing our custom extension file my-openssl-client-auth.cnf. In this file we can only provide the extensions which we need to override.
openssl x509 -req -days 365 -in childcertificate.csr -CA mycertificate.crt 
		-CAkey mycertificate.key -set_serial 01 -out childcertificate.crt 
		-extfile C:\Test\Openssl\my-openssl-client-auth.cnf
In this exmaple, our custom extension file(my-openssl-client-auth.cnf) contains the following content to override only one extension property extendedKeyUsage
extendedKeyUsage = clientAuth
clientAuth tells the openssl to create certificate for the purpose of only Client Authentication.

References:

Related Post(s):

OpenSSL - Sign Child Certificate with Self-Signed Root CA

In the last post we have learned how to generate Private Key, CSR and a Self-Signed Certificate cert file. In this post we will go one step further and create a child certificate and signed it from root authority (which in this case is mycertificate.crt, created in last post)

Lets start creating the child certificate and then sign it for Self-Signed Root CA.

Generate a private key.

Run this command to generate private key:

openssl genrsa -out childcertificate.key 4096

Create a certificate signing request (CSR)

The CSR contains the common name and some other information. Here is the command you need to create CSR.

openssl req -sha256 -new -key childcertificate.key -out childcertificate.csr

After entering this command, you will be asked series of questions.

Here is the short description of questions.

  • Country Name (2 letter code): The two-letter country code where the company is legally located.
  • State or Province Name (full name): The state/province where the company is located.
  • Locality Name (e.g., city): The city where the company is located.
  • Organization Name (e.g., company): Company's legally registered name (e.g., MyCompany).
  • Organizational Unit Name (e.g., section): The name of the department within the organization. (To leave it blank; simply press Enter.)
  • Common Name (e.g., server FQDN): The fully-qualified domain name (FQDN) (e.g., www.mycompany.com).
  • Email Address: Your email address. (To leave it blank; simply press Enter.)
  • A challenge password: You password. (To leave it blank; simply press Enter).
  • An optional company name: Optional Company Name (To leave it blank; simply press Enter).

Your answers to these questions will be embedded in the CSR.

From the above command, it will store the CSR information in childcertificate.csr file.

Generate a child certificate (crt file) and Sign with Root CA.

Run this command to create certificate(.crt) file from CSR, and also sign with Root CA by providing the root certificate's crt and key files.

openssl x509 -req -days 365 -in childcertificate.csr -CA mycertificate.crt 
        -CAkey mycertificate.key -set_serial 01 -out childcertificate.crt

In this command:

  • mycertificate.crt and mycertificate.key represents the Root CA being used to sign the child certificate.
  • childcertificate.crt is the target file we want to generate from childcertificate.csr file.

Extract Public Key

If you want to extract the public key, you can use this command:

openssl rsa -in childcertificate.key -pubout > childcertificate.pub

It will generate the public key in childcertificate.pub file.

Generate PFX(or PKCS#12) file for the certificate.

The PFX or PKCS#12 format is a binary format for storing the certificate and private key into a single encryptable file. PFX files are usually found with the extensions .pfx and .p12

openssl pkcs12 -export -out childcertificate.pfx -inkey childcertificate.key 
        -in childcertificate.cer

References:

Related Post(s):

September 27, 2020

OpenSSL - WARNING: can't open config file: C:/OpenSSL/openssl.cnf

After installing openssl, we have to set the path for its config file. Otherwise it will keep giving a warning message for any command we run. For example you are trying to run this command to generate private key.

openssl genrsa -out mycertificate.key 4096

It will give you following warning message:

WARNING: can't open config file: C:/OpenSSL/openssl.cnf
Generating RSA private key, 4096 bit long modulus
......................++
.....................................................++
unable to write 'random state'
e is 65537 (0x10001)

To fix this issue, we have to tell openssl where to find its .cnf file.

We can do this by one of the following ways.

  • Before starting to create private keys or CSR from openssl command prompt, run this command to set is config file path.
    set OPENSSL_CONF=C:\OpenSSL\bin\openssl.cnf
    You can find this cnf file inside bin folder, at the root of the path where you have installed openssl.
  • Set the same variable OPENSSL_CONF in the Windows environment variables, with the path to the config file at your system.
  • You can use -config parameter to append the config file path with each command you run from openssl. i.e.
    openssl ....................  -config C:\OpenSSL\bin\openssl.cnf
  • If you are using powershell, you can set environment variable like this:
    $env:OPENSSL_CONF = "C:\OpenSSL\bin\openssl.cnf"

September 26, 2020

OpenSSL - Generate Private Key, CSR and Certificate

OpenSSL is a robust, commercial-grade tool for the Transport Layer Security (TLS) and Secure Sockets Layer (SSL) protocols. Its an open-source command line tool that is commonly used to:

  • Generate private keys
  • Create CSRs
  • Install your SSL/TLS certificate
  • Identify certificate information.

In this we will see how to generate Private Keys, CSRs and Certificate.

If you do not have openssl already installed, you can download it from https://www.openssl.org/source/

Lets start creating the CSR and then Self-Signed Certificate.

Generate a private key.

Run this command to generate private key:

openssl genrsa -out mycertificate.key 4096

Create a certificate signing request (CSR)

This would be a .csr file used to send to a Certificate Authority (CA) (e.g., DigiCert) to request a public SSL certificate, since we are generating a self-sgined certificate so we will not send the generated CSR to a Certificate Authority (CA), but will create our own certificate .cer file using openssl.

The CSR contains the common name and some other information. Here is the command you need to create CSR.

openssl req -sha256 -new -key mycertificate.key -out mycertificate.csr

After entering this command, you will be asked series of questions.

Here is the short description of questions.

  • Country Name (2 letter code): The two-letter country code where the company is legally located.
  • State or Province Name (full name): The state/province where the company is located.
  • Locality Name (e.g., city): The city where the company is located.
  • Organization Name (e.g., company): Company's legally registered name (e.g., MyCompany).
  • Organizational Unit Name (e.g., section): The name of the department within the organization. (To leave it blank; simply press Enter.)
  • Common Name (e.g., server FQDN): The fully-qualified domain name (FQDN) (e.g., www.mycompany.com).
  • Email Address: Your email address. (To leave it blank; simply press Enter.)
  • A challenge password: You password. (To leave it blank; simply press Enter).
  • An optional company name: Optional Company Name (To leave it blank; simply press Enter).

Your answers to these questions will be embedded in the CSR.

From the above command, it will store the CSR information in mycertificate.csr file.

Generate a certificate (cer file) from CSR.

Run this command to create certificate(.cer) file from CSR.

openssl x509 -req -sha256 -days 365 -in mycertificate.csr 
       -signkey mycertificate.key -out mycertificate.cer

Using our previsouly generated key and CSR, here we are generating the certificate (.cer) file with validity of 365 days.

Convert .cer file to .crt file.

You can use the folllowing command to create .crt file from .cer file (.crt may need if you want to create a child certificate being signed from this mycertificate)

openssl x509 -inform PEM -in mycertificate.cer -out mycertificate.crt

Extract Public Key

If you want to extract the public key, you can use this command:

openssl rsa -in mycertificate.key -pubout > mycertificate.pub

It will generate the public key in mycertificate.pub file.

Generate PFX(or PKCS#12) file for the certificate.

The PFX or PKCS#12 format is a binary format for storing the certificate and private key into a single encryptable file. PFX files are usually found with the extensions .pfx and .p12

openssl pkcs12 -export -out mycertificate.pfx -inkey mycertificate.key 
        -in mycertificate.cer

References:

Related Post(s):

September 7, 2020

Host Django site in IIS

Django is a free, open source web framework written in the Python language.

A web framework is a software framework that provide a standard way to build web applications. It allows web developers to focus on developing the business requirements rather than reinventing the wheel every time for standard, secure web applications.

In this post we will create a django project and host it in IIS.

It is best practice to provide a dedicated environment for each Django project you create, it allows you to run different versions of django for different applications on the same machine. There are many options to manage environments within the Python ecosystem, we will use the Python's default package venv for managing environments.

Create django project

Following are the steps you need to create a django project.

  • To create a virtual environment for your project, open a new command prompt, navigate to the folder where you want to create your project and then run the following command:

    	python -m venv myproject_env
    

    In this exmaple, I have executed this command at c:\projects. Above command will create a virtual environment and you will see a new folder named myproject_env at the path where you executed this command.

  • Next, we need to activate the environment, run this command from the command prompt(from same path).

    	.\myproject_env\Scripts\activate
    

    We have setup our virtual envrionemnt.

  • Lets create a new directory named src.

    	mkdir src 
    

    We have src folder at c:\projects.

  • Move to src folder

    	cd src
    
  • and install django by using this command.

        pip install Django
    

    This will install the latest release of django.

  • Create a new django project (from command prompt at src folder),

    	django-admin startproject myproject
    
  • Execute manage.py runserver command, it will start the django site with development server at http://127.0.0.1:8000/

    	python manage.py runserver
    
  • Enter this url in browser and you will see django's default page rendered successfully.

Install and enable wfastcgi

wfastcgi:

wfastcgi.py provides a bridge between IIS and Python using WSGI and FastCGI. It can be used with any Python web application or framework that supports WSGI.

  • Run the following command to install wfastcgi

    	pip install wfastcgi
    
  • After installing wfastcgi, we need to enable it using:

    	wfastcgi-enable
    

    Note that, you need to open command prompt will elevated privilege.

    If the above command is executed successfully, it will display the output similar to this:

    Applied configuration changes to section "system.webServer/fastCgi" 
        for "MACHINE/WEBROOT/APPHOST" 
        at configuration commit path "MACHINE/WEBROOT/APPHOST"
    

Host django site in IIS

We have a working django site. Following are the steps we need to configure to make django work under IIS.

  • Copy the project's folder(the folder which contains the actuall source code, in our case myproject folder located at c:\projects\src) in wwwroot.

  • Create a new website in IIS with name myproject.

    In our exmaple we are using port 82 for new website.

  • Open Hanlder Mappings section.

  • Click on Add Module Mapping link on the right side:

  • In Add Module Mapping dialog box, enter * for Request Path.

  • From Module dropdown, select FastCgiModule.

  • In Executable textbox, enter the following path to python.exe and wfastcgi.py separated by | sign. In our case the path is:

    "c:\projects\myproject_env\scripts\python.exe
        |
        c:\projects\myproject_env\lib\site-packages\wfastcgi.py" 
    	

    You need to change the path as per your environment.

  • Enter any desired name in Name field, in our case, it is Django Hanlder.

  • Click the Request Restrictions button, it will open the following dialog.

  • Uncheck the checkbox Invoke handler only if request is mapped to:

  • Then click OK on both dialog boxes.

  • It will ask you to create a FastCGI application.

    Click Yes.

  • It creates a web.config file in the project's root folder which we have copied in wwwroot(C:\inetpub\wwwroot\myproject). Open the web.config file and update the content as below:

    	<?xml version="1.0" encoding="UTF-8"?>
    	<configuration>
    		<system.webServer>
    			<handlers>
    			<add 
                    	name="Django Handler" 
                    	path="*" verb="*" 
                    	modules="FastCgiModule" 
                    	scriptProcessor="c:\projects\myproject_env\scripts\python.exe
                                     |
                                     c:\projects\myproject_env\lib\site-packages\wfastcgi.py" 
                    	resourceType="Unspecified" 
                    	/>
    			</handlers>
    		</system.webServer>
    		<appSettings>
    		  <add key="WSGI_HANDLER" value="myproject.wsgi.application" />
    		  <add key="PYTHONPATH" value="C:\inetpub\wwwroot\myproject" />
    		  <add key="DJANGO_SETTINGS_MODULE" value="myproject.settings" />
    		</appSettings> 
    	</configuration>


    Make sure to change the project name and path as per your settings.

That's it. We have setup the django site in IIS. Navigate the follwoing link in browser:

	http://localhost:82/

You can change the port number if you have configured a different one when creating website in IIS.

And you will see the django default page.

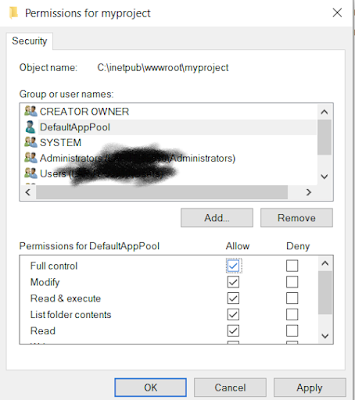
If you get any error, check if you have given the proper rights on the project folder to DefaultAppPool.

August 18, 2020

Conditionally run a target for publish profile

In the last post we have seen how to write custom actions for BeforePublish and AfterPublish events. In this post we will take one more step towards customizing the action execution. Occasionally we need to perform custom actions like copying files to output folder but with some condition, like if a particular directory not already exists in the output or could be any other condition etc.

In this post we are not the exploring capability of actions you can perform with target tag but will see how you can add conditions with Target tag. So I will simply write custom messages to the console with different conditions.

The following Target tag outputs the text message to console based on the condition specified in Condition attribute. Here we are checking if the $(MSBuildProjectDirectory)\MyData folder exists, if so, then it will output a text message to the console otherwise it will do nothing.

<Target Name="CustomActionsAfterPublish" AfterTargets="AfterPublish" Condition="Exists('$(MSBuildProjectDirectory)\MyData')">
   <Message Text="Some text to the console" Importance="high" />
</Target>

Here we have used MSBuild reserved property MSBuildProjectDirectory which represents the absolute path of the directory where the project file is located, and then we are checking if a folder named MyData exists in that location.

Obviously you are not going to check for this condition in real project but this is just to demonstrate that you can use the Exists operrator in Condition attribute to check for a folder exists. You can reverse the same condition by using the ! operator to check if folder not exists.

<Target Name="CustomActionsAfterPublish" AfterTargets="AfterPublish" Condition="!Exists('$(MSBuildProjectDirectory)\MyData')">
   <Message Text="Some text to the console" Importance="high" />
</Target>

Another operator you can use in Condition attribute is == operator. For exmaple may want to check if the current publish profile's configuration is DEBUG then you want to run the target action. You can write this condition as follows:

<Target Name="CustomActionsAfterPublish" AfterTargets="AfterPublish" Condition="'$(Configuration)'=='DEBUG'">
   <Message Text="Some text to the console" Importance="high" />
</Target>

Here we have used MSBuild project property Configuration which contains the configuration value you specified in your publish profile.

Similary you can use != operator to check for inequality.

<Target Name="CustomActionsAfterPublish" AfterTargets="AfterPublish" Condition="'$(Configuration)'!='DEBUG'">
   <Message Text="Some text to the console" Importance="high" />
</Target>

This will run the target action if current configuration is not equal to DEBUG.

Some of the commonly used project propeties are:

  • MSBuildProjectName: Represents the filename of the project without extension.
  • MSBuildProjectFile: Represents the full filename of the project with extension.
  • Platform: The operating system you are building for. e.g "Any CPU", "x86", and "x64".
  • MSBuildProjectDirectory: Absolute path of the directory where the project file is located.

You may find more details about project properties on Microsoft Docs:

August 17, 2020

Run a target action before or after publishing

Target tag allow us to execute custom actions on particular events. We can also specify the order of target actions in a particular sequence we need. We have different target attributes for publish profiles, but in this post I will demonstrate BeforeTargets and AfterTargets for publish event.

Microsoft Docs:

BeforeTargets and AfterTargets. These Target attributes specify that this target should run before or after the specified targets (MSBuild 4.0).

We can use these built-in BeforePublish and AfterPublish targets to execute an action before or after the publish. For exmaple, following tag logs the console messages before and after publishing.

<Target Name="MyCustomActionBeforePublish" BeforeTargets="BeforePublish">
    <Message Text="Logging Message BeforePublish" Importance="high" />
  </Target>
  <Target Name="MyCustomActionAfterPublish" AfterTargets="AfterPublish">
    <Message Text="Logging Message AfterPublish" Importance="high" />
</Target>

Just logging a console message is not very helpful. You can perform a variety of options, one could be to copy files from a particular source directory. Following example allows the publishing profile to copy files from the path specified in Include attribute of MySourceFiles to the destination path specified in DestinationFolder attribute of Copy tag. Since we are using the event name AfterPublish, the source content will be copied after it completes the publishing.

<Target Name="MyCustomActionAfterPublish" AfterTargets="AfterPublish">
    <ItemGroup>
      <MySourceFiles Include="C:\Test\ExternalContent\*.*"/>
    </ItemGroup>
    <Copy SourceFiles="@(MySourceFiles)" DestinationFolder="bin\Debug\netcoreapp2.2\publish\TestTarget\"/>
  </Target>

In this exmaple, we are using absolute path in MySourceFiles tag, you can also use relative path as illustrated in DestinationFolder attribute of Copy tag.

References:

July 22, 2020

How to include external files/folders in Publish Profile

Often we need to include external files/folders in publish profile to deploy on published site. We have two ways to achieve this:

General file inclusion

In this method we use the DotNetPublishFiles tag, which is provided by a publish targets file in the Web SDK.

The following example's demonstrates how to copy a folder located outside of the project directory to the published site.

<ItemGroup>
    <MyCustomFiles Include="$(MSBuildProjectDirectory)/../ExternalContent/**/*" />
    <DotNetPublishFiles Include="@(MyCustomFiles)">
      <DestinationRelativePath>wwwroot/ExternalContent/%(RecursiveDir)%(Filename)%(Extension)</DestinationRelativePath>
    </DotNetPublishFiles>
  </ItemGroup>
  • Declares a MyCustomFiles(it can be any custom name) tag to cover files matching the globbing pattern specified in Include attribute. The ExternalContent folder referenced in the pattern is located outside of the project directory. We are using a reserved property $(MSBuildProjectDirectory), which resolves the project file's absolute path.

  • In DotNetPublishFiles tag, we provide our custom tag name MyCustomFiles in the Include attribute, whih serves as a source path for files/folders. In DestinationRelativePath tag, we specified the target path(with respect to published folder) where we want to copy the files. In this example, we are copying ExternalContent folder's content to wwwroot/ExternalContent folder. We have also used item metadata such as %(RecursiveDir), %(Filename), %(Extension). This represents the wwwroot/ExternalContent folder of the published site.

If you don't want to specify source path relative to the project file's absolute path, you can also specific local absolute path, like:

  <ItemGroup>
    <MyCustomFiles Include="C:\Test\ExternalContent\*" />
    <DotNetPublishFiles Include="@(MyCustomFiles)">
      <DestinationRelativePath>wwwroot/ExternalContent/%(RecursiveDir)%(Filename)%(Extension)</DestinationRelativePath>
    </DotNetPublishFiles>
  </ItemGroup>

Here we have changed the source relative path from $(MSBuildProjectDirectory)/../ExternalContent/**/* to C:\Test\ExternalContent\*.

Selective file inclusion

In this method we will use the ResolvedFileToPublish tag, which is provided by a publish targets file in the .NET Core SDK. Because the Web SDK depends on the .NET Core SDK, either item can be used in an ASP.NET Core project.

The following exmaple demonstrates how to copy a file located outside of the project into the published site's wwwroot folder. The file name of externalfile.txt is maintained.

  <ItemGroup>
    <ResolvedFileToPublish Include="..\externalfile.txt">
      <RelativePath>wwwroot\externalfile.txt</RelativePath>
    </ResolvedFileToPublish>
  </ItemGroup>
  • In ResolvedFileToPublish tag, we are using Include attribute to specify the file we want to copy. This file resides in the parent directory of the project file's container directory.

  • RelativePath represent the relative path for the published directory.

The default behavior of ResolvedFileToPublish is to always copy the files provided in the Include attribute to the published site. We can override this default behavior by including a CopyToPublishDirectory child tag with inner text of either Never or PreserveNewest. For example:

 <ResolvedFileToPublish Include="..\externalfile.txt">
   <RelativePath>wwwroot\externalfile.txt</RelativePath>
   <CopyToPublishDirectory>PreserveNewest</CopyToPublishDirectory>
 </ResolvedFileToPublish>

Again, if you don't want to specify source path relative to the project file's absolute path, you can also specific local absolute path, like:

  <ItemGroup>
    <ResolvedFileToPublish Include="C:\Test\externalfile.txt">
      <RelativePath>wwwroot\externalfile.txt</RelativePath>
      <CopyToPublishDirectory>PreserveNewest</CopyToPublishDirectory>
    </ResolvedFileToPublish>
  </ItemGroup>

References:

July 21, 2020

How to exclude files from Publish Profile

When publishing ASP.NET Core web apps, it will publish/deploy the:

  • Build artifacts
  • files with .config extension
  • files with .json extension
  • everything inside wwwroot folder

At certain times you may need to exclude some specific file or folder from deployment content.

There are two ways you can exclude files from publishing.

Content Tag

If you need to prevent multiple files from being copied to deployed folder, you can use globbing patterns to cover a range of matching files.

Content tag will be used to specify the action on the file. For example, the following Content element will exclude all (.txt) files in the wwwroot\content folder and its subfolders.

<ItemGroup>
  <Content Update="wwwroot/content/**/*.txt" CopyToPublishDirectory="Never" />
</ItemGroup>

Note that it will delete all (.txt) files that are already exists at the deployed site within specified folder path.

You can specify different globbing patterns as per your requirement. Another version of pattern coud be like this:

<ItemGroup>
  <Content Update="wwwroot/content/Site*.css" CopyToPublishDirectory="Never" />
</ItemGroup>

This will match all css files in wwwroot/content folder with file name starts with Site e.g. SiteAdmin.css, SiteCustomer.css, etc...

You can add this markup to a publish profile (.pubxml file) or the .csproj file. Since .csproj file operates at the global level, if you add this tag to the .csproj file, the rule will be applied to all publish profiles in the project.

MsDeploySkipRules Tag

Another way to exclude file or folder is to use MsDeploySkipRules tag.

The following tag excludes all files/folders from the wwwroot\content folder:

<ItemGroup>
  <MsDeploySkipRules Include="CustomSkipFolder">
    <ObjectName>dirPath</ObjectName>
    <AbsolutePath>wwwroot\\content</AbsolutePath>
  </MsDeploySkipRules>
</ItemGroup>

Note that unlike Content tag, this will not delete the targeted file or folder if that are already exists on the deployed site.

Similarly you can specify a single file in AbsolutePath tag, but you need to change the ObjectName tag to filePath rather than dirPath, and also change the value of Include attribute from CustomSkipFolder to CustomSkipFile.

<ItemGroup>
  <MsDeploySkipRules Include="CustomSkipFile">
    <ObjectName>filePath</ObjectName>
    <AbsolutePath>wwwroot\\content\\Site.css</AbsolutePath>
  </MsDeploySkipRules>
</ItemGroup>

References:

June 25, 2020

Fixing the error "Web Deploy cannot modify the file on the destination because it is locked by an external process."

When you publish your web application from Visual Studio, you many encounter file lock error:

Web Deploy cannot modify the file 'MyApi.dll' on the destination because it is locked by an external process.
In order to allow the publish operation to succeed, you may need to either restart your application to release the lock, 
or use the AppOffline rule handler for .Net applications on your next publish attempt.  
Learn more at: http://go.microsoft.com/fwlink/?LinkId=221672#ERROR_FILE_IN_USE.

When you publish web application in Visual Studio, it will not force the remote app to be stopped/restarted. The Web Deploy team has introduced an AppOffline rule which provides a solution for this problem.

There could be many reasons you may want to take your app offline while publishing. For example you app has files locked which need to be updated (the reason behind above error), or you need to clear an in-memory cache for changes to take effect (like ASP.Net Core app pool will keep configuration values from appsettings.json file in memory, and you have to restart the apppool to make changes take effect, if it is not configured with auto-load option).

We can define publish profiles in Visual Studio, which are simple xml files with .pubxml extension stored under Properties\PublishProfiles.

These publish profiles contain the settings for a particular profile. You can customize these files to modify the publish process. To enable this find the .pubxml file corresponding to the publish profile you want to update. Then add the following element in the PropertyGroup element.

 <EnableMSDeployAppOffline>true</EnableMSDeployAppOffline>

The resulting publish profile will look similar to this.

<?xml version="1.0" encoding="utf-8"?>
<!--
This file is used by the publish/package process of your Web project. You can customize the behavior of this process
by editing this MSBuild file. In order to learn more about this please visit https://go.microsoft.com/fwlink/?LinkID=208121. 
-->
<Project ToolsVersion="4.0" xmlns="http://schemas.microsoft.com/developer/msbuild/2003">
  <PropertyGroup>
    <EnableMSDeployAppOffline>true</EnableMSDeployAppOffline>
    <WebPublishMethod>MSDeploy</WebPublishMethod>
    <LastUsedBuildConfiguration>Release</LastUsedBuildConfiguration>
    <LastUsedPlatform>Any CPU</LastUsedPlatform>
    <SiteUrlToLaunchAfterPublish />
    <LaunchSiteAfterPublish>True</LaunchSiteAfterPublish>
    <ExcludeApp_Data>False</ExcludeApp_Data>
    <TargetFramework>netcoreapp2.2</TargetFramework>
    <ProjectGuid>51c6d4da-2c14-4beb-8113-2bea0cfa3000</ProjectGuid>
    <SelfContained>false</SelfContained>
    <_IsPortable>true</_IsPortable>
    <MSDeployServiceURL>localhost</MSDeployServiceURL>
    <DeployIisAppPath>Default Web Site/MyApi</DeployIisAppPath>
    <RemoteSitePhysicalPath />
    <SkipExtraFilesOnServer>True</SkipExtraFilesOnServer>
    <MSDeployPublishMethod>InProc</MSDeployPublishMethod>
    <EnableMSDeployBackup>False</EnableMSDeployBackup>
    <UserName />
    <_SavePWD>False</_SavePWD>
  </PropertyGroup>
</Project>

Once you save these changes, when you publish using that profile your app will be taken offline during publishing, and you will not receive above error message for file lock.

Edit .csproj file

Another way to set this property is from .csproj file, which will effect every profile in a given project.

You can place the following PropertyGroup in your project file.

<PropertyGroup>
  
  <!--... other properties-->
  
  <EnableMSDeployAppOffline>true</EnableMSDeployAppOffline>
</PropertyGroup>

Visual Studio 2017 - Create a Publish Profile

In Visual Studio you can create Publish profiles to simplify the publishing process. You can add any number of profiles within a single project to publish the application for different scenarios or environments. Once the profile is created, you can use that profile to publish the application from Visual Studio or from command line.

You can create a publish profile by right click on the project and click Publish option.

Note that you need to launch the Visual Studio under Administrator mode in order to create/save a profile.

It will open a dialog and ask you to Pick a Publish target. In this example I am selecting the option IIS, FTP, etc.

Select the IIS, FTP, etc option and click Publish button on the bottom. It will open a new dialog allow you to configure profile. Fill in the required information. In this example, I am publishing MyApp on the server localhost.

Click the Next button, it will allow you to configure more settings, like Configuration, Target Framework, Remove additional files at destination etc.

After you are satisfied with the configuration settings click on the Save button. Visual Studio's publish tool creates an xml file at Properties/PublishProfiles/{PROFILE NAME}.pubxml describing the publish profile. This file contains configuration settings that will be consumed by the publishing process. You can easily edit this xml file to customize the publish process. When you click on the Save button, it will close this dialog and returns back to the project's publish screen. It will start publishing your project first time on the target server. In IIS it will create a new website with the name you provided during publish profile, and sets the Application pool to the DefaultAppPool

If everything goes fine, after successful publishing it will open the target URL in the default browser.

May 21, 2020

ASP.Net Core Controllers - Secure with Api Key

In this post I will go through a simple example of how to authenticate an .Net Core Controller with Api Key in ASP.NET Core 2.2 API with C#. I am using Visual Studio 2017 with .Net Core 2.2 for developing the API, and postman tool for testing the API.

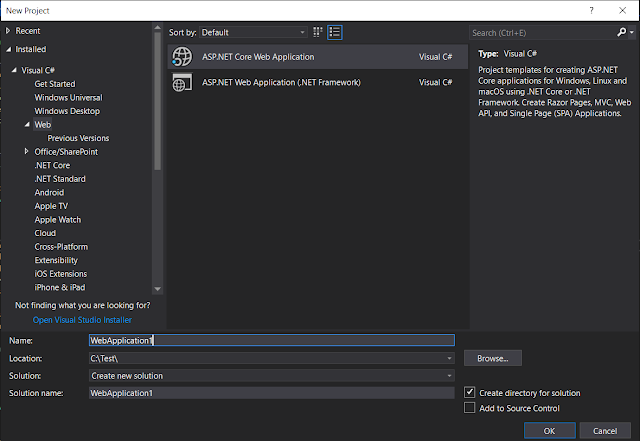
First create a new project from Visual Studio 2017(you can also use Visual Studio Code with .Net Core CLI to create sample project structure) with project template ASP.Net Core Web Application .

Create ASP.Net Core Web Application

In the next dialog, it will ask you for the default template to auto-generate required project structure for you, here select the API from given templates.

Create ASP.Net Core Web Application - Template

It will auto-generate a controller ValuesController with different REST action methods.

  • Get
  • Post
  • Put
  • Delete

Run the project, and from postman make a call to the values controller's get method (you may have a different port number):

 https://localhost:44365/api/values

You will see the output:

ASP.Net Core Web Application - Default Output

Till now, we have created a fresh API project and run it successfully. Lets add Key Authentication in this API.

We will implement a Filter ApiKeyAuthAttribute to check for Api Key in the request header(you may check other sources like querystring, or request body etc). ApiKeyAuthAttribute will implement the interface IAsyncActionFilter so that it can inspect incoming request for Api Key. Also it will inherit from Attribute class so that we can use this filter as an attribute on our controller or action methods where we need authentication. In ApiKeyAuthAttribute, we have to implement IAsyncActionFilter's member OnActionExecutionAsync where we will write our logic to check for Api Key.

[AttributeUsage(AttributeTargets.Class | AttributeTargets.Method)]
public class ApiKeyAuthAttribute : Attribute, IAsyncActionFilter
{
 private const string ApiKeyHeaderName = "X-Api-Key"; // header-name constant
 private const string SecretApiKey = "My Secret"; // store this key in config file or database etc.
 
 public async Task OnActionExecutionAsync(ActionExecutingContext context, ActionExecutionDelegate next)
 {
  //if no header found, return UnauthorizedResult
  if (!context.HttpContext.Request.Headers.TryGetValue(ApiKeyHeaderName, out var requestApiKey))
  {
   context.Result = new UnauthorizedResult();
   return;
  }
  
  //if header is found, but key is not maching with our secret key, return UnauthorizedResult
  //checking against hardcoded local variable, you may want to store this in external source or call an external service to authenticate provided key.
  if (!SecretApiKey.Equals(requestApiKey))
  {
   context.Result = new UnauthorizedResult();
   return;
  }

  //if reaches here, it means the request has valid apikey, so it is authenticated, call the next middleware component.
  await next();
 }
}

Next we have to decorate the desired controller(in our case ValuesController) with the custom attribute ApiKeyAuth.

ValuesController - ApiKeyAuth Attribute

We are done here. Note that we don't have to make any changes in Startup.cs class when you are using Filter as opposed to our last example of BasicAuthenticationHandler where we need to call AddAuthentication() method on IServiceCollection object to configure the target authentication handler.

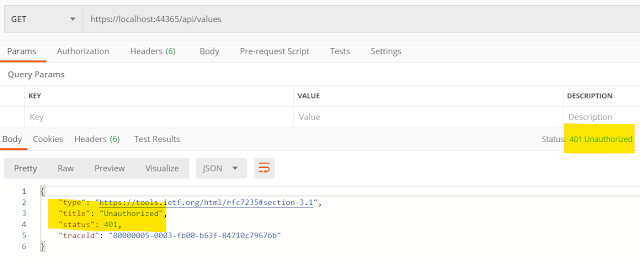
Your API is ready with Key Authentication. With postman if you make a call without X-Api-Key header(or with invalid header value), it will give you 401 error.

Postman -  Call Api - 401 Error

With a valid value of X-Api-Key, in our case My Key 123, postman will receive success response.

Postman -  Call Api - 200 OK Response

References:

May 20, 2020

ASP.Net Core API - How to implement BasicAuthentication

In this tutorial we'll go through a simple example of how to implement Basic authentication in ASP.NET Core 2.2 API with C#. I am using Visual Studio 2017 with .Net Core 2.2 for developing the API, and postman tool for testing the API.

First create a new project from Visual Studio 2017(you can also use Visual Studio Code with .Net Core CLI to create sample project structure) with project template ASP.Net Core Web Application .

Create ASP.Net Core Web Application

In the next dialog, it will ask you for the default template to auto-generate required project structure for you, here select the API from given templates.

Create ASP.Net Core Web Application - Template

It will auto-generate a controller ValuesController with different REST action methods.

  • Get
  • Post
  • Put
  • Delete

Run the project, and from postman make a call to the values controller's get method (you may have a different port number):

 https://localhost:44365/api/values

You will see the output:

ASP.Net Core Web Application - Default Output

Till now, we have created a fresh API project and run it successfully. Lets add Basic Authentication in this API.

In Startup.cs, replace the code for ConfigureServices() method with the following:

public void ConfigureServices(IServiceCollection services)
{
 services.AddMvc().SetCompatibilityVersion(CompatibilityVersion.Version_2_2);

 // configure basic authentication 
 services.AddAuthentication("BasicAuthentication")
  .AddScheme<AuthenticationSchemeOptions, BasicAuthenticationHandler>("BasicAuthentication", null);
} 

Here we have added BasicAuthenticationHandler as authentication mechanism for incoming requests. You have to add a using statement:

using Microsoft.AspNetCore.Authentication;

Next, we have to add the class BasicAuthenticationHandler.

using Microsoft.AspNetCore.Authentication;
using Microsoft.AspNetCore.Mvc.Controllers;
using Microsoft.Extensions.Logging;
using Microsoft.Extensions.Options;
using System;
using System.Collections.Generic;
using System.Linq;
using System.Net.Http.Headers;
using System.Security.Claims;
using System.Text;
using System.Text.Encodings.Web;
using System.Threading.Tasks;

namespace CoreApiAuthentication
{
    public class BasicAuthenticationHandler : AuthenticationHandler<AuthenticationSchemeOptions>
    {
        public BasicAuthenticationHandler(
            IOptionsMonitor<AuthenticationSchemeOptions> options,
            ILoggerFactory logger,
            UrlEncoder encoder,
            ISystemClock clock
            )
            : base(options, logger, encoder, clock)
        {

        }

        protected override async Task<AuthenticateResult> HandleAuthenticateAsync()
        {
            if (!Request.Headers.ContainsKey("Authorization"))
                return AuthenticateResult.Fail("Missing Authorization Header");

            try
            {
                var authHeader = AuthenticationHeaderValue.Parse(Request.Headers["Authorization"]);
                var credentialBytes = Convert.FromBase64String(authHeader.Parameter);
                var credentials = Encoding.UTF8.GetString(credentialBytes).Split(new[] { ':' }, 2);
                var username = credentials[0];
                var password = credentials[1];

                bool result = await Task.Run(() => IsAuthentic(username, password));
                if (result == false)
                {
                    return AuthenticateResult.Fail("Invalid Username or Password");
                }
            }
            catch
            {
                return AuthenticateResult.Fail("Invalid Authorization Header");
            }

            var claims = new List<Claim>() {
                new Claim(ClaimTypes.NameIdentifier, "test"),
                new Claim(ClaimTypes.Name, "test")
            };

            var identity = new ClaimsIdentity(claims, Scheme.Name);
            var principal = new ClaimsPrincipal(identity);
            var ticket = new AuthenticationTicket(principal, Scheme.Name);

            return AuthenticateResult.Success(ticket);
        }

        private bool IsAuthentic(string usreName, string password)
        {
            //in real project, authenticate username and password from an external service or database etc.
            if ( usreName == "test" && password == "12345")
            {
                return true;
            }

            return false;
        }
    }
}

HandleAuthenticateAsync() is the method which will be automatically called by the API. Actual authentication logic is being written in the method IsAuthentic(), which is checking for a hardcoded username and password, of-course this is only for demo purpose and you will never use this sort of thing in production code. We are returning AuthenticateResult.Fail() method call when the authentication is failed and AuthenticateResult.Success() method call for successfull authentication.

Next, in Configure() method you have to tell IApplicationBuilder object to use authentication.

app.UseAuthentication();

Complete code for this method looks similar to this:

public void Configure(IApplicationBuilder app, IHostingEnvironment env)
{
 if (env.IsDevelopment())
 {
  app.UseDeveloperExceptionPage();
 }
 else
 {
  // The default HSTS value is 30 days. You may want to change this for production scenarios, see https://aka.ms/aspnetcore-hsts.
  app.UseHsts();
 }

 app.UseAuthentication();
 app.UseHttpsRedirection();
 app.UseMvc();
}

Final thing is to decorate the desired controller(in our case ValuesController) with Authorize attribute.

ValuesController - Authorize Attribute

Your API is ready with Basic Authentication. With postman if you make a call without Authorization header it will give you 401 error.

Postman -  Call Api - 401 Error

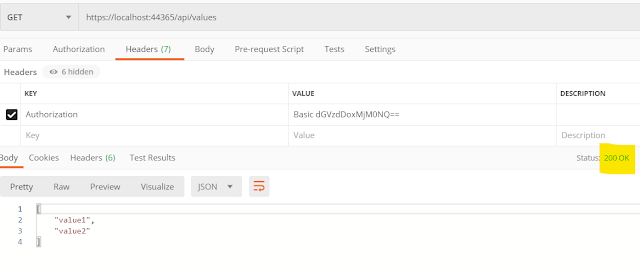
In our case, valid Authorization header value (base64 string for our username and password, separated by colon ':') will be:

 Basic dGVzdDoxMjM0NQ==

With valid Authorization header postman will receive success response.

Postman -  Call Api - 200 OK Response