September 7, 2020

Host Django site in IIS

Django is a free, open source web framework written in the Python language.

A web framework is a software framework that provide a standard way to build web applications. It allows web developers to focus on developing the business requirements rather than reinventing the wheel every time for standard, secure web applications.

In this post we will create a django project and host it in IIS.

It is best practice to provide a dedicated environment for each Django project you create, it allows you to run different versions of django for different applications on the same machine. There are many options to manage environments within the Python ecosystem, we will use the Python's default package venv for managing environments.

Create django project

Following are the steps you need to create a django project.

  • To create a virtual environment for your project, open a new command prompt, navigate to the folder where you want to create your project and then run the following command:

    	python -m venv myproject_env
    

    In this exmaple, I have executed this command at c:\projects. Above command will create a virtual environment and you will see a new folder named myproject_env at the path where you executed this command.

  • Next, we need to activate the environment, run this command from the command prompt(from same path).

    	.\myproject_env\Scripts\activate
    

    We have setup our virtual envrionemnt.

  • Lets create a new directory named src.

    	mkdir src 
    

    We have src folder at c:\projects.

  • Move to src folder

    	cd src
    
  • and install django by using this command.

        pip install Django
    

    This will install the latest release of django.

  • Create a new django project (from command prompt at src folder),

    	django-admin startproject myproject
    
  • Execute manage.py runserver command, it will start the django site with development server at http://127.0.0.1:8000/

    	python manage.py runserver
    
  • Enter this url in browser and you will see django's default page rendered successfully.

Install and enable wfastcgi

wfastcgi:

wfastcgi.py provides a bridge between IIS and Python using WSGI and FastCGI. It can be used with any Python web application or framework that supports WSGI.

  • Run the following command to install wfastcgi

    	pip install wfastcgi
    
  • After installing wfastcgi, we need to enable it using:

    	wfastcgi-enable
    

    Note that, you need to open command prompt will elevated privilege.

    If the above command is executed successfully, it will display the output similar to this:

    Applied configuration changes to section "system.webServer/fastCgi" 
        for "MACHINE/WEBROOT/APPHOST" 
        at configuration commit path "MACHINE/WEBROOT/APPHOST"
    

Host django site in IIS

We have a working django site. Following are the steps we need to configure to make django work under IIS.

  • Copy the project's folder(the folder which contains the actuall source code, in our case myproject folder located at c:\projects\src) in wwwroot.

  • Create a new website in IIS with name myproject.

    In our exmaple we are using port 82 for new website.

  • Open Hanlder Mappings section.

  • Click on Add Module Mapping link on the right side:

  • In Add Module Mapping dialog box, enter * for Request Path.

  • From Module dropdown, select FastCgiModule.

  • In Executable textbox, enter the following path to python.exe and wfastcgi.py separated by | sign. In our case the path is:

    "c:\projects\myproject_env\scripts\python.exe
        |
        c:\projects\myproject_env\lib\site-packages\wfastcgi.py" 
    	

    You need to change the path as per your environment.

  • Enter any desired name in Name field, in our case, it is Django Hanlder.

  • Click the Request Restrictions button, it will open the following dialog.

  • Uncheck the checkbox Invoke handler only if request is mapped to:

  • Then click OK on both dialog boxes.

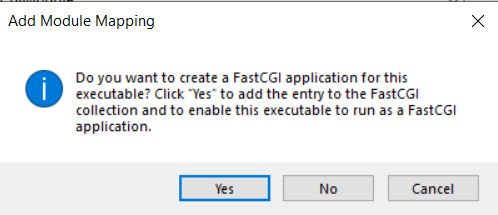
  • It will ask you to create a FastCGI application.

    Click Yes.

  • It creates a web.config file in the project's root folder which we have copied in wwwroot(C:\inetpub\wwwroot\myproject). Open the web.config file and update the content as below:

    	<?xml version="1.0" encoding="UTF-8"?>
    	<configuration>
    		<system.webServer>
    			<handlers>
    			<add 
                    	name="Django Handler" 
                    	path="*" verb="*" 
                    	modules="FastCgiModule" 
                    	scriptProcessor="c:\projects\myproject_env\scripts\python.exe
                                     |
                                     c:\projects\myproject_env\lib\site-packages\wfastcgi.py" 
                    	resourceType="Unspecified" 
                    	/>
    			</handlers>
    		</system.webServer>
    		<appSettings>
    		  <add key="WSGI_HANDLER" value="myproject.wsgi.application" />
    		  <add key="PYTHONPATH" value="C:\inetpub\wwwroot\myproject" />
    		  <add key="DJANGO_SETTINGS_MODULE" value="myproject.settings" />
    		</appSettings> 
    	</configuration>


    Make sure to change the project name and path as per your settings.

That's it. We have setup the django site in IIS. Navigate the follwoing link in browser:

	http://localhost:82/

You can change the port number if you have configured a different one when creating website in IIS.

And you will see the django default page.

If you get any error, check if you have given the proper rights on the project folder to DefaultAppPool.

August 18, 2020

Conditionally run a target for publish profile

In the last post we have seen how to write custom actions for BeforePublish and AfterPublish events. In this post we will take one more step towards customizing the action execution. Occasionally we need to perform custom actions like copying files to output folder but with some condition, like if a particular directory not already exists in the output or could be any other condition etc.

In this post we are not the exploring capability of actions you can perform with target tag but will see how you can add conditions with Target tag. So I will simply write custom messages to the console with different conditions.

The following Target tag outputs the text message to console based on the condition specified in Condition attribute. Here we are checking if the $(MSBuildProjectDirectory)\MyData folder exists, if so, then it will output a text message to the console otherwise it will do nothing.

<Target Name="CustomActionsAfterPublish" AfterTargets="AfterPublish" Condition="Exists('$(MSBuildProjectDirectory)\MyData')">
   <Message Text="Some text to the console" Importance="high" />
</Target>

Here we have used MSBuild reserved property MSBuildProjectDirectory which represents the absolute path of the directory where the project file is located, and then we are checking if a folder named MyData exists in that location.

Obviously you are not going to check for this condition in real project but this is just to demonstrate that you can use the Exists operrator in Condition attribute to check for a folder exists. You can reverse the same condition by using the ! operator to check if folder not exists.

<Target Name="CustomActionsAfterPublish" AfterTargets="AfterPublish" Condition="!Exists('$(MSBuildProjectDirectory)\MyData')">
   <Message Text="Some text to the console" Importance="high" />
</Target>

Another operator you can use in Condition attribute is == operator. For exmaple may want to check if the current publish profile's configuration is DEBUG then you want to run the target action. You can write this condition as follows:

<Target Name="CustomActionsAfterPublish" AfterTargets="AfterPublish" Condition="'$(Configuration)'=='DEBUG'">
   <Message Text="Some text to the console" Importance="high" />
</Target>

Here we have used MSBuild project property Configuration which contains the configuration value you specified in your publish profile.

Similary you can use != operator to check for inequality.

<Target Name="CustomActionsAfterPublish" AfterTargets="AfterPublish" Condition="'$(Configuration)'!='DEBUG'">
   <Message Text="Some text to the console" Importance="high" />
</Target>

This will run the target action if current configuration is not equal to DEBUG.

Some of the commonly used project propeties are:

  • MSBuildProjectName: Represents the filename of the project without extension.
  • MSBuildProjectFile: Represents the full filename of the project with extension.
  • Platform: The operating system you are building for. e.g "Any CPU", "x86", and "x64".
  • MSBuildProjectDirectory: Absolute path of the directory where the project file is located.

You may find more details about project properties on Microsoft Docs:

August 17, 2020

Run a target action before or after publishing

Target tag allow us to execute custom actions on particular events. We can also specify the order of target actions in a particular sequence we need. We have different target attributes for publish profiles, but in this post I will demonstrate BeforeTargets and AfterTargets for publish event.

Microsoft Docs:

BeforeTargets and AfterTargets. These Target attributes specify that this target should run before or after the specified targets (MSBuild 4.0).

We can use these built-in BeforePublish and AfterPublish targets to execute an action before or after the publish. For exmaple, following tag logs the console messages before and after publishing.

<Target Name="MyCustomActionBeforePublish" BeforeTargets="BeforePublish">
    <Message Text="Logging Message BeforePublish" Importance="high" />
  </Target>
  <Target Name="MyCustomActionAfterPublish" AfterTargets="AfterPublish">
    <Message Text="Logging Message AfterPublish" Importance="high" />
</Target>

Just logging a console message is not very helpful. You can perform a variety of options, one could be to copy files from a particular source directory. Following example allows the publishing profile to copy files from the path specified in Include attribute of MySourceFiles to the destination path specified in DestinationFolder attribute of Copy tag. Since we are using the event name AfterPublish, the source content will be copied after it completes the publishing.

<Target Name="MyCustomActionAfterPublish" AfterTargets="AfterPublish">
    <ItemGroup>
      <MySourceFiles Include="C:\Test\ExternalContent\*.*"/>
    </ItemGroup>
    <Copy SourceFiles="@(MySourceFiles)" DestinationFolder="bin\Debug\netcoreapp2.2\publish\TestTarget\"/>
  </Target>

In this exmaple, we are using absolute path in MySourceFiles tag, you can also use relative path as illustrated in DestinationFolder attribute of Copy tag.

References:

July 22, 2020

How to include external files/folders in Publish Profile

Often we need to include external files/folders in publish profile to deploy on published site. We have two ways to achieve this:

General file inclusion

In this method we use the DotNetPublishFiles tag, which is provided by a publish targets file in the Web SDK.

The following example's demonstrates how to copy a folder located outside of the project directory to the published site.

<ItemGroup>
    <MyCustomFiles Include="$(MSBuildProjectDirectory)/../ExternalContent/**/*" />
    <DotNetPublishFiles Include="@(MyCustomFiles)">
      <DestinationRelativePath>wwwroot/ExternalContent/%(RecursiveDir)%(Filename)%(Extension)</DestinationRelativePath>
    </DotNetPublishFiles>
  </ItemGroup>
  • Declares a MyCustomFiles(it can be any custom name) tag to cover files matching the globbing pattern specified in Include attribute. The ExternalContent folder referenced in the pattern is located outside of the project directory. We are using a reserved property $(MSBuildProjectDirectory), which resolves the project file's absolute path.

  • In DotNetPublishFiles tag, we provide our custom tag name MyCustomFiles in the Include attribute, whih serves as a source path for files/folders. In DestinationRelativePath tag, we specified the target path(with respect to published folder) where we want to copy the files. In this example, we are copying ExternalContent folder's content to wwwroot/ExternalContent folder. We have also used item metadata such as %(RecursiveDir), %(Filename), %(Extension). This represents the wwwroot/ExternalContent folder of the published site.

If you don't want to specify source path relative to the project file's absolute path, you can also specific local absolute path, like:

  <ItemGroup>
    <MyCustomFiles Include="C:\Test\ExternalContent\*" />
    <DotNetPublishFiles Include="@(MyCustomFiles)">
      <DestinationRelativePath>wwwroot/ExternalContent/%(RecursiveDir)%(Filename)%(Extension)</DestinationRelativePath>
    </DotNetPublishFiles>
  </ItemGroup>

Here we have changed the source relative path from $(MSBuildProjectDirectory)/../ExternalContent/**/* to C:\Test\ExternalContent\*.

Selective file inclusion

In this method we will use the ResolvedFileToPublish tag, which is provided by a publish targets file in the .NET Core SDK. Because the Web SDK depends on the .NET Core SDK, either item can be used in an ASP.NET Core project.

The following exmaple demonstrates how to copy a file located outside of the project into the published site's wwwroot folder. The file name of externalfile.txt is maintained.

  <ItemGroup>
    <ResolvedFileToPublish Include="..\externalfile.txt">
      <RelativePath>wwwroot\externalfile.txt</RelativePath>
    </ResolvedFileToPublish>
  </ItemGroup>
  • In ResolvedFileToPublish tag, we are using Include attribute to specify the file we want to copy. This file resides in the parent directory of the project file's container directory.

  • RelativePath represent the relative path for the published directory.

The default behavior of ResolvedFileToPublish is to always copy the files provided in the Include attribute to the published site. We can override this default behavior by including a CopyToPublishDirectory child tag with inner text of either Never or PreserveNewest. For example:

 <ResolvedFileToPublish Include="..\externalfile.txt">
   <RelativePath>wwwroot\externalfile.txt</RelativePath>
   <CopyToPublishDirectory>PreserveNewest</CopyToPublishDirectory>
 </ResolvedFileToPublish>

Again, if you don't want to specify source path relative to the project file's absolute path, you can also specific local absolute path, like:

  <ItemGroup>
    <ResolvedFileToPublish Include="C:\Test\externalfile.txt">
      <RelativePath>wwwroot\externalfile.txt</RelativePath>
      <CopyToPublishDirectory>PreserveNewest</CopyToPublishDirectory>
    </ResolvedFileToPublish>
  </ItemGroup>

References:

July 21, 2020

How to exclude files from Publish Profile

When publishing ASP.NET Core web apps, it will publish/deploy the:

  • Build artifacts
  • files with .config extension
  • files with .json extension
  • everything inside wwwroot folder

At certain times you may need to exclude some specific file or folder from deployment content.

There are two ways you can exclude files from publishing.

Content Tag

If you need to prevent multiple files from being copied to deployed folder, you can use globbing patterns to cover a range of matching files.

Content tag will be used to specify the action on the file. For example, the following Content element will exclude all (.txt) files in the wwwroot\content folder and its subfolders.

<ItemGroup>
  <Content Update="wwwroot/content/**/*.txt" CopyToPublishDirectory="Never" />
</ItemGroup>

Note that it will delete all (.txt) files that are already exists at the deployed site within specified folder path.

You can specify different globbing patterns as per your requirement. Another version of pattern coud be like this:

<ItemGroup>
  <Content Update="wwwroot/content/Site*.css" CopyToPublishDirectory="Never" />
</ItemGroup>

This will match all css files in wwwroot/content folder with file name starts with Site e.g. SiteAdmin.css, SiteCustomer.css, etc...

You can add this markup to a publish profile (.pubxml file) or the .csproj file. Since .csproj file operates at the global level, if you add this tag to the .csproj file, the rule will be applied to all publish profiles in the project.

MsDeploySkipRules Tag

Another way to exclude file or folder is to use MsDeploySkipRules tag.

The following tag excludes all files/folders from the wwwroot\content folder:

<ItemGroup>
  <MsDeploySkipRules Include="CustomSkipFolder">
    <ObjectName>dirPath</ObjectName>
    <AbsolutePath>wwwroot\\content</AbsolutePath>
  </MsDeploySkipRules>
</ItemGroup>

Note that unlike Content tag, this will not delete the targeted file or folder if that are already exists on the deployed site.

Similarly you can specify a single file in AbsolutePath tag, but you need to change the ObjectName tag to filePath rather than dirPath, and also change the value of Include attribute from CustomSkipFolder to CustomSkipFile.

<ItemGroup>
  <MsDeploySkipRules Include="CustomSkipFile">
    <ObjectName>filePath</ObjectName>
    <AbsolutePath>wwwroot\\content\\Site.css</AbsolutePath>
  </MsDeploySkipRules>
</ItemGroup>

References: