December 3, 2018

Create a Symbolic Link in Windows

Symbolic Link, Soft Link or SymLink referred to the same thing, is a file that is linked to another file or directory, which can be on the same computer or any other on the network. You can create Symbolic Link by using mklink command, which is available since Windows Vista.

Syntax of mklink is:

MKLINK [[/D] | [/H] | [/J]] Link_File_Or_Directory_Path Target_File_Or_Directory_Path

As you can see from the above syntax, mklink allows following 3 switches to create different types of Symbolic Links.

  • /D Directory symbolic link.
  • /H Creates a hard link instead of a symbolic link.
  • /J Directory junction.

The default is a file symbolic link, i.e. if you did not specify and switch than the link created will be File Symbolic Link.

Lets start create each type of link with an example:

First we setup he environment for examples to follow. I created a folder named Symbolic Links at C:/. Inside Symbolic Links folder created another folder named Original, which will be act as Target Folder of symbolic links and contains two files file1.txt and file2.txt.

Create a Hard Link

In this example, I will create a Hard Link to file1.txt which we created inside our Target Folder named Original. The linked file will be created at path C:\SymbolicLink\H_Link.

  • Open the command prompt and go to the path C:\SymbolicLink
  • Create new directory H_Link with the following command

       mkdir H_Link
      
  • Run the following command:

       mklink /H "C:\SymbolicLink\H_Link\file1.txt" "C:\SymbolicLink\Original\file1.txt"
      

    If you get the following error message:

       You do not have sufficient privilege to perform this operation.
      

    Then just restart the command prompt with Administrator Privileges. If you are already running command prompt with Administrator Privileges then you will see the success message as follows:

       Hardlink created for C:\SymbolicLink\H_Link\file1.txt <<===>> C:\SymbolicLink\Original\file1.txt
      

    We have successfully create the Symbolic Link to a file (also know as Hard Link).

Create a Directory Symbolic Link

In this exmaple, I will create a Directory Symbolic Link to Target Folder named Original. The directory linked will be created at path C:\SymbolicLink\D_Link.

  • Open the command prompt and go to the path C:\SymbolicLink
  • Run the following command:

       mklink /D "C:\SymbolicLink\D_Link" "C:\SymbolicLink\Original"
      

    If you get the following error message:

       You do not have sufficient privilege to perform this operation.
      

    Then just restart the command prompt with Administrator Privileges. If you are already running command prompt with Administrator Privileges then you will see the success message as follows:

       symbolic link created for C:\SymbolicLink\D_Link <<===>> C:\SymbolicLink\Original
      

    If you run the DIR command at C:\SymbolicLink, you will see that the newly created directory link will be displayed as .
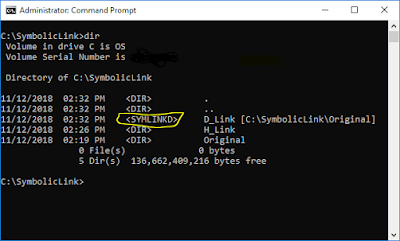
    Create symbolic links

    In windows explorer, the linked directory will be shown with icon similar to the shortcut icon, like this:

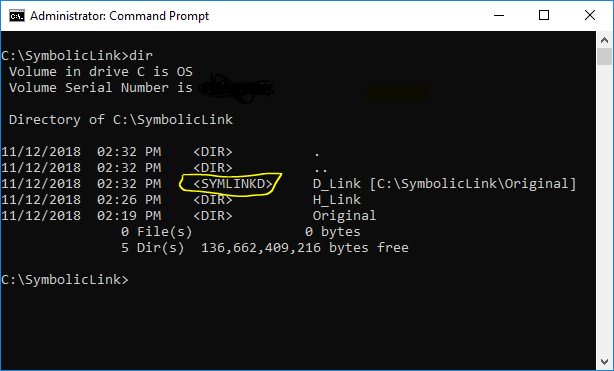
    Create symbolic links

Create a Directory junction

In this exmaple, I will create a Directory Symbolic Link to Target Folder named Original. The directory linked will be created at path C:\SymbolicLink\J_Link.

  • Open the command prompt and go to the path C:\SymbolicLink
  • Run the following command:

       mklink /J "C:\SymbolicLink\J_Link" "C:\SymbolicLink\Original"
      

    You will see the success message as follows:

       Junction created for C:\SymbolicLink\J_Link <<===>> C:\SymbolicLink\Original
      

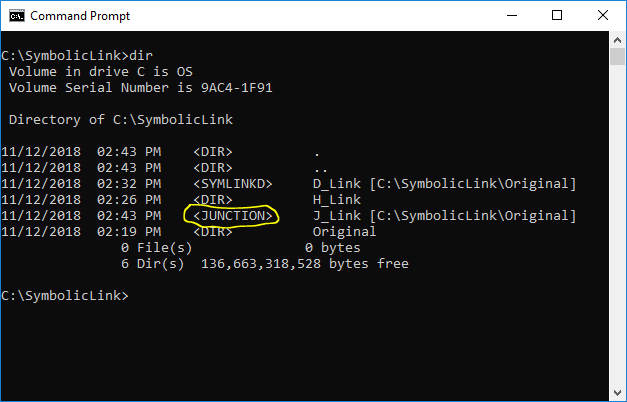
    If you run the DIR command at C:\SymbolicLink, you will see that the newly created directory link will be displayed as .

    Create symbolic links

    In windows explorer, the linked directory will be shown with the icon similar to Directory Symbolic Link:
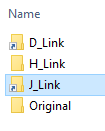
    Create symbolic links

It seems like Directory Symbolic Link and Directory junction works in the same way. But there is a difference. I will explain the difference in next post soon.

November 12, 2018

IIS 7.0 or greater is required to install IIS SEO Toolkit 1.0

I downloaded the Search Engine Optimization Toolkit 64 bit installer from www.iis.net, and while trying to install at my PC with Windows 10, it was showing me this error:

 IIS Version 7.0 or greater is required to install IIS Search Engine Optimization Toolkit 1.0

After searcing, I found the following solution worked for me:

  • Find the HKEY_LOCAL_MACHINE\SOFTWARE\Microsoft\InetStp from RegEdit.
  • Right click on MajorVersion name and then click Modify...

    Edit regedit SEO
  • In decimal format, it is showing value 10. Change this value to 9 and click OK.

    Edit regedit SEO
  • Now try to install Search Engine Optimization Toolkit, it should be installed successfully.
  • After installing SEO Toolkit, revert the value of MajorVersion back to 10 and click OK.

November 8, 2018

Find File-Type by Magic Number of File

In this post, we will find the file type for a file using Magic Number.

What is a Magic Number?

From Wikipedia Magic Number

Magic Number is a constant numerical or text value used to identify a file format or protocol.

Magic number is a hex number occupying a few bytes at the beginning of the file and indicates the type of content, but is not visible to users.

Some users may be thinking why not simply check the file extension to find the file type. Yes, We made the same mistake!

In common scenarios this would be enough to check by file extensions, but we faced this scenario where we can not trust on file extension. The problem we faced during our website's Penetration Testing. There is a form which let user to upload files and it is required that user can only upload PDF files. We added a check based on file extension and made it vulnerable.

During the Penetration Test, our QA team has found this vulnerability, hackers can upload even exe files by renaming the target file to PDF, like some-dangerous-file.exe.pdf. If you are checking by file extension then this file will get successfully uploaded on server.

In order to correctly find the content type of a file, we have to check Magic Number of target file. Since Magic Number can vary in length for different file types, for example, 5 bytes (4D-5A) for exe file and 14 digits (25-50-44-46-2d) for pdf file. In this example, I am reading first 20 bytes to find magic number, you may need to read more bytes for magic number if the file format you are targetting has the magic number with length greater than 20.

Lets move to the code segment, in this sample I have written two functions. IsMagicNumberMatched() is the method doing the real work to check magic number for the file-path passed as parameter. GetAuditorOpinionFromFile() is the wrapper method to test magic numbers for different files. I am writing here 4 common file types exe, pdf, xml and rar. In the end, this method will return status message as string, to display the Magic Number status if it is matched with the parameter we passed.

 public static string GetAuditorOpinionFromFile()
 {
  string filePath_EXE = @"C:\SOME_PATH_TO\MyFile.exe";
  string filePath_PDF = @"C:\SOME_PATH_TO\MyFile.pdf";
  string filePath_XML = @"C:\SOME_PATH_TO\MyFile.xml";
  string filePath_RAR = @"C:\SOME_PATH_TO\MyFile.rar";

  Dictionary numberList = new Dictionary();
  numberList.Add("exe", "4D-5A");
  numberList.Add("pdf", "25-50-44-46-2d");
  numberList.Add("xml", "3c-3f-78-6d-6c-20");
  numberList.Add("rar", "52-61-72-21-1A-07-00");

  StringBuilder sb = new StringBuilder();            
  sb.AppendFormat("File Path: {0}, File Magic No: {1}, IsMatched: {2}", filePath_EXE, numberList["exe"], IsMagicNumberMatched(filePath_EXE, numberList["exe"])).AppendLine();
  sb.AppendFormat("File Path: {0}, File Magic No: {1}, IsMatched: {2}", filePath_PDF, numberList["pdf"], IsMagicNumberMatched(filePath_PDF, numberList["pdf"])).AppendLine();
  sb.AppendFormat("File Path: {0}, File Magic No: {1}, IsMatched: {2}", filePath_XML, numberList["xml"], IsMagicNumberMatched(filePath_XML, numberList["xml"])).AppendLine();
  sb.AppendFormat("File Path: {0}, File Magic No: {1}, IsMatched: {2}", filePath_RAR, numberList["rar"], IsMagicNumberMatched(filePath_RAR, numberList["rar"])).AppendLine();

  return sb.ToString();
 }

 private static bool IsMagicNumberMatched(string filePath, string candidateMagicNo)
 {
  BinaryReader reader = new BinaryReader(new FileStream(Convert.ToString(filePath), FileMode.Open, FileAccess.Read, FileShare.None));

  ////set start position = 0, and read first 20 bytes. for some other with magic number length greater than 20, you may need to read more bytes.
  reader.BaseStream.Position = 0x0;
  byte[] data = reader.ReadBytes(20);

  //close the reader
  reader.Close();

  //convert bytes data to string in hex format
  string string_data_as_hex = BitConverter.ToString(data);

  // substring to select first (n) characters from hexadecimal array
  string currentMagicNo = string_data_as_hex.Substring(0, candidateMagicNo.Length);
  
  return currentMagicNo.ToLower() == candidateMagicNo.ToLower();
 }

I hope you find this post helpful, I welcome your comments or suggestions to help improve this post.

Resources:

November 6, 2018

Unhandled exception of type ‘StackOverflowException’

While working on website project using Visual Studio 2015, I encountered this strange error message:

 An unhandled exception of type ‘System.StackOverflowException’ 
 occurred in System.Runtime.Serialization.dll
StackOverFlow exception

You may notice that if you click on View Detail... link of the exception message, there is no more information is available like stack trace etc.

StackOverFlow exception

I know there is no any complex logic defined in my code-base that could fall in infinite loop and cause StackOverflowException. After searching, I found the real cause of this error, and is not related to my code-base but a feature by Visual Studio know as Browser Link.

From MSDN blog:

Browser Link is just a channel between your Visual Studio IDE and any open browser. This will allow dynamic data exchange between your web application and Visual Studio.

Visual Studio uses this channel to exchange data between web application and Visual Studio, since it will serialze data before exchange, that was leading to StackOverflowException. The solution is just disable this feature.

There are two ways to disable this feature:

  1. From Visual Studio, click on the small down arrow near Refresh Linked Browsers button, from the drop-down options listed, just un-check Enable browser link.

    Enable browser link
  2. Add the following key in web.config appSettings tag.

     <add key=”vs:EnableBrowserLink” value=”false” />
    

Resources:

October 11, 2018

ASP.NET Health Monitoring with Custom Events

In the last post we have created a custom provider to send log data to WCF service client using ASP.NET Health Monitoring feature. We have seen that there are multiple events which we can map to the provider in order to log information about that events. Just to recap here is the list of default events available by ASP.Net Health Monitoring feature.

  • All Events
  • Heartbeats
  • Application Lifetime Events
  • Request Processing Events
  • Infrastructure Errors
  • Request Processing Errors
  • All Audits
  • Failure Audits
  • Success Audits

These events could provide plenty of useful information which can help us to analyze application state if there comes any problem while running in production environment. But there may be the case where you might want to log your own custom event. For example, I want to log a hit event for specific page using this feature rather than use some other logging library or write my own, which further may require extra configuration steps or wrapper classes. Writing your own custom event helps you to log event information with ASP.Net Health Monitoring feature and saves you from that extra effort.

Lets start writing the custom event.

First we have to inherit base class WebRequestEvent found in the namespace System.Web.Management. While calling the base constructor we have to provide eventCode. Note that for custom events we have available event codes starting from 100000. You may find full list of event codes defined as constant fields in WebEventCodes sealed class. The Last EventCode constant defined is:

public const int WebExtendedBase = 100000;

For custom events we have to use codes starting from this number. In this exmaple I am using constant event code variable by adding to 10 to the WebExtendedBase event code value, as:

private const int EVENT_CODE = System.Web.Management.WebEventCodes.WebExtendedBase + 10;

10 is just an arbitrary value, you can pick any number.

If you want to add extra information then you have to write an override of Raise() function, which is not necessary, but in this example I am writing this override to add my custom message, in a class level private variable I am using this variable to add information about current UserId from session variable if present:

private string defaultLocalMessage = "";

Which I want to log alongwith other fields. But this variable could not be directly accessible from WebBaseEvent object's properties which we see in last example, in ProcessEvent() method of custom provider. If we can not directly access additional variables then what is the benefit of using this variable? Well, There is a workaround!

Any additional information holding by custom variables, can be used in another overriden function FormatCustomEventDetails. Although this function returns void, it will not directly return any value but this function is interally called when the provider invokes one of the ToString() methods. So, finally when you call ToString() function for WebBaseEvent object in the function ProcessEvent(), you will get that additional information that you holded in local variables and added to the WebEventFormatter object in another overriden method FormatCustomEventDetails(). When you see the code you will get it more clear.

Here is the complete code listing for custom event class PageHitRequestEvent.

public class PageHitRequestEvent : System.Web.Management.WebRequestEvent
{
    private string defaultLocalMessage = "";
    private const int EVENT_CODE = System.Web.Management.WebEventCodes.WebExtendedBase + 10;

    public PageHitRequestEvent(string eventMessage, object eventSource)
        :
        base(eventMessage, eventSource, EVENT_CODE)
    {
        
    }

    // Raises the PageHitRequestEvent.
    public override void Raise()
    {
        // prepare custom message.
        defaultLocalMessage = "";
        if(HttpContext.Current == null)
        {
            defaultLocalMessage = ", LocalMessage: {Request Context is null";
        }
        else
        {
            defaultLocalMessage += "SessionID: " + HttpContext.Current.Session.SessionID;

            string userId = HttpContext.Current.Session["UserId"] as string;
            if (string.IsNullOrEmpty(userId))
            {
                defaultLocalMessage += ", UserId: (Anonymous)";
            }
            else
            {
                defaultLocalMessage += ", UserId: " + HttpContext.Current.Session["UserId"];
            }
            defaultLocalMessage += "}";
        }
        
        // raise the event. 
        base.Raise();
    }

    public override void FormatCustomEventDetails(WebEventFormatter formatter)
    {
        base.FormatCustomEventDetails(formatter);

        // Add custom data.
        formatter.AppendLine("");

        formatter.IndentationLevel += 1;

        formatter.TabSize = 4;

        formatter.AppendLine("* PageHitRequestEvent Start *");

        // Display custom event information.
        formatter.AppendLine(defaultLocalMessage);
              
        formatter.AppendLine("* PageHitRequestEvent End *");

        formatter.IndentationLevel -= 1;
    }   
    
}

The second step is to raise this event from the source we want to log information about. Lets say we have some critical page in WebForms application or Contoller/Action in MVC Application, and we want to log data every time user hit that URL. Only we have to create the object of custom event class and simply call the Raise() method, which will just trigger the event and any related provider will handle this event as usual.

PageHitRequestEvent myEventObject = new PageHitRequestEvent("some logging message", this);
// raise the event.
myEventObject.Raise();

If you are using the custom provider from my previous post, where I logged detailed information from ToString() method, you will also get the information which you have written to the WebEventFormatter object in FormatCustomEventDetails method.

Finally comes the configuration part. Although in custom provider example, we have mapped eventName="All Events" in rules section, which will allow the corresponding provider to handle all events, so also our custom event we have created in this example.

But also if you want you can separately add custom event and its mapping with the desired provider.

First add the following line in eventMappings tag to define custom event name.

 <add name="My Event" type="PageHitRequestEvent" />

Second add following line in rules tag to map this event to the desired provider.

 <add name="My Event Rule" eventName="My Event" provider="FailedAuthenticationProvider2"
            minInstances="1" maxLimit="Infinite" minInterval="00:00:00" custom="" />
 

Now the given provider should be able to handle the custom event when triggered.

Resources: