May 21, 2020

ASP.Net Core Controllers - Secure with Api Key

In this post I will go through a simple example of how to authenticate an .Net Core Controller with Api Key in ASP.NET Core 2.2 API with C#. I am using Visual Studio 2017 with .Net Core 2.2 for developing the API, and postman tool for testing the API.

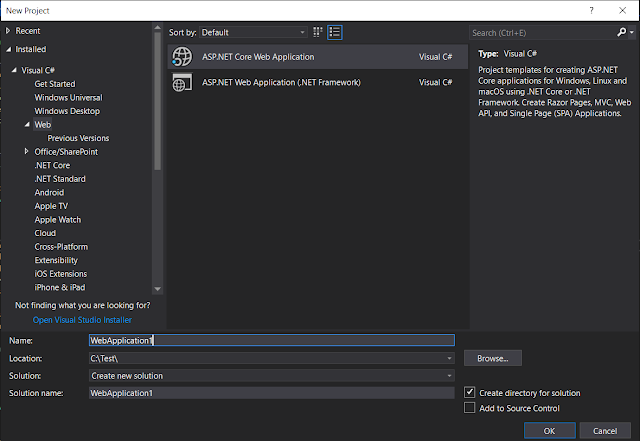
First create a new project from Visual Studio 2017(you can also use Visual Studio Code with .Net Core CLI to create sample project structure) with project template ASP.Net Core Web Application .

Create ASP.Net Core Web Application

In the next dialog, it will ask you for the default template to auto-generate required project structure for you, here select the API from given templates.

Create ASP.Net Core Web Application - Template

It will auto-generate a controller ValuesController with different REST action methods.

  • Get
  • Post
  • Put
  • Delete

Run the project, and from postman make a call to the values controller's get method (you may have a different port number):

 https://localhost:44365/api/values

You will see the output:

ASP.Net Core Web Application - Default Output

Till now, we have created a fresh API project and run it successfully. Lets add Key Authentication in this API.

We will implement a Filter ApiKeyAuthAttribute to check for Api Key in the request header(you may check other sources like querystring, or request body etc). ApiKeyAuthAttribute will implement the interface IAsyncActionFilter so that it can inspect incoming request for Api Key. Also it will inherit from Attribute class so that we can use this filter as an attribute on our controller or action methods where we need authentication. In ApiKeyAuthAttribute, we have to implement IAsyncActionFilter's member OnActionExecutionAsync where we will write our logic to check for Api Key.

[AttributeUsage(AttributeTargets.Class | AttributeTargets.Method)]
public class ApiKeyAuthAttribute : Attribute, IAsyncActionFilter
{
 private const string ApiKeyHeaderName = "X-Api-Key"; // header-name constant
 private const string SecretApiKey = "My Secret"; // store this key in config file or database etc.
 
 public async Task OnActionExecutionAsync(ActionExecutingContext context, ActionExecutionDelegate next)
 {
  //if no header found, return UnauthorizedResult
  if (!context.HttpContext.Request.Headers.TryGetValue(ApiKeyHeaderName, out var requestApiKey))
  {
   context.Result = new UnauthorizedResult();
   return;
  }
  
  //if header is found, but key is not maching with our secret key, return UnauthorizedResult
  //checking against hardcoded local variable, you may want to store this in external source or call an external service to authenticate provided key.
  if (!SecretApiKey.Equals(requestApiKey))
  {
   context.Result = new UnauthorizedResult();
   return;
  }

  //if reaches here, it means the request has valid apikey, so it is authenticated, call the next middleware component.
  await next();
 }
}

Next we have to decorate the desired controller(in our case ValuesController) with the custom attribute ApiKeyAuth.

ValuesController - ApiKeyAuth Attribute

We are done here. Note that we don't have to make any changes in Startup.cs class when you are using Filter as opposed to our last example of BasicAuthenticationHandler where we need to call AddAuthentication() method on IServiceCollection object to configure the target authentication handler.

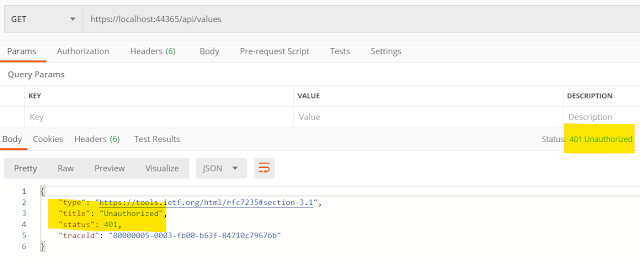
Your API is ready with Key Authentication. With postman if you make a call without X-Api-Key header(or with invalid header value), it will give you 401 error.

Postman -  Call Api - 401 Error

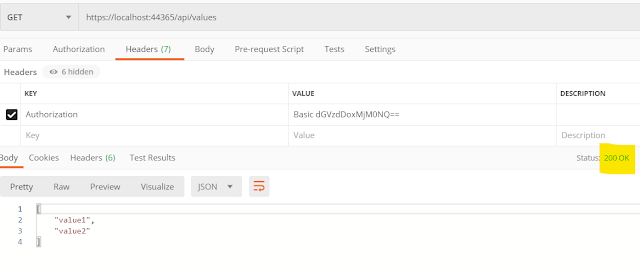
With a valid value of X-Api-Key, in our case My Key 123, postman will receive success response.

Postman -  Call Api - 200 OK Response

References:

May 20, 2020

ASP.Net Core API - How to implement BasicAuthentication

In this tutorial we'll go through a simple example of how to implement Basic authentication in ASP.NET Core 2.2 API with C#. I am using Visual Studio 2017 with .Net Core 2.2 for developing the API, and postman tool for testing the API.

First create a new project from Visual Studio 2017(you can also use Visual Studio Code with .Net Core CLI to create sample project structure) with project template ASP.Net Core Web Application .

Create ASP.Net Core Web Application

In the next dialog, it will ask you for the default template to auto-generate required project structure for you, here select the API from given templates.

Create ASP.Net Core Web Application - Template

It will auto-generate a controller ValuesController with different REST action methods.

  • Get
  • Post
  • Put
  • Delete

Run the project, and from postman make a call to the values controller's get method (you may have a different port number):

 https://localhost:44365/api/values

You will see the output:

ASP.Net Core Web Application - Default Output

Till now, we have created a fresh API project and run it successfully. Lets add Basic Authentication in this API.

In Startup.cs, replace the code for ConfigureServices() method with the following:

public void ConfigureServices(IServiceCollection services)
{
 services.AddMvc().SetCompatibilityVersion(CompatibilityVersion.Version_2_2);

 // configure basic authentication 
 services.AddAuthentication("BasicAuthentication")
  .AddScheme<AuthenticationSchemeOptions, BasicAuthenticationHandler>("BasicAuthentication", null);
} 

Here we have added BasicAuthenticationHandler as authentication mechanism for incoming requests. You have to add a using statement:

using Microsoft.AspNetCore.Authentication;

Next, we have to add the class BasicAuthenticationHandler.

using Microsoft.AspNetCore.Authentication;
using Microsoft.AspNetCore.Mvc.Controllers;
using Microsoft.Extensions.Logging;
using Microsoft.Extensions.Options;
using System;
using System.Collections.Generic;
using System.Linq;
using System.Net.Http.Headers;
using System.Security.Claims;
using System.Text;
using System.Text.Encodings.Web;
using System.Threading.Tasks;

namespace CoreApiAuthentication
{
    public class BasicAuthenticationHandler : AuthenticationHandler<AuthenticationSchemeOptions>
    {
        public BasicAuthenticationHandler(
            IOptionsMonitor<AuthenticationSchemeOptions> options,
            ILoggerFactory logger,
            UrlEncoder encoder,
            ISystemClock clock
            )
            : base(options, logger, encoder, clock)
        {

        }

        protected override async Task<AuthenticateResult> HandleAuthenticateAsync()
        {
            if (!Request.Headers.ContainsKey("Authorization"))
                return AuthenticateResult.Fail("Missing Authorization Header");

            try
            {
                var authHeader = AuthenticationHeaderValue.Parse(Request.Headers["Authorization"]);
                var credentialBytes = Convert.FromBase64String(authHeader.Parameter);
                var credentials = Encoding.UTF8.GetString(credentialBytes).Split(new[] { ':' }, 2);
                var username = credentials[0];
                var password = credentials[1];

                bool result = await Task.Run(() => IsAuthentic(username, password));
                if (result == false)
                {
                    return AuthenticateResult.Fail("Invalid Username or Password");
                }
            }
            catch
            {
                return AuthenticateResult.Fail("Invalid Authorization Header");
            }

            var claims = new List<Claim>() {
                new Claim(ClaimTypes.NameIdentifier, "test"),
                new Claim(ClaimTypes.Name, "test")
            };

            var identity = new ClaimsIdentity(claims, Scheme.Name);
            var principal = new ClaimsPrincipal(identity);
            var ticket = new AuthenticationTicket(principal, Scheme.Name);

            return AuthenticateResult.Success(ticket);
        }

        private bool IsAuthentic(string usreName, string password)
        {
            //in real project, authenticate username and password from an external service or database etc.
            if ( usreName == "test" && password == "12345")
            {
                return true;
            }

            return false;
        }
    }
}

HandleAuthenticateAsync() is the method which will be automatically called by the API. Actual authentication logic is being written in the method IsAuthentic(), which is checking for a hardcoded username and password, of-course this is only for demo purpose and you will never use this sort of thing in production code. We are returning AuthenticateResult.Fail() method call when the authentication is failed and AuthenticateResult.Success() method call for successfull authentication.

Next, in Configure() method you have to tell IApplicationBuilder object to use authentication.

app.UseAuthentication();

Complete code for this method looks similar to this:

public void Configure(IApplicationBuilder app, IHostingEnvironment env)
{
 if (env.IsDevelopment())
 {
  app.UseDeveloperExceptionPage();
 }
 else
 {
  // The default HSTS value is 30 days. You may want to change this for production scenarios, see https://aka.ms/aspnetcore-hsts.
  app.UseHsts();
 }

 app.UseAuthentication();
 app.UseHttpsRedirection();
 app.UseMvc();
}

Final thing is to decorate the desired controller(in our case ValuesController) with Authorize attribute.

ValuesController - Authorize Attribute

Your API is ready with Basic Authentication. With postman if you make a call without Authorization header it will give you 401 error.

Postman -  Call Api - 401 Error

In our case, valid Authorization header value (base64 string for our username and password, separated by colon ':') will be:

 Basic dGVzdDoxMjM0NQ==

With valid Authorization header postman will receive success response.

Postman -  Call Api - 200 OK Response