December 5, 2016

Select from list of values - Table Value Constructor

Table Value Constructor provides a way to construct a table from row value expressions. It allows multiple rows of data to be specified in a single DML statement. One simpler version of select statement with single row values may be used like this:

select 1 as Id, 'ST0258' as ItemCode, 'LASER JET TONER HP 1320 (49A)' as ItemName

But what if we need to select multiple rows with value literals, we need Table Value Constructor. Lets see how we can write similar select statement but with multiple rows.

SELECT Id, ItemCode, ItemName
FROM
  (
    VALUES
  (1, 'ST0258', 'LASER JET TONER HP 1320 (49A)'),
  (2, 'ST0259', 'LASER JET TONER HP 1000 (15A)'),
  (3, 'ST0260', 'LASER JET TONER HP P1005 (35A)'),
  (4, 'ST0261', 'LASER JET TONER HP 540 (CM1312)'),
  (5, 'ST0262', 'LASER JET TONER HP P2035 (05A)')
  )
  AS MyTableName (Id, ItemCode, ItemName)

Its a really cool technique and helps me to save my time while working with small chunks of data or debugging scenarios.

You can also use subqueries to construct row values, but the limitation is that only single scalar values are allowed as a row value expression to construct a single cell value. A subquery that involves multiple columns is not allowed as a row value expression, i.e., you can not specify a subquery with more than one columns to construct multiple cells of a row. For example, the following code will generate syntax error because it contains a subquery constructing more than one columns.

SELECT Id, ItemCode, ItemName
FROM
  (
    VALUES
  (1, 'ST0258', 'LASER JET TONER HP 1320 (49A)'),
  (2, 'ST0259', 'LASER JET TONER HP 1000 (15A)'),
  (3, 'ST0260', 'LASER JET TONER HP P1005 (35A)'),
  (4, 'ST0261', 'LASER JET TONER HP 540 (CM1312)'),
  (5, 'ST0262', 'LASER JET TONER HP P2035 (05A)'),
  (select Id,Item_Code,Item_Name from dbo.items where Item_Code='ST0263')
  )
  AS MyTableName (Id, ItemCode, ItemName)

However, you can rewrite the statement by specifying each column separately in the subquery. The following example code will execute successfully.

SELECT Id, ItemCode, ItemName
FROM
  (
    VALUES
  (1, 'ST0258', 'LASER JET TONER HP 1320 (49A)'),
  (2, 'ST0259', 'LASER JET TONER HP 1000 (15A)'),
  (3, 'ST0260', 'LASER JET TONER HP P1005 (35A)'),
  (4, 'ST0261', 'LASER JET TONER HP 540 (CM1312)'),
  (5, 'ST0262', 'LASER JET TONER HP P2035 (05A)'),
  (
   (select Id from dbo.items where item_code='ST0263'),
   (select Item_Code from dbo.items where item_code='ST0263'),
   (select Item_Name from dbo.items where item_code='ST0263')
  )
  )
  AS MyTableName (Id, ItemCode, ItemName)

References:

December 1, 2016

SSMS - Keyboard shortcut CTRL+K, CTRL+C not working

Keyboard shortcuts speed up development tasks in order to get more productive results. I encountered this problem that some keyboard shortcuts stopped working like CTRL+K, CTRL+C is not commenting the selected text, and it seemed unaffected. There could be two possible reasons which may cause this behavior:

  • First check if you have any add-ins installed? Perhaps this is the cause of making default shortcuts not working as expected because an add-in has taken over the control.
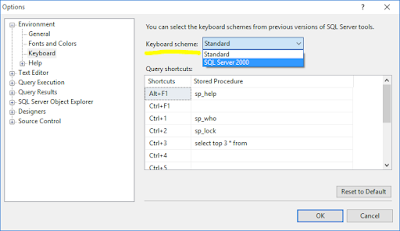
  • Second, check the keyboard scheme under Tools > Options > Environment > Keyboard. In my case, it has been switched to SQL Server 2000 you might try switching it back to Standard.

    SSMS keyboard shortcut scheme dialog

November 15, 2016

Publishing LightSwitch Application-Web deployment task failed

I used to publish my LightSwitch application to a certain location (my folder name is 'IMS2') in wwwroot directory. I have windows 10 installed with Visual Studio 2012 Ultimate. Everything was working smoothly, until I mistakenly deleted the target folder (IMS2), after that when I try to publish LightSwitch application, it starts giving me following error:

Web deployment task failed. (This access control list is not in canonical form and therefore cannot be modified.) C:\Program Files (x86)\MSBuild\Microsoft\VisualStudio\v11.0\Web\Microsoft.Web.Publishing.targets

After searching and multiple tries I found following two options solved my problem.

  • First, probably the account doesn't have permissions to the target folder (IMS2) you are trying to publish to. Try to publish to a different folder.
  • Second, try reordering the permissions for target folder in IIS Web Server. For this follow these steps:

    1. Open IIS Web Server and select the target website node which is being created by LightSwitch publish wizard.
    2. Right-click on it and select Edit Permissions.

      IIS Edit Permissions

    3. It opens up following dialog box, go to the Security tab, it will prompts that permissions are not incorrectly ordered. Click the OK button.

      IIS Edit Permissions security-tab

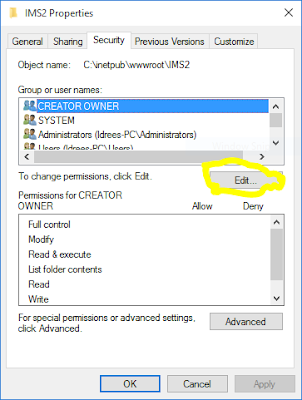
    4. Within the Security tab, Click the Edit button as shown below:

      IIS Edit Permissions security-tab-edit-button

    5. It will show the following popup asking for Reorder permissions. Click on Reorder button.

      IIS Edit Permissions security-tab-reorder

    And its done, now restart your Visual Studio instance and try publish the LightSwitch application. This time it should publish your application successfully.

November 7, 2016

Crystal Reports - Arabic/RTL special characters display.

While developing the Crystal Reports for Arabic language, I encountered the problem that if the Arabic text contains special characters like open/close parenthesis "()", square brackets "[]" or angle brackets "<>" etc., then it was not showing that text correctly while printing the reports. In this post I share what I did to fix my problem, in case if some one else encounter similar problem can benefit from.

For example, I have a text-object. Before setting this option, it was displaying text as follows:

arabic text in crystal report

To fix this formatting issue, please follow these steps:

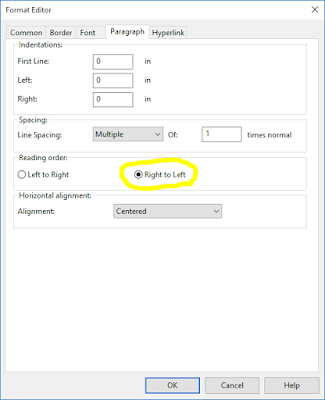
  1. First right click on Text-Object and click on option "Format Object".

  2. Go to Paragraph Tab.

  3. In the Reading order section, check the option Right to Left. As shown below:

    arabic text in crystal report - format editor RTL

And its done. Now it should print the reports with special characters in appropriate state for RTL languages. As my text-object now display this way:

arabic text in crystal report - RTL

October 17, 2016

Crystal Reports - Suppress the Section when SubReport is blank

You might encounter unwanted blank(white space) while printing in Crystal Report which contains one or more sub-report(s). You can follow these steps to get hide a blank section or group, if there are no records in sub-report(s).

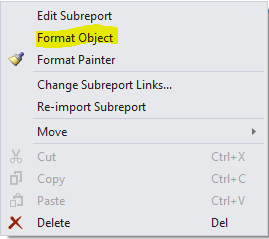
  1. First right click on sub-report and click on option "Format Object".

    crystal report - menu format object

  2. Go to "Subreport" tab and set the checkbox "Suppress Blank Subreport" as marked true.

    crystal report - subreport-tab-suppress-blank-subreport

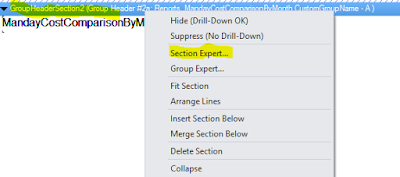
  3. At this stage, sub-report will be hidden, but still you might see blank space on parent report. And for this we have to set one more option for the section or group where you have placed the sub-report. So right click on the Section or Group, and select "Section Expert" option from menu.

    crystal report - group-header-menu-section-expert-item

  4. In this Section Expert dialog box, select the target Group/Section from left hand side, where you have placed sub-report, and then in the "Common" tab on right side, set the checkbox "Suppress Blank Section" as marked true.

    crystal report - expert-common-tab-suppress-blank-section

Now run the main report and you should not see that blank space caused by sub-report(s) having no data.

September 20, 2016

C# DataTable ReadOnlyException - "Column X is read only."

While using typed DataSets you might encounter this exception.

    Column X is read only.

Its because the default value for ReadOnly property of DataColumn in Typed DataSets is True. You can set it False in the properties window, but this will take impact in all code segments wherever this DataTable is being used.

So selectively setting ReadOnly property to false is a better option if you need this in only some parts of the program. You can loop through all columns of the table and set its ReadOnly property to false:

 foreach (DataColumn column in table.Columns) 
 {
    column.ReadOnly = false; 
 }

Or you can set for single column at a time:

    table.Columns["MyColumnName"].ReadOnly = false; 

August 7, 2016

Setting Up Angular 2 with Visual Studio 2015 - ASP.NET Core

In this post I will explain how to setup Angular2 with Visual Studio 2015 hosted inside ASP.NET Core project. Mostly the steps are taken from the Quick Start tutorial at https://angular.io.

We have to make sure that the following requisites are being installed.

  • Visual Studio 2015 - You can find community edition atmicrosoft.com. If you already have VS 2015 community edition installed, make sure that it has also installed Update3.
  • ASP.Net Core - You can find ASP.Net Core on the same link, it needs VS 2015 Update3.

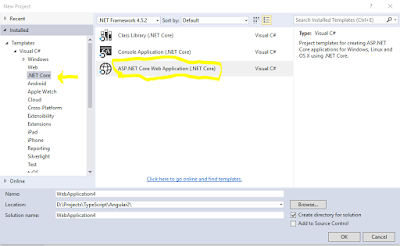
Let start developing sample project. Create a new ASP.NET Core project.

asp.net-core-new-project-template

Select empty template.

core-template-empty

Open project.json file and add the static files support to serve an HTML page. For this, add following line in the dependencies node under the Kestrel dependency.

"Microsoft.AspNetCore.Server.Kestrel": "1.0.0-rc2-final"
"Microsoft.AspNetCore.StaticFiles": "1.0.0-rc2-final"

So the final project.json file should be similar to this:

{
  "dependencies": {
    "Microsoft.NETCore.App": {
      "version": "1.0.0-rc2-3002702",
      "type": "platform"
    },
    "Microsoft.AspNetCore.Server.IISIntegration": "1.0.0-rc2-final",
    "Microsoft.AspNetCore.Server.Kestrel": "1.0.0-rc2-final",
    "Microsoft.AspNetCore.StaticFiles": "1.0.0-rc2-final"
  },

  "tools": {
    "Microsoft.AspNetCore.Server.IISIntegration.Tools": {
      "version": "1.0.0-preview1-final",
      "imports": "portable-net45+win8+dnxcore50"
    }
  },

  "frameworks": {
    "netcoreapp1.0": {
      "imports": [
        "dotnet5.6",
        "dnxcore50",
        "portable-net45+win8"
      ]
    }
  },

  "buildOptions": {
    "emitEntryPoint": true,
    "preserveCompilationContext": true
  },

  "runtimeOptions": {
    "gcServer": true
  },

  "publishOptions": {
    "include": [
      "wwwroot",
      "web.config"
    ]
  },

  "scripts": {
    "postpublish": [ "dotnet publish-iis --publish-folder %publish:OutputPath% --framework %publish:FullTargetFramework%" ]
  }
}

To host our Angular app, we will add an html page index.html under wwwroot folder.

To enable serving static files, like this html page, we have to modify the startup code. Open up Startup.cs file and remove any code in Configure method, and place this line:

app.UseStaticFiles();

At this stage, lets pause and test the work done till now, to see our index.html page running in browser. Follow these steps:

Open up VS Developer Command Prompt and navigate to the project folder, where web.config or project.json files are located. Type "dotnet run". App will be compiled and Kestrel web server will started.

Open browser and navigate to http://localhost:5000/index.html. You will see index.html page.

Try make changes in index.html and refresh the page in browser to see the changes reflected.

Now our html page is running in without Angular support. Lets proceed to next phase.

Press Ctrl+C on same command prompt to shutdown server.

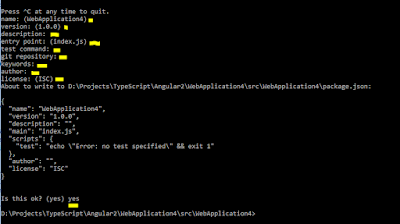
Type "npm init" to initialize package.json file.

It will prompt for some inputs, you can provide any reasonable input, or just leave blank and press ENTER. And finally it will ask for "yes/no" option, then type "yes" and press ENTER.

npm-init

Here your package.json file is initiated.

In Visual Studio - Solution Explorer you can see that "dependencies" node got a sub-folder npm. Open package.json file. Add "dependencies" and "devDependencies" nodes as below:

"dependencies": {
 "@angular/common": "2.0.0-rc.4",    
 "@angular/compiler": "2.0.0-rc.4",
 "@angular/core": "2.0.0-rc.4",
 "@angular/forms": "0.2.0",
 "@angular/http": "2.0.0-rc.4",
 "@angular/platform-browser": "2.0.0-rc.4",
 "@angular/platform-browser-dynamic": "2.0.0-rc.4",
 "@angular/router": "3.0.0-beta.1",
 "@angular/router-deprecated": "2.0.0-rc.2",
 "@angular/upgrade": "2.0.0-rc.4",
 "systemjs": "0.19.27",
 "core-js": "^2.4.0",
 "reflect-metadata": "^0.1.3",
 "rxjs": "5.0.0-beta.6",
 "zone.js": "^0.6.12",
 "angular2-in-memory-web-api": "0.0.14"  
},
  "devDependencies": {
    "typescript": "^1.8.10",
    "gulp": "^3.9.1",
    "path": "^0.12.7",
    "gulp-clean": "^0.3.2",
    "gulp-concat": "^2.6.0",
    "gulp-typescript": "^2.13.6",
    "typings": "^1.3.1",
    "gulp-tsc": "^1.2.0"
  },

So final package.json file should be similar to this:

{
  
"name": "webapplication11",
"version": "1.0.0",
"description": "",
"main": "index.js",

"dependencies": {
 "@angular/common": "2.0.0-rc.4",
 "@angular/compiler": "2.0.0-rc.4",
 "@angular/core": "2.0.0-rc.4",
 "@angular/forms": "0.2.0",
 "@angular/http": "2.0.0-rc.4",
 "@angular/platform-browser": "2.0.0-rc.4",
 "@angular/platform-browser-dynamic": "2.0.0-rc.4",
 "@angular/router": "3.0.0-beta.1",
 "@angular/router-deprecated": "2.0.0-rc.2",
 "@angular/upgrade": "2.0.0-rc.4",
 "systemjs": "0.19.27",
 "core-js": "^2.4.0",
 "reflect-metadata": "^0.1.3",
 "rxjs": "5.0.0-beta.6",
 "zone.js": "^0.6.12",
 "angular2-in-memory-web-api": "0.0.14"
},
  "devDependencies": {
    "typescript": "^1.8.10",
    "gulp": "^3.9.1",
    "path": "^0.12.7",
    "gulp-clean": "^0.3.2",
    "gulp-concat": "^2.6.0",
    "gulp-typescript": "^2.13.6",
    "typings": "^1.3.1",
    "gulp-tsc": "^1.2.0"
  },

  
"scripts": {
    "test": "echo \"Error: no test specified\" && exit 1"
  },
 
"author": "",
"license": "ISC"

}

Add new item, with TypeScript JSON Configuration File item template at root of the project, with default file name(tsconfig.json). Add following lines in "compilerOptins" node under "target" node.

    "suppressImplicitAnyIndexErrors": true,
    "emitDecoratorMetadata": true,
    "experimentalDecorators": true,
    "module": "system",
    "moduleResolution": "node"

And this line just above(outside) the compilerOptions node:

"compileOnSave": true,

Final tsconfig.json file should be similar to this:

{
  "compileOnSave": true,

  "compilerOptions": {
    "noImplicitAny": false,
    "noEmitOnError": true,
    "removeComments": false,
    "sourceMap": true,
    "target": "es5",
    "suppressImplicitAnyIndexErrors": true,
    "emitDecoratorMetadata": true,
    "experimentalDecorators": true,
    "module": "system",
    "moduleResolution": "node"

  },
  "exclude": [
    "node_modules",
    "wwwroot"
  ]
}

Add new item, with Gulp Configuration File item template at root of the project, with default file name(gulpfile.js). Update the file content with following:

var gulp = require('gulp');

gulp.task('copy', function () {
    gulp.src('./app/**/*.*')
        .pipe(gulp.dest('./wwwroot/app'));
});

gulp.task('watch', function () {
    gulp.watch('./app/**/*.*', ['copy']);
});

gulp.task('nodemodules', function () {
    gulp.src('./node_modules/core-js/**/*.js')
        .pipe(gulp.dest('./wwwroot/node_modules/core-js'));
    gulp.src('./node_modules/@angular/**/*.js')
        .pipe(gulp.dest('./wwwroot/node_modules/@angular'));
    gulp.src('./node_modules/zone.js/**/*.js')
        .pipe(gulp.dest('./wwwroot/node_modules/zone.js'));
    gulp.src('./node_modules/systemjs/**/*.js')
        .pipe(gulp.dest('./wwwroot/node_modules/systemjs'));
    gulp.src('./node_modules/reflect-metadata/**/*.js')
        .pipe(gulp.dest('./wwwroot/node_modules/reflect-metadata'));
    gulp.src('./node_modules/rxjs/**/*.js')
        .pipe(gulp.dest('./wwwroot/node_modules/rxjs'));

});

gulp.task('default', ['nodemodules', 'copy', 'watch']);

That's all things setup for Angular, now lets come the the real Angular part.

Create new folder called "app" under project root. Add new item main.ts to app folder, using TypeScript file template.

Place the following code in main.ts

import { bootstrap }    from '@angular/platform-browser-dynamic';
import { AppComponent } from './app.component';
bootstrap(AppComponent);

Add new item app.component.ts to app folder, using TypeScript file template. Place the following code in app.component.ts.

import { Component } from '@angular/core';
@Component({
  selector: 'my-app',
  template: '<h1>My First Angular 2 App</h1>'
})
export class AppComponent { }

Create new JavaScript file startup.js under wwwroot folder, with following content.

/**
 * System configuration for Angular 2 samples
 * Adjust as necessary for your application needs.
 */
(function (global) {
    // map tells the System loader where to look for things
    var map = {
        'app': 'app', // 'dist',
        '@angular': 'node_modules/@angular',
        'angular2-in-memory-web-api': 'node_modules/angular2-in-memory-web-api',
        'rxjs': 'node_modules/rxjs'
    };
    // packages tells the System loader how to load when no filename and/or no extension
    var packages = {
        'app': { main: 'main.js', defaultExtension: 'js' },
        'rxjs': { defaultExtension: 'js' },
        'angular2-in-memory-web-api': { main: 'index.js', defaultExtension: 'js' },
    };
    var ngPackageNames = [
      'common',
      'compiler',
      'core',
      'http',
      'platform-browser',
      'platform-browser-dynamic',
      'router',
      'router-deprecated',
      'upgrade',
    ];
    // Individual files (~300 requests):
    function packIndex(pkgName) {
        packages['@angular/' + pkgName] = { main: 'index.js', defaultExtension: 'js' };
    }
    // Bundled (~40 requests):
    function packUmd(pkgName) {
        packages['@angular/' + pkgName] = { main: '/bundles/' + pkgName + '.umd.js', defaultExtension: 'js' };
    }
    // Most environments should use UMD; some (Karma) need the individual index files
    var setPackageConfig = System.packageWithIndex ? packIndex : packUmd;
    // Add package entries for angular packages
    ngPackageNames.forEach(setPackageConfig);
    var config = {
        map: map,
        packages: packages
    };
    System.config(config);
})(this);

Now, update index.html with the following content:

<html>
<head>
    <title>Angular 2 QuickStart</title>
    <meta charset="UTF-8">
    <meta name="viewport" content="width=device-width, initial-scale=1">
    <link rel="stylesheet" href="styles.css">
    <!-- 1. Load libraries -->
    <!-- Polyfill(s) for older browsers -->
    <script src="node_modules/core-js/client/shim.min.js"></script>
    <script src="node_modules/zone.js/dist/zone.js"></script>
    <script src="node_modules/reflect-metadata/Reflect.js"></script>
    <script src="node_modules/systemjs/dist/system.src.js"></script>
    <!-- 2. Configure SystemJS -->
    <script src="startup.js"></script>
    <script>
      System.import('app').catch(function(err){ console.error(err); });
    </script>
</head>
<!-- 3. Display the application -->
<body>
    <my-app>Loading...</my-app>
</body>
</html>

And add new css file named styles.css in wwwroot folder with the following content taken from https://angular.io/:

h1 {
  color: #369;
  font-family: Arial, Helvetica, sans-serif;
  font-size: 250%;
}
body {
  margin: 2em;
}
 /*
  * See https://github.com/angular/angular.io/blob/master/public/docs/_examples/styles.css
  * for the full set of master styles used by the documentation samples
  */

That's finished, try run your project and you will see output message:


My First Angular 2 App

You can download the sample project from my github repo Angular2-GettingStarted-With-VS2015. You may need to restore all packages, and npm(upgrade to latest version) and .NET Core to run it.


References:
July 21, 2016

MS SQL Server - Returning the Inserted Rows

In this post, we will understand how to return the inserted rows. For example, we are inserting records in a table from Stored Procedure, then we want to return the resulting inserted values to the calling application.

For this we use the OUTPUT clause. OUTPUT clause adds a result set (in a virtual table INSERTED) to the INSERT statement, which contains specified set of columns and the set of rows that were inserted. Let see an example to understand this concept.

Let create a sample table and insert some records.

declare @tblCustomerOrders table (
 CustomerCode varchar(50),
 CustomerName varchar(50),
 OrderAmount decimal(18, 2)
)

insert into @tblCustomerOrders (CustomerCode, CustomerName, OrderAmount)
values 
('C001', 'Imran', 100),
('C002', 'Salman', 40),
('C003', 'Kamran', 500)

Here is nothing special, we just created a table variable and inserted 3 rows. But it will only display a message showing 3 row(s) affected as below, but do not return any data to the calling application.

SQL - inserted-rows-message

Now, rewrite the above insert statement and add the OUTPUT clause to return inserted rows. In the following example, the OUTPUT clause will return CustomerCode, CustomerName and OrderAmount.

insert into @tblCustomerOrders (CustomerCode, CustomerName, OrderAmount)
OUTPUT INSERTED.CustomerCode, INSERTED.CustomerName, INSERTED.OrderAmount
values 
('C001', 'Imran', 100),
('C002', 'Salman', 40),
('C003', 'Kamran', 500)

It will output the following result set:

SQL - inserted-rows-display-columns

You can also output only selected columns, like you specify in regular SELECT clause. In the following exmaple, the OUTPUT clause is only returning CustomerCode and OrderAmount, CustomerName column will not be returned in the resulting table.

insert into @tblCustomerOrders (CustomerCode, CustomerName, OrderAmount)
OUTPUT INSERTED.CustomerCode, INSERTED.OrderAmount
values 
('C001', 'Imran', 100),
('C002', 'Salman', 40),
('C003', 'Kamran', 500)

The output will be:

SQL - inserted-rows-display-columns2

Also for simplicity, you can use * to return all columns. In the following exmaple, the OUTPUT clause will return all the columns that will be used in insert statement.

insert into @tblCustomerOrders (CustomerCode, CustomerName, OrderAmount)
OUTPUT INSERTED.*
values 
('C001', 'Imran', 100),
('C002', 'Salman', 40),
('C003', 'Kamran', 500)

The output will return all columns:

SQL - inserted-rows-display-columns-all

June 23, 2016

MS SQL Server - Window Functions - Aggregate Functions

Aggregate functions perform a calculation on a set of values and return a single value, frequently used with the GROUP BY clause of the SELECT statement.

In this post, we will try using aggregate functions with and without OVER clause. I recommend you to read the previous post on Window Ranking Functions

Let create a sample table and insert some records.


declare @tblCustomerOrders table (
 CustomerName varchar(50),
 OrderAmount decimal(18, 2)
)

insert into @tblCustomerOrders (CustomerName, OrderAmount)
values 
('Imran', 100),
('Imran', 40),
('Kamran', 500),
('Salman', 350),
('Kamran', 430),
('Salman', 210),
('Imran', 70),
('Salman', 105),
('Imran', 750)

In this table, if we want to see the sum of OrderAmount for each customer, we use the following query.

SELECT 
  CustomerName
 ,SUM(OrderAmount) AS 'Sum'
FROM @tblCustomerOrders

But when you run this query you will get error:

Column '@tblCustomerOrders.CustomerName' is invalid in the select list 
because it is not contained in either an aggregate function or the 
GROUP BY clause.

Since we are missing the GROUP BY clause, we got this error. To work it as expected, we have to add GROUP BY clause with CustomerName field.

SELECT
  CustomerName
 ,SUM(OrderAmount) AS 'Sum'
FROM @tblCustomerOrders
GROUP BY CustomerName

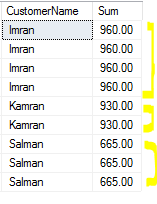
Now you will get the expected result.

window-aggregate-function-group-by-sum

Lets see another scenario, if we want to list all customers with their SUM() of OrderAmounts, but we also need to list individual order amounts in separate column. Try this query:

SELECT
  CustomerName
 ,OrderAmount -- (individual OrderAmount)
 ,SUM(OrderAmount) AS 'Sum'
FROM @tblCustomerOrders
GROUP BY CustomerName

Since, OrderAmount field is not mentioned in GROUP BY clause, so you will get error message display:

Column '@tblCustomerOrders.OrderAmount' is invalid in the select list 
because it is not contained in either an aggregate function or the 
GROUP BY clause.

Now add OrderAmount field in GROUP BY clause along-with CustomerName field.

SELECT 
  CustomerName
 ,OrderAmount -- (individual OrderAmount)
 ,SUM(OrderAmount) AS 'Sum'
FROM @tblCustomerOrders
GROUP BY CustomerName, OrderAmount

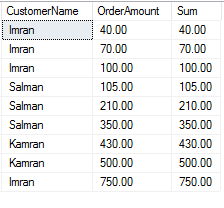
This query will not generate error, but you get the following output, which is not the desired one.

window-aggregate-function-group-by-sum2

Because each row is also grouped by OrderAmount, so the SUM(OrderAmount) is same as of OrderAmount.

How to fix this, there comes the OVER clause. Although there may be some other workarounds you can use to get the desired output, but the simpler one is using the OVER clause. You can put your aggregate functions in conjunction with OVER clause and there is no need to add GROUP BY clause.

Try getting SUM with OVER clause:

SELECT
  CustomerName
 ,SUM(OrderAmount) OVER() AS 'Sum'
FROM @tblCustomerOrders

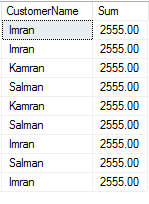
This will generate the output:

window-aggregate-function-with-over-without-partition1

But this is not the expected result, it is calculating the SUM of all records and not calculating SUM for individual Customers. As I also mentioned in my last post on Window Functions, add PARTITION BY clause in OVER clause.

The output will be:

window-aggregate-function-with-over-with-partition1

As you might noticed, unlike the working query with GROUP BY clause discussed above, this query is displaying the list of all records along-with SUM, i.e. CustomerNames are repeating with no of occurrences exists in the table. So you can also add OrderAmount field to display along-with SUM filed.

SELECT
  CustomerName
 ,OrderAmount
 ,SUM(OrderAmount) OVER(PARTITION BY CustomerName) AS 'Sum'

FROM @tblCustomerOrders

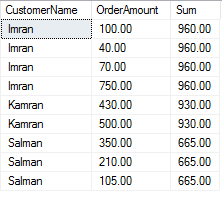
Generates the output:

window-aggregate-function-with-over-with-partition2

This gives us the solution that we can list down all customer records with SUM of OrderAmount and also showing individual OrderAmounts.

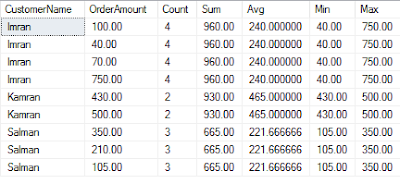
Similarly we can use other aggregate functions like COUNT(), AVG(), MIN(), MAX()

SELECT
  CustomerName
 ,OrderAmount
 ,COUNT(OrderAmount) OVER(PARTITION BY CustomerName) AS 'Count'   
 ,SUM(OrderAmount) OVER(PARTITION BY CustomerName) AS 'Sum'
 ,AVG(OrderAmount) OVER(PARTITION BY CustomerName) AS 'Avg'
 ,MIN(OrderAmount) OVER(PARTITION BY CustomerName) AS 'Min'
 ,MAX(OrderAmount) OVER(PARTITION BY CustomerName) AS 'Max'
 
FROM @tblCustomerOrders

Will generate the output as expected:

window-aggregate-function-with-over-with-partition-all-functions

References:

May 26, 2016

MS SQL Server - Window Functions - Ranking Functions

A window function is one that can be applied to a set of rows, The word ‘window’ is used to refer to the set of rows that the function works on. It provides a way to work with data grouped into logical windows.

The OVER clause used to define a window or set of rows within a query result set. Then we use a window function to computes a value for each row in the subset. OVER clause can be used to compute aggregated values such as average, sum, min, max, or a top N per group results.

The window function can be of two types:

  • Ranking function
  • Aggregate function.

In this post, I will discuss Ranking Window Functions.

Depending of on whether you’re using a ranking window function or aggregate window function, the OVER clause will need to be implemented accordingly. If we use the OVER clause with a ranking function, we can specify an optional PARTITION BY clause and a required ORDER BY clause. However, if we are working with with an aggregate function, then a PARTITION BY clause must be used, and should not have an ORDER BY clause.

Working with Ranking Window Functions

Ranking functions return an integer ranking value for each row or group in a partition/window.

Transact-SQL provides the following ranking functions:

  • ROW_NUMBER
  • RANK
  • DENSE_RANK
  • NTILE

Let see each function in action with an example.

  • ROW_NUMBER:

    Returns a sequential integer number for each row in the window.

    Example: Create a sample table and insert some records to query.

    declare @tblItems table (
     ItemCode varchar(5),
     ItemCategory varchar(50),
     StockQty int
    )
    
    insert into @tblItems(ItemCode, ItemCategory, StockQty)
    values 
    ('I001', 'Books', 10),
    ('I002', 'Books', 20),
    ('I003', 'Laptops', 25),
    ('I004', 'Laptops', 30),
    ('I005', 'Laptops', 20),
    ('I006', 'SmartPhones', 50),
    ('I007', 'SmartPhones', 30),
    ('I008', 'Books', 10)
    

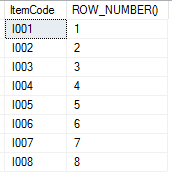
    The following example calculates a row number for @tblTest based on ItemCode.

    SELECT 
     Itemcode
    ,ROW_NUMBER() OVER(ORDER BY itemcode) AS 'ROW_NUMBER()'
    FROM @tblItems
    

    Here is the output:

    window-ranking-function-row-number
  • RANK:

    Define an integral rank value for each row in the window. It returns a same rank value for repeated column values, however, the next number in the ranking sequence is skipped by the number of repeating rows (also known as gap). It does not always return consecutive integers.

    The following example ranks the @tblItems with sort by ItemCategory. Since the ItemCodes I001, I002, I008 have same ItemCategory, these are tied, these are ranked one, and the next rank for item I003 is returned as 4, i.e. skipped the values 2 and 3 from the previous tied items.

    SELECT 
     ItemCode
    ,ItemCategory
    ,RANK() OVER (ORDER BY ItemCategory) AS 'RANK()'
    FROM @tblItems
    

    Here is the output:

    window-ranking-function-rank
  • DENSE_RANK:

    Define an integral rank value for each row in the window, without any gaps in the ranking. It also returns a same rank value for repeated column values. If values in the ranking column are the same, they receive the same rank. The next number in the ranking sequence is the next number in the sequence. The numbers returned by the this function do not have gaps and always have consecutive ranks.

    The following example ranks the @tblItems with sort by ItemCategory. Since the ItemCodes I001, I002, I008 have same ItemCategory, these are tied, these are ranked one, and the next rank for item I003 is returned as 2, i.e. it does not skipped the gap values (2 and 3) from the previous tied items.

    SELECT 
     ItemCode
    ,ItemCategory
    ,DENSE_RANK() OVER (ORDER BY ItemCategory) AS 'DENSE_RANK()'
    FROM @tblItems
    

    Here is the output:

    window-ranking-function-dense-rank
  • NTILE:

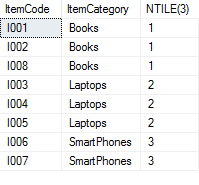
    Divides the result set into the number of groups specified as an argument to the function. The groups are numbered, starting at one. For each row, NTILE returns the number of the group to which the row belongs.

    The following example divides rows into 3 groups of items based on ItemCategory. Because the total number of rows is not divisible by the number of groups, the first two groups have 3 rows and the remaining groups have 2 rows each.

    SELECT 
     ItemCode
    ,ItemCategory
    ,NTILE(3) OVER(ORDER BY ItemCategory) AS 'NTILE(3)' 
    FROM @tblItems
    

    Here is the output:

    window-ranking-function-ntile3

    Let see another example of NTILE with group argument as 4. The following example divides rows into 4 groups of items based on ItemCategory. Now the total number of rows is divisible by the number of groups, so each group has equal number of rows (2 rows in each group).

    SELECT 
     ItemCode
    ,ItemCategory
    ,NTILE(4) OVER(ORDER BY ItemCategory) AS 'NTILE(4)' 
    FROM @tblItems
    

    Here is the output:

    window-ranking-function-ntile4

References:

April 11, 2016

TypeScript - How to import other TypeScript files.

As you proceed using TypeScript in large projects, you will end up with multiple typescript files. Then you may find a problem how we can use/import functions/classes from other files.

For example we have following interface in IShape.ts file.

interface IShape {
        x: number;
        y: number;
        height: number;
        width: number;
    }

And in another file Square.ts we have Square class with one of the constructor overloads is accepting that IShape interface as parameter.

class Square {
        public x: number;
        public y: number;
        public height: number;
        public width: number;

        constructor();
        constructor(obj: IShape);
        constructor(obj?: any) {
            this.x = obj && obj.x || 0
            this.y = obj && obj.y || 0
            this.height = obj && obj.height || 0
            this.width = obj && obj.width || 0;
        }

But if you try to compile this, you may get the following error:

Error TS2304 Cannot find name 'IShape'.

Because Square.ts don't know about ISquare.ts. To fix this error, we have to add reference to ISquare.ts file on the top of Square.ts.

/// 

class Square {
        public x: number;
        public y: number;
        public height: number;
        public width: number;

        constructor();
        constructor(obj: IShape);
        constructor(obj?: any) {
            this.x = obj && obj.x || 0
            this.y = obj && obj.y || 0
            this.height = obj && obj.height || 0
            this.width = obj && obj.width || 0;
        }

Now it will compile successfully.

You can add multiple lines of references to add multiple files. Just remember that path is relative to the current file.

March 28, 2016

TypeScript - Namespaces

TypeScript allows to define namespaces for logical grouping of code. Older versions of typescript use the keyword module while newer version can also used the keyword namespace which can be used in place of module keyword. Lets see namespaces in action in following example.
We have defined a class MySquare in namespace ShapesNamespace.
namespace ShapesNamespace {
    export class MySquare {
        public x: number;
        public y: number;
        public height: number;
        public width: number;
    }
}
Where namespace keyword defined namespace scope. Also notice the keyword export before the keyword class, it will expose this class to become accessible from outside of ShapesNamespace. If you do not add export keyword, you can not access this class outside of ShapesNamespace.
Now let use this class in another namespace.
namespace AnotherNamespace {
    var square1 = new ShapesNamespace.MySquare();
    square1.height = 10;
}

Here we are accessing MySquare class from AnotherNamespace with fully qualified class name. Intellisense will show available items in the code.

typescript-001-namespace-access-from-another-ns

Another way to use code from other namespaces is to use aliases. Let see how we can use short names as aliases instead of typing more text in fully qualified names again and again.


namespace AnotherNamespace {
    import MySquareAlias = ShapesNamespace.MySquare;
    var square1 = new MySquareAlias();
    square1.height = 10;
}

We used the import keyword to set alias of ShapesNamespace.MySquare class, when we need to access that class, we can simply use its alias MySquareAlias instead of typing full name. Also intellisense works as expected.

typescript-001-namespace-import

March 14, 2016

TypeScript - Function / Constructor Overloading

TypeScript supports overloading of functions/constructor, but not in the same way as in .Net. Since JavaScript does not provide support of overloading itself, TypeScript enforces strong typing against the various overload signatures at design time, the function name is the same, but the signature of each overload (i.e. their name and parameters, but not the return type) is different. But we still have to write a generalized function that could work in generated JavaScript code, that is compatible with all overloads signatures, and will have only one function implementation.

This example make it clear:

interface IShape {
        x: number;
        y: number;
        height: number;
        width: number;
    }

    class Square {
        public x: number;
        public y: number;
        public height: number;
        public width: number;

        constructor();
        constructor(obj: IShape);
        constructor(obj?: any) {
            this.x = obj && obj.x || 0
            this.y = obj && obj.y || 0
            this.height = obj && obj.height || 0
            this.width = obj && obj.width || 0;
        }
    }

Square class has total 3 constructor signatures, first one is empty, second contains an object of type implementing interface IShape, and the last overload receives parameter with type any to make it compatible with previous overloads. Also notice that only the last overload function signature could have the actual implementation code.

In the calling stack, it looks at the overload list, and check the first overload to call the function with the provided parameters. If it finds a match, it picks this overload as the correct overload. For this reason, usually overloads should be ordered from most specific to least specific.

You can create objects with this class in the following ways:

    //empty constructor
    var square1: Square;
    square1 = new Square();
    square1.x = 10;
    square1.y = 50;
    square1.height = 100;
    square1.width = 100;
    
    var squareConfig: IShape;
    squareConfig = { x: 10, y: 50, height: 100, width: 100 };

    //contstructor with interface IShap
    var square2: Square;
    square2 = new Square(squareConfig);

    //contstructor with JavaScript object literal
    var square3: Square;
    square3 = new Square({ x: 10, y: 50, height: 100, width: 100 });

If you are working in Visual Studio with TypeScript support enabled, you will get intellicense support, and display avialable overloads similar to this:

typescript-overloads-001-empty-constructor

typescript-overloads-001-IShape-constructor

Following function overloads added to the Square class, having different parameters of basic types.

 SetColor(x:boolean) : void;
 SetColor(x: number): void;
 SetColor(x: string): void;
 SetColor(x: any): void
 {
  if (typeof x == "boolean"){
   alert("Boolean overload is called, use default color value.");
  }
  else if (typeof x == "number") {
   alert("Number overload is called, use color from number value.");
  }
  else if (typeof x == "string") {
   alert("Number overload is called, use color from string value.");
  }
 }

Since we could have only one real function implementation, so inside this function body, we have to check for different types in order to respond with desired behavior.

Visual Studio Intellicense support will display overload options similar to this:

typescript-overloads-001-boolean-overload

typescript-overloads-001-number-overload

typescript-overloads-001-string-overload

Above function can be called in the following ways:

    square1.SetColor(true);
    square1.SetColor(255);
    square1.SetColor("#235253");

March 9, 2016

TypeScript: cast HTMLElement

While working with document.getElementsByTagName() in TypeScript, I faced problems in casting. Finally I make it work after searcing different sites, and concluded those things in this post that could help someone facing the same problem.

Function document.getElementsByTagName() returns NodeListOf<Element>, Where Element is more generic type extends from type Node. Since TypeScript used lib.d.ts declaration file to recognize native javascript functions and properties, you can find this function's multiple signatures in lib.d.ts with different tag names, each have different return type. For example, document.getElementsByTagName("h1") will return NodeListOf<HTMLHeadingElement>.

Here is the list of some common html elements with corresponding varabiles casts.

 var nodeList1: NodeListOf = document.getElementsByTagName("h1");
 var nodeList2: NodeListOf = document.getElementsByTagName("p");
 var nodeList3: NodeListOf = document.getElementsByTagName("div");
 var nodeList4: NodeListOf = document.getElementsByTagName("a");
 var nodeList5: NodeListOf = document.getElementsByTagName("input");

NodeList is an array-like structure containing multiple items of Node, you can access individual item by passing a particular index. For example, following example will return the first element in the nodelist with tag name h1.

 var var1: HTMLHeadingElement = document.getElementsByTagName("h1")[0];

In inheritance tree of the Document Object Model in lib.d.ts file, you can find that Element extends the Node type, acting as more generic type. Which further extended by HTMLElement, and then all major elements, including in above listing, will extend from HTMLElement.

Same like C# (or other Object-Oriented Languages), you have to take care of proper inheritance structure while working with elements casting. Consider these variables:

 var var1: Element = document.getElementsByTagName("h1")[0];
 var var2: HTMLElement = document.getElementsByTagName("h1")[0];
 var var3: HTMLHeadingElement = document.getElementsByTagName("h1")[0];

If you try to assign var2 to var1:

    var1 = var2;

it will be ok, since HTMLElement extends from Element. But if you try to assign var1 to var2:

    var2 = var1;

you will get compile error as below:

 TS2322 (Error Code)
 Type 'Element' is not assignable to type 'HTMLElement'. Property 'accessKey' is missing in type 'Element'.
 
 //or in generic form, if you try similar thing with other elements.
 Type 'x' is not assignable to type 'y'. Property 'z' is missing in type 'x'.

Because compiler is looking for target type's properties, if any property is missing in source type, it will prompt similar error message showing the name of the missing property.

The function document.getElementsByTagName() always returns NodeListOf<T>, If you want to work on array, you can cast this to array in the following statement:

 var nodeList: HTMLElement[] = (<HTMLElement[]> <any> document.getElementsByTagName("h1"));

This returns all h1 elements in variable nodeList, the array of HTMLElement.

Or you can also iterate through nodeList array items in for loop. In the following example, it will iterate through all items in nodeList and add these items to a new array.

 var nodeList: NodeListOf = document.getElementsByTagName("h1");
 var elementList : Array = [];

 if (nodeList) {
  for (let i = 0; i < nodeList.length; i++) {
   
   let node : Node = nodeList[i];
   elementList.push(node as HTMLElement);
  }
 }

References:

http://www.typescriptlang.org

March 7, 2016

Getting started with TypeScript in ASP.Net MVC Project

Microsoft introduced TypeScript, a typed superset for ECMAScript 2015 (ES2015) syntax that compiles down into plain JavaScript, it provides the ability to translate/compile its features into ECMAScript 3 or 5. Since JavaScript is just a scripting language and not have designed as a programming language for big web applications. It does not provide structured coding pillars likes classes, interfaces, modules/namespaces. So there comes TypeScript, both language and compiler is open-sourced under Apache 2.0 license. TypeScript compiler performs only file-local transformations for TypeScript code files, and does not re-order the code segments (like variable declarations).

It focuses on providing useful tools for building large scale applications by implementing features, such as classes, interfaces, OOPs, modules and much more. TypeScript file extension is .ts and when compiled, it produces plain JavaScript output file with .js extension. In this tutorial, we will try to get started with TypeScript in Visual Studio IDE, by first installing its plugin for Visual Studio and then will write small TypeScript code to make sure we have installed TypeScript successfully and ready to write real code for our applications.

There are two main ways to install the TypeScript

Since we are using Visual Studio as our IDE, I will follow second option in this post. Now I assumed that you have Visual Studio setup with required TypeScript plugin and also Web Essentials. Create a sample ASP.Net MVC Web Application project, and run it to see every thing is working fine.

Incorporate TypeScript into Visual Studio projects

Lets add our first TypeScript in this project, create a new file with FileTemplate as TypeScript File, named file1.ts, all typescript files have extension of .ts. When you compiled project next time, if every thing is properly setup it will be build successfully. But you might not get the generated output javascript file, if so, you might have to follow these instructions.

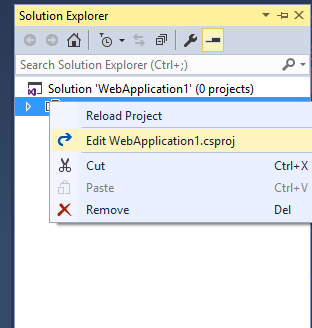
First right click on project file in Solution Explorer, and click Unload Project.

typescript-0001-unload-project-file

Right click on project file in Solution Explorer, and click Edit {ProjectName}.csproj.

typescript-0001-edit-project-file

In xml, look for ItemGroup tags, and add a new ItemGroup tag for typescript files we want to use. So in this example, since we only have one typescipt file file1.ts, you should have something similar to this.


     <ItemGroup>
    <Content Include="file.js">
      <DependentUpon>file.ts</DependentUpon>
    </Content>
  </ItemGroup>
  <ItemGroup>
    <TypeScriptCompile Include="file1.ts" />
  </ItemGroup>
  <Target Name="BeforeBuild">
    <Exec Command="&quot;$(PROGRAMFILES)\Microsoft SDKs\TypeScript\0.8.0.0\tsc&quot;@(TypeScriptCompile ->'"%fullpath)"', ' ')" />
  </Target>

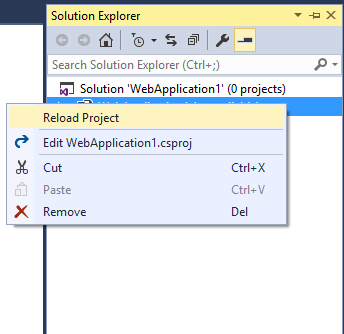
After finished adding support for typescript files in project file's xml, right click on the project file and click Reload Project.

typescript-0001-reload-project-file

Try rebuild the project, it should be completed successfully.

Now our project is ready for typescript. Remember that typescript is only syntactic sugar, and has value only till compile time. On successfully compilation, it generates the output javascript file or real use in the same directory where current typescript file is placed. So it means, finally you have to use the generated javascript file in html as we are using regular javascript. Lets see typescript in action.

Open BundleConfig class in App_Start folder, and add the generated javascript file path in RegisterBundles function as follows:

 public static void RegisterBundles(BundleCollection bundles)
 {
  ...code removed for clearity 

  bundles.Add(new ScriptBundle("~/bundles/MyJavaScript").Include(
        "~/MyTypeScripts/file1.js"
        ));
 }

We have to add the file path for generated javascript file, not the typescript file. For this example, I am adding a simple button in Index view of HomeController. But before this you have to add the script reference in shared _Layout.cshtml in head section:

    @Scripts.Render("~/bundles/MyJavaScript")
At the bottom of the Index view of HomeController, I added the following script tag:
    // A $( document ).ready() block.
    $(document).ready(function () {

        initMyScript();
    });

This will call initMyScript() javascript function on document load. So far we have not written this function in javascript or typescript. Lets write first typescript code in file.ts. Since this post is limited only for getting started typescript in Visual Studio, so I used only simple script for clarity.

function initMyScript(): void {

    document.getElementById("aLink").addEventListener("click", setParagraphText);
}

function setParagraphText():void {

    var msg: string = "link is clicked";
    document.getElementById("pTest").innerHTML = msg;
}

This typescript defines two functions, initMyScript() function, which is called on document load, and attach an event listener for click event of element aLink. The setParagraphText() event handler sets the innerHTML of element pTest by a simple string variable.

One successfully compilation of above typescript, it will generate the corresponding javascript in file.js:

function initMyScript() {
    document.getElementById("aLink").addEventListener("click", setParagraphText);
}
function setParagraphText() {
    var msg = "link is clicked2";
    document.getElementById("pTest").innerHTML = msg;
}
//# sourceMappingURL=file1.js.map
And this is simple html for elements used in above script:
<div class="col-md-4">
        <p><a id="aLink" class="btn btn-default" >Click Me</a></p>

        <p id="pTest">This content will be replaced.</p>
</div>

Thats it. Now run your project to see TypeScript in action. I discussed here only the minimum steps required to incorporate TypeScript in Visual Studio MVC Projects. You can continue playing with TypeScript by adding advanced features.

References:

http://www.typescriptlang.org

February 29, 2016

PHP Yii2 Framework - Internationalization

Internationalization enables the web application for greater usability for various languages and regions without re-designing your application specifically for each locale. In this post I will discuss how you can enable web application for internationalization using PHP Yii2 framework. As development environment, I am using XAMPP on windows 10.

To illustrate a demo application, I will add two text labels with language translations, English-Language, Arabic-Language and Urdu-Language.

A sample output of this demo will be like this:

With Arabic-Translator:

yii2-001-i18n-arabic

With Urdu-Translator:

yii2-001-i18n-urdu

With English-Translator:

yii2-001-i18n-english

We have to follow these steps in order to add internationalization to web application.

First add the following, sourceLanguage and configuration array for i18n component, in your web application's configuration.

 'sourceLanguage' => 'en-US',
    
    'i18n' => [
        'translations' => [
            'app*' => [
                'class' => 'yii\i18n\PhpMessageSource',
                'basePath' => 'path\to\your_project\messages',
                'sourceLanguage' => 'en-US',
                'fileMap' => [
                    'app' => 'app.php',
                    'app/error' => 'error.php',
                ],
            ],
        ],
    ],

Where basePath contains the path for messages folder, which contains the config file and all translations for different languages we want to add support for, in our application. For this demo, you can simply create a new folder named messages in your project's root directory, and place that folder path here in basePath key.

I assumed that your application is ready with source language as English, so in next step, we will use the yii's message command to extract all text strings used in the application, and placed in separate files for translations. But before make it work, we have to create a config file which tells the yii framework, what languages we are going to use in application. So open the command prompt, go to your project's root directory and issue the following command.

yii message/config D:\xampp\htdocs\yiidemo\messages\config.php

Here you change the project's path according to your local environment. It will create config.php file in message folder, open this file and find the key 'languages' => ['de'] in the configuration array. Here you can define what languages you want to support in your application, we will define languages here. For this demo, since English is the default language, I have to add two more languages Arabic and Urdu. So I make the following changes:

'languages' => ['ar-SA','ur-PK'],

After defining the languages for yii, next step is to setup different files for specific languages to which you can store translations. For this can easily issue the following command, it will do this job for you.

yii message/extract D:\xampp\htdocs\yiidemo\messages\config.php

Of-course, you change the project's path according to your local environment. It will create new folder(s) inside messages folder, for each language you defined above. In my project, it looks like this:

yii2-001-i18n-messages folder

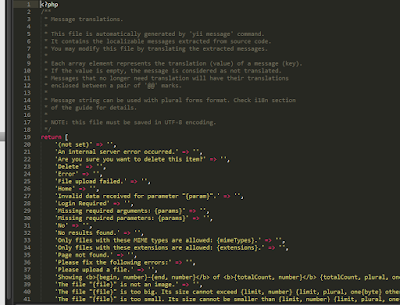
Notice that, since I defined languages as ar-SA and ur-PK, therefore it creates the folders with the same names. In each folder you will see two files app.php and yii.php. Where yii.php contains the default strings, yii is using for different purposes, like error messages, warnings etc. You have to put all your custom strings in app.php. Both files only contains associative arrays with english strings as keys, and in value parts, you have to put your translations for target language. Wherever yii encountered a text string matched in this array, it will simply put the alternative translated message in place of that string.For example, yii.php will be look like this:

yii2-001-i18n-yii-php

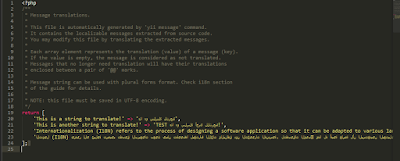
and app.php similar to this:

yii2-001-i18n-app-php

This is the place, you need to provide translated messages to yii framework. As you might noticed above in app.php in ar-SA folder, I added there 3 sample English strings with corresponding Arabic translations.

Now all your translations scheme is setup and is ready to use in project. To use the translated messages in your application, you need to do two things:

First you have to set the current language of the application, so that yii2 framework can translate messages accordingly. Using the following line:

// change target language to Arabic
\Yii::$app->language = 'ar-SA';

Second, wrap every string text that you want to be translated in a call to the Yii::t() method, as follows:

echo \Yii::t('app', 'This is a string to translate!');

Thats it. Now your application can display text messages in the languages you configured and provide translations. You can add more languages and also can add more message translations in associative array of app.php for desired languages.


References:

http://www.yiiframework.com/doc-2.0/guide-tutorial-i18n.html

February 18, 2016

PHP Yii2 Framework - Working with Behaviors

Behaviors are instances of yii\base\Behavior, or of a child class. Behaviors allow you to add functionality to an existing component class without modifying the original class or creating a new derived class. Once we attached the behavior's functions and properties to the component class, we can access those functions and properties on the object of that component class, as if these are regular class functions or properties.

Lets use Behavior in an example. We have a Customer component class, that has a regular public property name.

<?php

namespace app\components;

use yii\base\Component;

class Customer extends Component
{
    public $name = "Muhammad Idrees";
}

And we can access this public name property on $customer object as follows:

 ECHO $customer->name;

Now we need to add a new property to $customer object, but we don't want to modify the contents of original Customer class.

Here comes behaviors. To define a behavior, create a class that extends yii\base\Behavior. So we will create a new class CustomerBehavior with the following implementation.

<?php

namespace app\components;

use yii\base\Behavior;

class CustomerBehavior extends Behavior
{
    public $additionalProperty = "Some default value";

    public function additionalFunction()
    {
        $this->additionalProperty = "value changed";
    }
}

This CustomerBehavior class contains a new property additionalProperty and a new function additionalFunction. But at this moment this is just an empty behavior and has no effect on Customer class. To add this behavior functionality to an object of Customer class, we have to attach this behavior with Customer component.

There are two ways you can attach behavior to a component class:

  1. Static attachment

    To attach a behavior statically, we have to write the override behaviors() method of component class to which we want the behavior is being attached. The behaviors() method will return a list of behavior configurations which may contain a single behavior entry or multiple entries of behavior classes. In this example I used static approach, and attach the CustomerBehavior with override of behaviors() method. So the modified Customer class will become like this:

    <?php
    
    namespace app\components;
    
    use yii\base\Component;
    
    class Customer extends Component
    {
        public $name = "Muhammad Idrees";
    
        public function behaviors()
        {
      //return a list of behavior configurations
            return [
                CustomerBehavior::className()
            ];
        }
    }
    
  2. Dynamic attachment

    To attach a behavior dynamically to a component class, we have to call the yii\base\Component::attachBehavior() method of the component to which we want to attach the behavior. For example, to $customer object, we need to attach our newly defined CustomerBehavior, we have to call the attachBehavior() method as follows:

     // attach a behavior object
     $customer->attachBehavior('CustomerBehavior1', new CustomerBehavior);
    

    If you are using dynamic attachment of behaviors then you don't have to write the override behaviors() method in Customer class, attachBehavior() method will do the job.

Now we have defined desired behavior component, and also attached this behavior to the required component class. Now its time to actually use this behavior. Once a behavior is attached to a component, you can access the public members defined in the behavior through the component object:

 // "additionalProperty" a public property, defined in the CustomerBehavior class
 ECHO $customer->additionalProperty;

You can also call a public method of the behavior in the same way as it is a regular method defined within the original component class:

 // "additionalFunction" is a public function, defined in the CustomerBehavior class
 $customer->additionalFunction();

References:
http://www.yiiframework.com/doc-2.0/guide-concept-behaviors.html