November 30, 2015

AngularJS - Define a basic Custom Directive

Directives are used to attach a specified behavior to the DOM elements by using event listeners. Behavior can be anything, you want to perform some action on any desired event attached with the element or it can even transform the DOM element itself and/or its children. All this is done by AngularJS's HTML compiler which makes DOM elements interactive, means it does attach the behavior source code with target elements. 

Same as you create controllers and services for application requirements, you can define your own custom directives for specific purposes. Following is the template object showing the available options while creating a custom directive.
var objectTemplate = {
restrict: string,
priority: number,
template: string,
templateUrl: string,
replace: bool,
transclude: bool,
scope: bool or object,
controller: function,
require: string,
link: function,
compile: function
};
Lets start defining a basic custom directive.
var myApp = angular.module('demoApp', []);
myApp.directive('helloWorld', function () {
 return {
  restrict: 'EA',
  template: '
Hellow World! Message from custom directive. And here is the inserted text: .
', transclude: true }; });
Lets review the code segment:
restrict property defines the declaration style of the directive, this can have following options:
E => directive will be declared as element, e.g. <hello-world></hello-world>
A => attribute, e.g. <div hello-world></div>
C => class, e.g. <div class=hellow-world></div>
M => comment, e.g. <!--directive:hellow-world -->

In this example I have only used two options EA, it means we can declare our directive as an element or also can be added as an attribute to another element. So the following two lines will produce the same result.
  • <hello-world></hello-world>
  • <div hello-world>Div own message</div>
You can define the DOM elements to be replaced through the template or templateUrl properties. We can set the template content via a string, and templateUrl will be used if we want the template to be loaded from a file. We just defined our template as '<div>Hellow World! Message from custom directive. And here is the div text: <span ng-transclude></span>.</div>' to put a simple message inside a div.

transclude property allow us to replace or append the content from template with the regular content defined by element. Note that we have placed ng-transclude attribute on span tag and place it inside our template. Now when the page will be requested to load, the AngularJS HTML compiler will replace this span tag with the regular content defined within the element. Like in the following example, we display the number as the div's content alongwith the content defined in template property.

<div ng-repeat='number in [1,2,3,4,5]'>
 <div hello-world>{{number}}</div>
</div>

In this post we learned how to declare a basic custom directive. Hopefully in next post I will try to explain how to add logic in our directive to make it more interactive.
November 21, 2015

Crystal Report not displayed (with Error: bobj is undefined)

Few days back, I encountered a problem with Crystal Reports while hosted in IIS, it was not getting displayed at-all on ASP.Net page. After searching I got fixed with this, here are the 2 steps you might need to follow in case you face the same problem.
  1. Copy aspnet_client\system_web\4_0_30319\crystalreportviewers13 folder to you website's root directory. This would fix the problem in some cases. If not, try also the second point.
  2. There is already defined a section tag <sectionGroup name="crystalReports"> in web.config, here we need to add one more tag for crystal report viewer aso follows:
    <section name="crystalReportViewer" type="System.Configuration.NameValueSectionHandler" />
    
    
    Put the above line just below the <sectionGroup name="crystalReports"> line, before the closing </sectionGroup> tag.

    Somewhere in the last part of web.config, you will find a rptBuildProvider tag like this:
    <rptBuildProvider>
       <add embedRptInResource="true" />
    </rptBuildProvider>
    
    Just below  this tag, you have to add new tag for crystal report viewer to define the path from where it could find its required files.
    <crystalReportViewer>
       <add key="ResourceUri" value="/crystalreportviewers13" />
    </crystalReportViewer>
    
    Here we have defined the path as we have put the crystalreportviewers13 directory in the root of our website. Also you can place it some where else (i.e. in nested directories) if you want, so you have to change the path accordingly in ResourceUri key-value.
Now you can view your crystal report.

November 9, 2015

AngularJS - Form Validation

In this article I will explain how to validate web forms using AngularJS. It provides an easy way to validate data on client side and prevents sending post back to server until we receive correct data according to the defined rules. We can't depend on client side validation to keep our web applications secure, but it provides instant feedback to the user and enhance user experience making our form more interactive.

Validation Directives and Properties

We need to place fields within the form tag and give a name to it. Also, it's important to assign a name to each input field. AngularJS has many directives to provide form validation, following are the available on a classic input field.
Directive Type Description
ng-required boolean Sets the required attribute if set to true
ng-minlength number Sets the minlength validation error key if the value is shorter than minlength.
ng-maxlength number Sets the maxlength validation error key if the value is longer than maxlength.
ng-pattern string Sets pattern validation error key if the ng-model value does not match the regExp in the attribute value.
We can achieve some of these validations through HTML5, but the advantage of using AngularJS directive is that it allows to maintain two-way data binding between model and view.
AngularJS added some properties to form that helps us to validate and provides various information about the current state of input controls and the form. These are:
Boolean: $valid, $invalid, $pristine, $dirty
Object: $error (could be as: { required: false, email:true })
The result can be evaluated through the boolean property $valid. It will be updated based on the validation rules defined for each field by particular directives. If any of these violates the validation rule(s), the result will be false.
The $pristine value by default start with true and becomes false after receiving any input value.
The $dirty flag is just the opposite, it starts with false and becomes true after the first input value is received.

Code Review

We will use a sample demo form to see how validation works in AngularJS. You will see the code listing in Test.html page. I have added the following libraries in head tag for AngularJS and Bootstrap:
<link href="client/assets/css/bootstrap.min.css" rel="stylesheet"></link>
<script src="client/assets/libs/angular.js"></script>
Define ng-app and ng-controller in body tag, to make html page aware of angular framework.
<body ng-app="validationDemoApp" ng-controller="myController">
    <form name="myForm" ng-submit="submitForm(myForm.$valid)" novalidate class="form-horizontal">  
 </form>
</body>
Body tag is using ng-app attribute to our angular application module 'validationDemoApp' and binded to the controller 'myController'. We have placed novalidate attribute to our form tag, it will prevents the HTML5 validation, because we will be validating ourselves. And on submit form, we are calling our javascript function submitForm(myForm.$valid) which accepts a boolean variable passed by form property $valid, within this function we can check this boolean to see if our form data is validated or not according to our defined rules.
Here is the html content for name field:
<div class="form-group">
 <label class="control-label col-sm-2" for="name">Name:</label>
 <div class="col-sm-6">
 
  <input type="text" name="name" placeholder="Name" class="col-lg-6" ng-model="user.name" 
      required ng-minlength="3" ng-maxlength="10" ng-pattern="/^[a-zA-Z0-9]*$/">
      
  <span ng-show="myForm.name.$error.required && isSubmitted" class="help-inline col-lg-offset-1">Please enter name.</span>
  <span ng-show="myForm.name.$error.minlength" class="help-inline col-lg-offset-1">Minimum length should be 3.</span>
  <span ng-show="myForm.name.$error.maxlength" class="help-inline col-lg-offset-1">Maximum length should be 10.</span>
  <span ng-show="myForm.name.$error.pattern" class="help-inline col-lg-offset-1">Please enter only alphanumeric characters.</span>
 </div>
</div>
I have placed each form's field inside a div which has defined the conditional css class as ng-class="{ 'has-error' : myForm.name.$invalid && isSubmitted }", it means apply the css class 'has-error' only if the 'name' property of 'myForm' is 'invalid' and also 'isSubmitted' flag is true. '$invalid' is the forms default property, while 'isSubmitted' is our local variable added to the $scope inside the submit function.
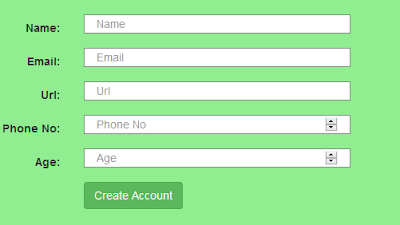
At initial state, you will get the form similar to this with no validation messages:

AngularValidation-New
 Next for the name field, we have defined 3 validation rules as required ng-minlength="3" ng-maxlength="10" which are self-explanatory. ng-pattern="/^[a-zA-Z0-9]*$/" will validate name field to accept only alphanumeric characters. Right after input tag I have placed <span> tags to display error messages with ng-show attribute to show/hide based on validation state.
At first it will display the validation message on screen if 'required' becomes true and also if user try to submit the form. Similarly we can set-up all other fields with different validation rules and different error message defined in <span> tags.
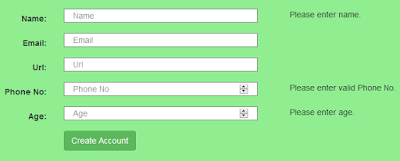
When you click on submit button without making any changes you will see the required validator messages like this:
AngularValidation-Required
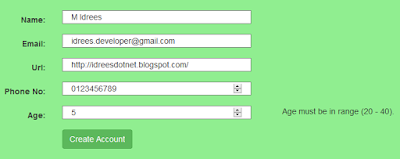
 For Age field, I put the range validation in range 20-40, and for this I have used custom validator(custom angular directive). So if you enter anything outside this range you will get error message like this:
AngularValidation-Custom Validation
 I have added an attribute named 'age-validate', this is not AngularJS default attribute, it is custom defined attribute contains our logic to validate age field. Lets move on to JavaScript code:
   // create angular app module
        var validationApp = angular.module('validationDemoApp', []);

        // create controller
        validationApp.controller('myController', function ($scope) {

            // all validation has passed
            //parameter is passed in form tag on submit, i.e. myForm.$valid
            $scope.submitForm = function (isValid) {
                $scope.isSubmitted = true;

                // check the form is valid
                if (isValid) {
     $('#lblMsg').after('
×Success! Your form is submitted successfully.
'); } }; }); validationApp.directive('ageValidate', function () { return { require: 'ngModel', link: function (scope, elem, attr, ngModel) { ngModel.$parsers.unshift(function (value) { if (value >= 20 && value <= 40) { ngModel.$setValidity('ageValidate', true); } else { ngModel.$setValidity('ageValidate', false); } return value; }); } }; });
First we created application module 'validationApp', then added our controller 'myController'. Inside myController we have defined our 'submitForm' function which will be called when the form submitted successfully after passing all validations.
Then comes the custom validation part (or custom angular directive). Note that for custom directive name 'ageValidate' is define will cameCase. Inside the 'link' function, we actually defined our validation logic. Here I am checking if value is between 20-40 then it is valid age otherwise 'false' will be set-up as being invalidated. ngModel.$setValidity('ageValidate', true) is the ultimate function where you can set the validity falg (true or false) providing the custom directive name.
Note: Keep remember that when we are defining custom directive, we are using camelCase without any dashes or underscores, but when we put this directive in html tags, we have to put dashes(-) in between words like in this example, I placed 'age-validate' attribute to the input tag for 'Age'.
We learned how to validate various types of inputs in AngularJS with built-in directives, as well as how to define our own custom validation rule in Angular way. I hope you enjoyed this article and got something out of it. I appreciate your feedback/comments or any improvements you want to suggest in this topic, to help in making the article better and helpful for others.