December 23, 2020

dotnet-svcutil - Generate Proxy Code With Collection Types

In the last post (WCF Proxy generation – using dotnet-svcutil) we have seen how to generate WCF proxy code using dotnet-svcutil.

You might have noticed that dotnet-svcutil has generated the collection types as arrays. For example, if the target service has any collection type in contract property like List<string>, then it is shown as array of string (string[]) in generated code.

You have to tell dotnet-svcutil to use that collection type by specifying a collection type parameter ct. But also you have to specify another reference parameter r to provide full path for the System.Collections assembly, otherwise it will give you error.

First run this command without providing the assembly path for System.Collection.

dotnet-svcutil https://localhost:8081/OrderManagement/OrderManagement.svc 
               -ct "System.Collections.Generic.List`1"

You will get this error message:

Error: No type could be loaded for the value 'System.Collections.Generic.List1' 
passed to the --collectionType option. Ensure that the assembly this type belongs 
to is specified via the --reference option.

Now provide a valid assembly path for System.Collection in r parameter:

dotnet-svcutil https://localhost:8081/OrderManagement/OrderManagement.svc
	-ct "System.Collections.Generic.List`1" 
	-r "C:\Program Files\dotnet\sdk\NuGetFallbackFolder\
           microsoft.netcore.app\2.2.0\ref\netcoreapp2.2\System.Collections.dll"

This command will create a Reference.cs file within ServiceReference folder, this time with collection type List<string> rather than string[].

Note: If you are running this command from powershell you might still get above error. Try to run from Windows Command Prompt and it will run successfully.

References:

Related Post(s):

December 22, 2020

WCF Proxy generation – using dotnet-svcutil

In the last post (WCF Proxy generation – using SvcUtil.exe) we have seen how to generate WCF proxy code using SvcUtil.exe.

In this post we will be looking into another option dotnet-svcutil.

This is a .NET Core CLI tool and is available cross-platform on Linux, macOS, and Windows.

Following are some of the reasons you may want to use dotnet-svcutil:

  • You can easily install it as NuGet package.
  • It will work even if you have a lower version of Visual Studio like the VS2017 (15.5 or less) version.
  • Since it is not bounded with Visual Studio version, you can also use it with free VS Code.
  • It is available cross-platform on Linux, macOS, and Windows.

From Visual Studio you can install using Nuget package manager as below:

Another option is to install it globally through the command line so that it can be used across the system.

You can use below command to install globally:

dotnet tool install --global dotnet-svcutil --version 2.0.2

Once installed, use this command to generate proxy code:

dotnet-svcutil https://localhost:8081/OrderManagement/OrderManagement.svc

This command will create a Reference.cs file within ServiceReference folder.

References:

Related Post(s):

December 19, 2020

WCF Proxy generation – using SvcUtil.exe

SvcUtil.exe is the the ServiceModel Metadata Utility tool used to generate service model code from the service URL or wsdl file.

In this example, we will generate client proxy classes by using service URL.

First make sure to have the target service up and running.

After verifying the service status go to Visual Studio Command Prompt and run the following command.

svcutil https://localhost:8081/OrderManagement/OrderManagement.svc /Language=c# 
		/t:Code /out:OrderManagementProxy.cs 
                /config:OrderManagementProxy.config

It contains following parameters:

  • First is the URL of the target service.
  • /Language specifies the output language in which we want to generate code.
  • /t Specifies the output to be generated by the tool, since we are generating proxy code so we will provide the value code.
  • /out Specifies the target file name for the generated code.
  • /config Specifies the filename for the generated configuration file, Default value is output.config

For config file you can also use another parameter /mergeConfig. It merges the generated configuration into an existing file, instead of overwriting the existing file. This will be useful if you provide your regular application's config file in the /config paramter, so in that case you dont want to overwrite that config file but to merge the new changes with existing configuration. For example like this:

svcutil https://localhost:8081/OrderManagement/OrderManagement.svc /Language=c# 
		/t:Code /out:OrderManagementProxy.cs 
                /config:app.config /mergeConfig

You can find the generated output code in the file OrderManagementProxy.cs in the current directory from where you run this command.

References:

Related Post(s):

November 2, 2020

.Net Core - Call WCF Service with Https link

In last post , we have seen how to add WCF reference in .Net Core Application. In this example we will see how we can call different WCF operations or methods both with Http link and Https link.

If the target WCF link is Http link then you can create the WCF client instance using following code snippet:

BasicHttpBinding basicHttpBinding = new BasicHttpBinding();
EndpointAddress endpointAddress = 
              new EndpointAddress("https://localhost:8081/OrderManagement/OrderManagement.svc");
OrderManagementClient wcfClient = 
              new OrderManagementClient(basicHttpBinding, endpointAddress);
var result = wcfClient.GetOrderByID(1);

However if the WCF link is bound over Https, then you have to make small changes in order to consume service with Https. You have to by-pass SSL Certificate Authentication. You can use following code snippet to consume WCF Service with Https link:

BasicHttpBinding basicHttpBinding = new BasicHttpBinding();
EndpointAddress endpointAddress = 
                new EndpointAddress("https://localhost:8082/OrderManagement/OrderManagement.svc");
OrderManagementClient wcfClient = 
                new OrderManagementClient(basicHttpBinding, endpointAddress);

//wcfClient.ClientCredentials.ServiceCertificate.SslCertificateAuthentication
//is need to be set for Https certificate authentication
wcfClient.ClientCredentials.ServiceCertificate.SslCertificateAuthentication =
	new X509ServiceCertificateAuthentication()
	{
		CertificateValidationMode = X509CertificateValidationMode.None,
		RevocationMode = System.Security.Cryptography.X509Certificates.X509RevocationMode.NoCheck
	};

var result = wcfClient.GetOrderByID(1);

Related Post:

November 1, 2020

.Net Core - Add WCF Reference

In this post, I will explain how you can add reference for a WCF Service in .Net Core Application, this will be a little bit different then how we consume WCF Service in regular .Net Framework.

In this example I have a WCF service already created, and I want to consume in .Net Core Console Application.

In Solution Explorer, right click on Connected Services node, and select Add Connected Service.

In Connected Services window, click on Microsoft WCF Web Service Reference Provider.

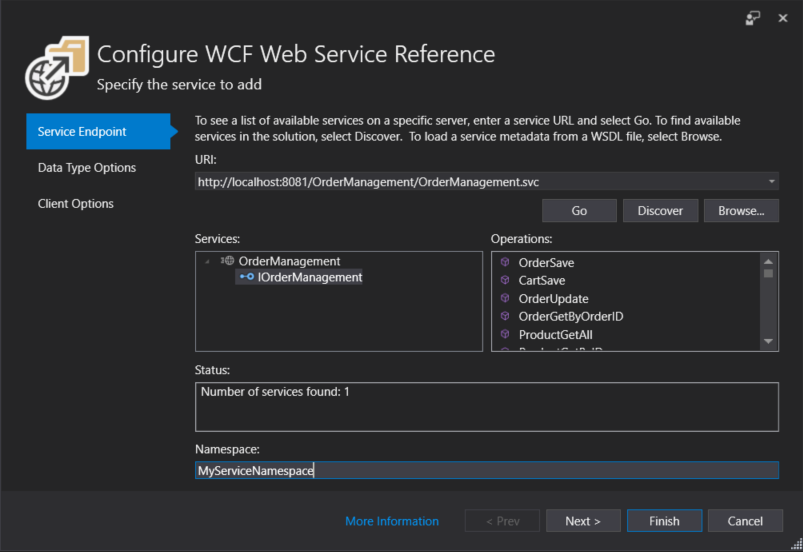
In the Service Endpoint tab, Enter the URL of WCF Service in the URL textbox and click Go button.

Type the desired namespace in Namespace textbox and click Next.

In the next tab Data Type Options, it will allow to change default options to generate client proxy. For example you can change Collection Type, the type from System.Array to System.Collections.Generic.List. Once you done with the changes click Next.

In Client Options tab, It will ask you to change the access level for generated classes. Default access level is public.

Click Finish button, and it will generate the required proxy classes to call WCF.

When the process completed, you are done with adding WCF reference.

Once you are done with adding reference, you can create an instance of the generated WCF client type and invoke the service operations as follows:

	BasicHttpBinding basicHttpBinding = new BasicHttpBinding();
	EndpointAddress endpointAddress = 
          		new EndpointAddress("http://localhost:8081/OrderManagement/OrderManagement.svc");
	OrderManagementClient wcfClient =
    			new OrderManagementClient(basicHttpBinding, endpointAddress);
	var result = wcfClient.GetOrderByID(1);

References:

Related Post(s):